Overview
In System Center Virtual Machine Manager 2008 R2 (VMM 2008 R2), Microsoft provides a single management console that supports multiple virtualization platforms including Hyper-V and VMware ESX/ESXi. With System Center Virtual Machine Manager 2012 (VMM 2012), Citrix XenServer is also supported. VMM 2012 allows the use of standard processes and procedures to perform daily management operations across the supported virtualization platforms, including:
Host Features
- Host discovery and management (clusters and pools)
- Host power optimization
- Host maintenance mode
Virtual Machine Features
- Creation, deployment, and management of virtual machines
- Creation, deployment, and management of VMM services
- Placement of virtual machines based on host ratings
- Load balancing
- Storage of resources in VMM library
- Conversion of virtual machines to Hyper-V

VMM 2012 also enables using XenServer host resources, along with Hyper-V and VMware hosts, to create heterogeneous private clouds managed using a single graphical user interface (GUI) and command-line interface (CLI).
Citrix XenServer Host Requirements
In order to be managed through VMM 2012, a Citrix XenServer must meet the following requirements:
- XenServer 5.6 Feature Pack 1
- XenServer SCVMM Integration Suite supplemental pack
The SCVMM Integration Suite supplemental pack is installed during the XenServer installation using a SCVMM Beta Integration CD, or post-installation through the CLI using a SCVMM Beta Integration ISO. VMM 2012 does not require an agent deployment to XenServer hosts.
XenServer hosts and XenServer pools can be added and managed using VMM 2012. However, a XenServer host must be installed before adding it to VMM 2012. Also, XenServer pools must be created and configured in Citrix XenCenter.
Configuring VMM 2012 to Manage Citrix XenServer
Before you can add a XenServer host to VMM 2012, you should create a Run As account to define account credentials that VMM 2012 can use to access a XenServer host. Although it is generally recommended that you perform this procedure before adding the XenServer host, you can also create a Run As account during the process to add a XenServer host.Adding a Run As Account in VMM 2012
- Launch the VMM Console and then select the Settings workspace.
- In the Settings pane, select Run As Accounts (Figure 1).
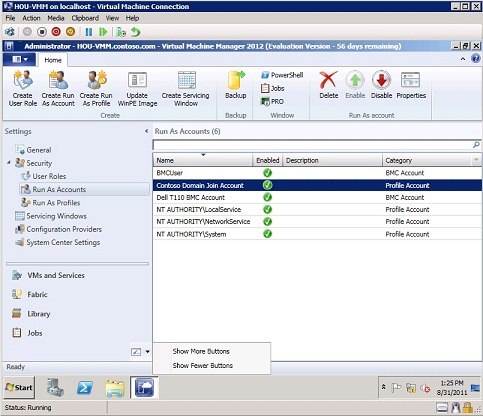
Figure 1: VMM Console – Settings Workspace
- In the Home bar, click Create Run As Account to launch the Create Run As Account wizard.
- In the Create Run As Account wizard, on the General page, enter a name for the new Run As account, then select the Host Computer option from the Category pull-down menu, then enter the account credentials (host or Active Directory account depending how the XenServer host is configured) in the username and password fields, and then select Next. (Figure 2).
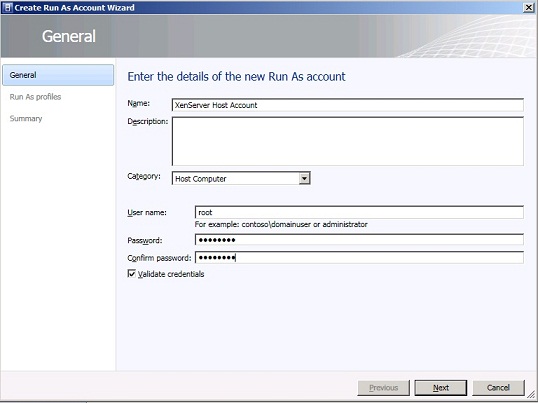
Figure 2: Create Run As Account Wizard – General Page
- On the Run As Profiles page, click Next (Figure 3).

Figure 3: Create Run As Account Wizard – Run As Profiles Page
- On the Summary page, click Finish (Figure 4).
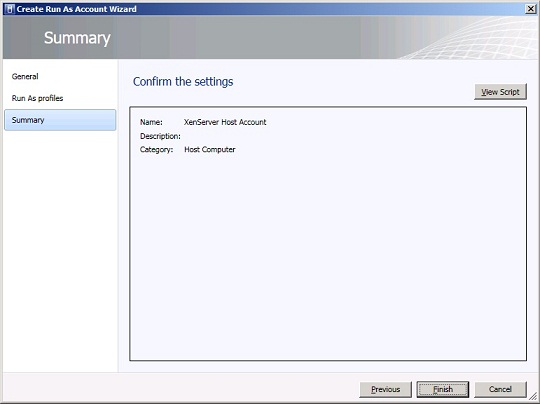
Figure 4: Create Run As Account Wizard – Summary Page
- In the Jobs Window, ensure that the Run As account creation is successful, and then close the window (Figure 5).
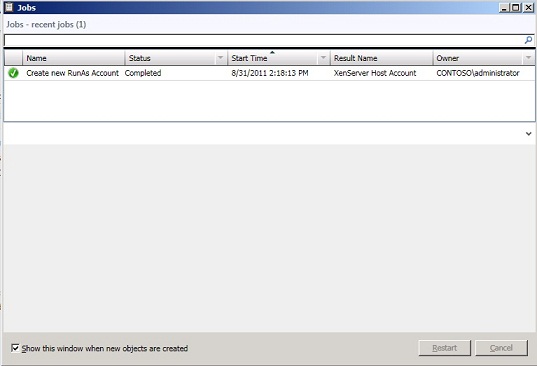
Figure 5: VMM 2012 Jobs Window – Run As Account
Adding a XenServer Host in VMM 2012
After creating a Run As account, you can add a XenServer host to VMM 2012 from within the Fabric workspace in the VMM Console.
- In the VMM 2012 Console, select the Fabric workspace (Figure 6).

Figure 6: VMM 2012 Console – Fabric Workspace
- In the Home bar, click Add Resources, and select Citrix XenServer Hosts and Clusters to launch the Add Resource wizard (Figure 7).

Figure 7: VMM 2012 – Add Resources
- In the Add Resource wizard, on the Server Settings page, enter the name of the XenServer hosts, the Run As account to connect to the host, the host group location, and then click Add (Figure 8).

Figure 8: VMM 2012 – Add Resource Wizard
- After adding the XenServer host, click Next.
- On the Summary page, click Finish (Figure 9).
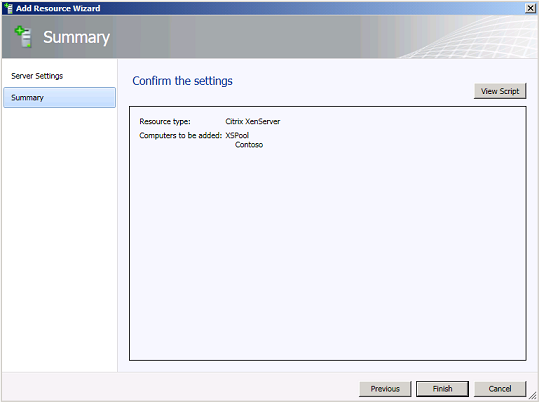
Figure 9: Add Resource Wizard – Summary Page
- In the Jobs window, verify that the host is successfully added (Figure 10).
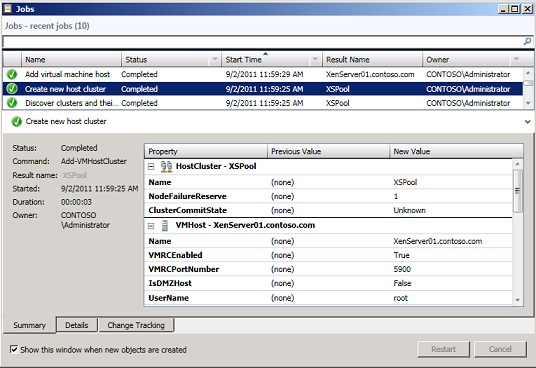
Figure 10: Jobs Window – Add XenServer Host
- In this example, because the XenServer host belongs to a pool, VMM 2012 created a host cluster named XSPool in the host group, and based it on the name of the pool in XenCenter.
Configuring Networking for a XenServer Host in VMM 2012
Before using VMM 2012 to create a virtual machine on a XenServer host that can connect to a virtual network, you must configure the network properties on the host. Using VMM 2012, you can associate XenServer host physical network adapters to logical networks.
- In the VMM 2012 Console, select the Fabric workspace (Figure 11).
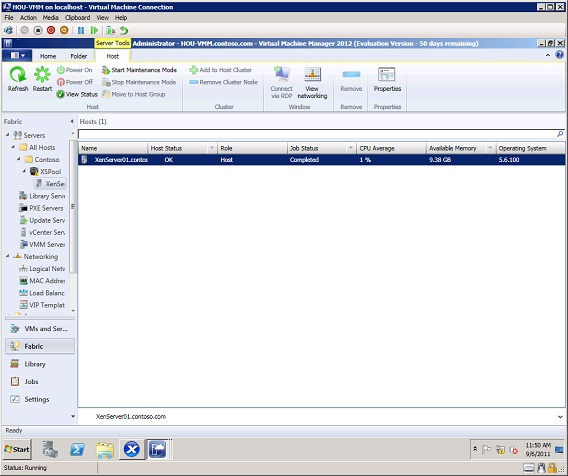
Figure 11: VMM 2012 Console – Fabric Workspace with XenServer Host
- In the Hosts Pane, right-click the XenServer host, and then select Properties (Figure 12).

Figure 12: VMM 2012 Console – Server Properties Selection
- In the XenServer host properties, select Hardware, and then select the Network Adapter (Figure 13).

Figure 13: VMM 2012 Console – Network Adapter Properties
- Under Logical Network Connectivity, select the logical network that should be associated with the network adapter, and then click OK in the Warning box (Figure 14).
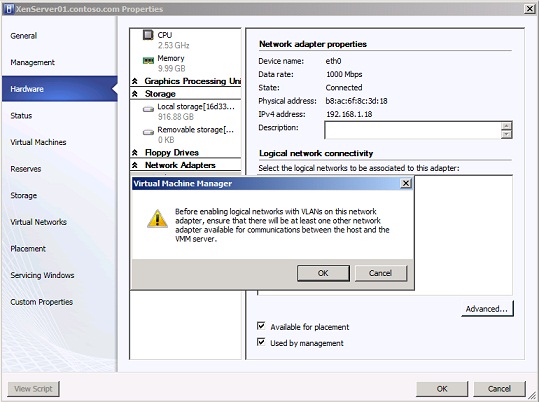
Figure 14: VMM 2012 Console – VLAN Warning
- Click OK to close the XenServer host properties page.
- In the Hosts pane, right-click the XenServer host, and then select View Networking (Figure 15).
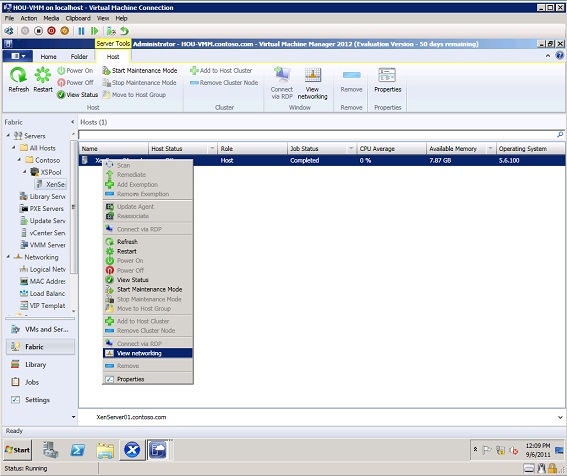
Figure 15: VMM 2012 Console – View Networking
- In the Networking Diagram window, verify that the XenServer host network adapter is connected to the required virtual network (Figure 16).
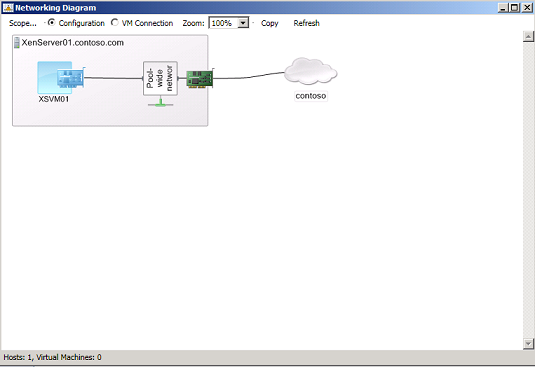
Figure 16: VMM 2012 Console – View Networking
Creating and deploying a Virtual Machine to XenServer using VMM 2012
Creating and deploying a new virtual machine to a XenServer host using VMM 2012 is performed in the VMs and Services workspace.
- In the VMM 2012 Console, select the VMs and Services workspace (Figure 17).

Figure 17: VMs and Services Workspace
- In the Home bar, click Create Virtual Machine (Figure 18) and then select Create Virtual Machine from the menu to launch the New Virtual Machine wizard.

Figure 18: VMM 2012 – Create Virtual Machine
- In the New Virtual Machine wizard, on the Select Source page, select Create The New Virtual Machine With A Blank Virtual Hard Disk, and then click Next (Figure 19).
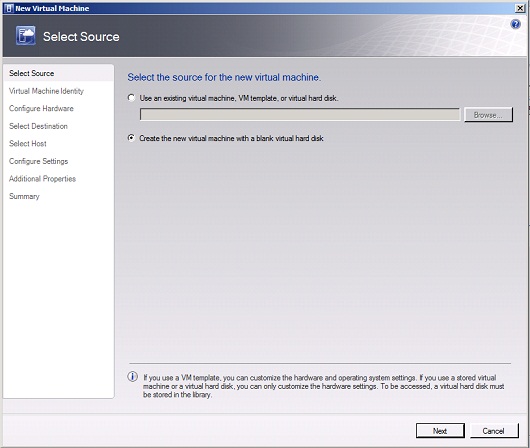
Figure 19: New Virtual Machine Wizard – Select Source Page
- On the Virtual Machine Identity page, enter a name for the virtual machine, and then select Next (Figure 20).

Figure 20: New Virtual Machine Wizard – Virtual Machine Identity Page
- On the Configure Hardware page, select the Compatibility option in the left pane, select the Xen capability profile in the right pane (Figure 21), adjust the resource configuration as required, and then click Next. The Xen capability profile is a pre-configured profile that defines resource minimum and maximum values that can be configured. Customized capability profiles are created in the Library workspace.
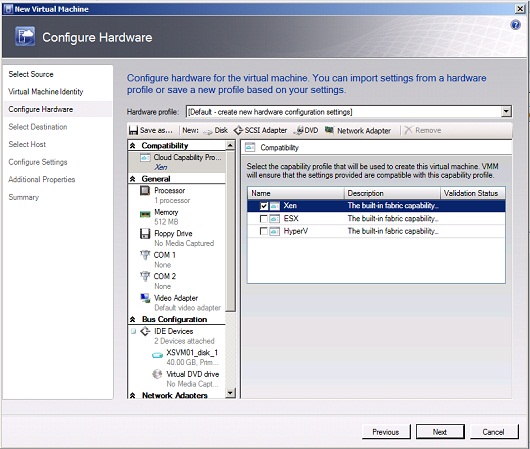
Figure 21: New Virtual Machine Wizard – Configure Hardware Page
- On the Select Destination page, select the Place The Virtual Machine On A Host option, and then click Next (Figure 22).

Figure 22: New Virtual Machine Wizard – Select Destination Page
- On the Select Host page, select the XenServer host, and then click Next (Figure 23).
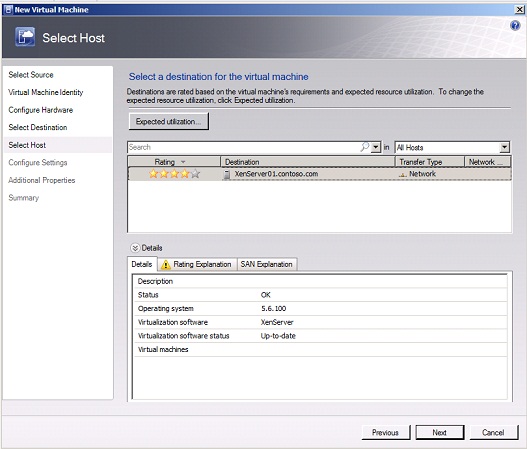
Figure 23: New Virtual Machine Wizard – Select Host Page
- On the Configure Settings page, select the VM storage location, network adapter, and deployment details, and then click Next (Figure 24).

Figure 24: New Virtual Machine Wizard – Configure Settings Page
- On the Additional Properties page, select the desired options to automate the start and stop of the virtual machine when the XenServer host is powered on or off, then specify the operating system that will be installed in the virtual machine, and then click Next (Figure 25).
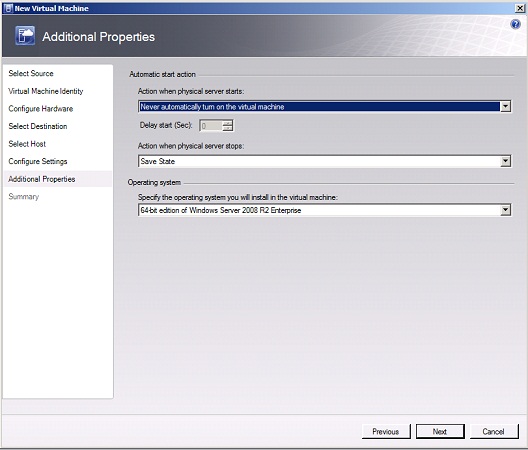
Figure 25: New Virtual Machine Wizard – Additional Properties Page
- On the Summary page, review the selected options, and then click Create (Figure 26).
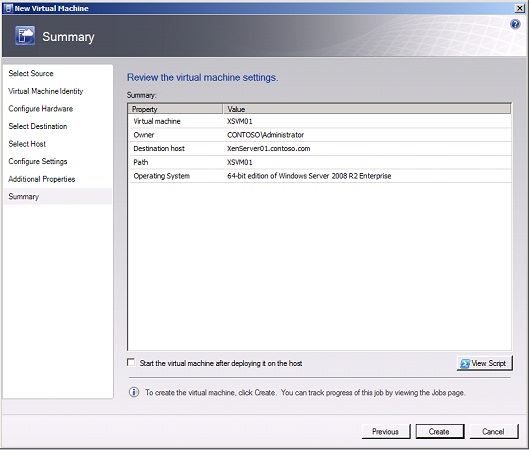
Figure 26: New Virtual Machine Wizard – Summary Page
- In the Jobs window, monitor the creation of the virtual machine on the XenServer host (Figure 27).
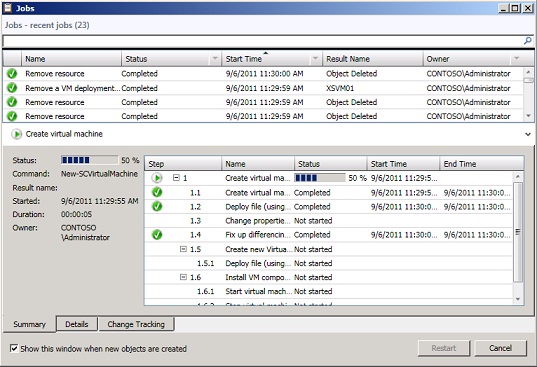
Figure 27: VMM 2012 Jobs Window – New Virtual Machine Creation
- In the VMM Console, view the status of the newly created virtual machine on the XenServer host (Figure 28).
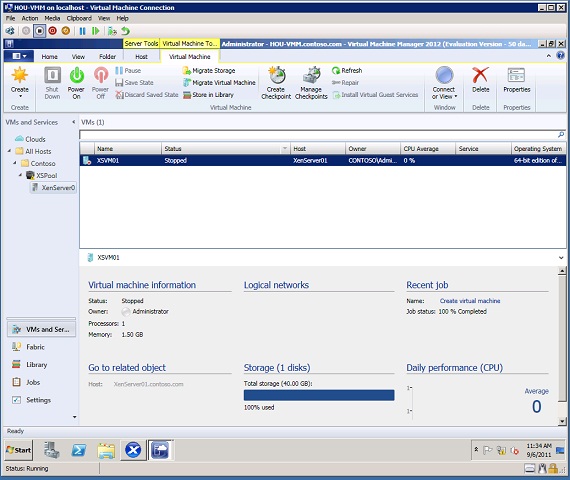
Figure 28: VMM 2012 Console – New Virtual Machine
Additional VMM 2012 Management Features for Citrix XenServer
VMM 2012 supports the ability to manage many additional facets of XenServer operations. The following table contains a brief overview of other major management features, but is not all inclusive. For more information, review the Citrix XenServer management information on the Microsoft Technet site.
Command Line Management | The VMM command shell supports XenServer hosts management |
VMM Service | A VMM service – a set of virtual machines defined using a service template that captures configuration, networking, load balancing, and deployment settings for a single release of a service – can be deployed to XenServer hosts |
Live Migration | VMM 2012 supports XenMotion between XenServer hosts in a managed pool |
Maintenance Mode | VMM 2012 supports placing a managed XenServer host in and out of maintenance mode |
Library | VMM 2012 support storing XenServer virtual machines, disks, and VMM templates in the VMM library |
VMM Templates | VMM templates supports XenServer hosts, with these restrictions: · Supports generalization and customization for Windows-based virtual machines only · Supports manual installation of XenServer Tools · Supports only original disk images without modifications |
Conversion | VMM 2012 supports conversion of XenServer Windows-based virtual machines to Hyper-V virtual machines using the P2V conversion process, without removing XenServer Tools |
Conclusion
While System Center VMM 2008 R2 provides the ability to manage virtualization environments that include both Microsoft and VMware virtualization components, Citrix XenServer is supported with VMM 2012. Because of Windows PowerShell integration with VMM 2012, administrators also have the choice to manage XenServer hosts either through the VMM 2012 console, or using the VMM command line. With VMM 2012, Microsoft provides a solid, single pane interface that allows organizations to deploy small scale or private clouds that support the top virtualization platforms on the market.