After the initial DPM 2007 deployment, which we can see in this article series, we have set up the prerequisites to deploy DPM and start protecting data. We should now configure some DPM features through the Options section. In this article we will focus on these features:
- End-user recovery
- Auto discover
- SMTP Server
- Alert Publishing
- Notifications
DPM also has many other features, such as throttle, compression, etc. In this article our focus will only be the features found in Options.
Configuring End-User Recovery
End-user recovery allows the end-user to use the Previous Version tab of a shared folder or file to recover the data from a protected computer without the Administrator intervention. In order to allow users to recovery their data through Previous Versions, we have to extend the Active Directory Schema, after that we can enable it and install the Shadow Copy client on the workstations.
First of all let’s prepare our Active Directory Schema to support the end-user recovery feature.
- Open the DPM Administrator Console.
- In the Actions Pane click on Options.
- Click the End-user Recovery tab.
- If your Active Directory has not been extended yet, the option “Enable end-user recovery” will be disabled. To extend the Active Directory schema click the Configure Active Directory button, as shown in Figure 01.
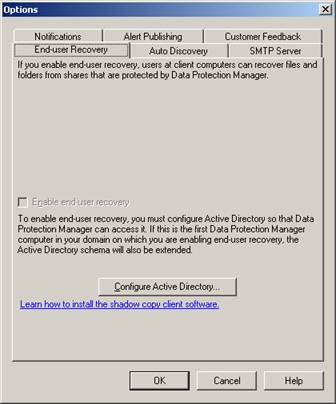
Figure 01: Configuring Active Directory to support the end-user recovery feature
- In the Configure Active Directory screen, if you have permission, click Use current credentials or type in a user that belongs to Schema Admins and Domain Admins groups. After that click OK.
- A message box will appear with the following question: This package will configure your Active Directory to support end-user recovery for Data Protection Manager. Do you want to continue? Click Yes.
- Another message box informing you that the Active Directory process update will take a few minutes will appear. Just click OK.
- We will receive a message box that the upgrade was configured successfully, as shown in Figure 02.
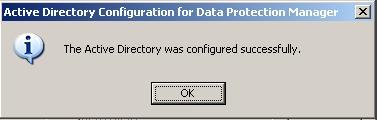
Figure 02: The Active Directory has been prepared and we can start using end-user recovery
Now, we are able to check the option “Enable end-user recovery” that will allow end-users to recover their data. (Figure 03)

Figure 03: Enabling the end-user recovery feature
The next step must be done client side; we have to install a Shadow Copy client version that supports DPM 2007, if you already have the Shadow Copy installed make sure that it supports DPM 2007. Shadow Copy client runs on Windows 2000 SP3 or later and Windows XP Professional. The shadow copy client can be found on TechNet. We can use SMS or another distribution software method in order to make it available to all workstations or it can be done manually.
Before starting to use the Previous Version tab, we must make sure of the following:
- There is no Shadow Copy enabled on the Shared Folders of the protected computer. If a computer has Shadow Copy this information will be shown to the client in the Previous Version tab not the DPM protected data.
- Wait for a synchronization before starting to use the Previous Version on the client.
Finally, we can validate that the feature works, using a client with Shadow Copy supported by DPM 2007. Right-click on a Shared Folder, and click Properties, and then click the Previous Version tab (Figure 04). The result will be all the Recovery Points available for this shared folder. You can also use the options: view, copy and restore.
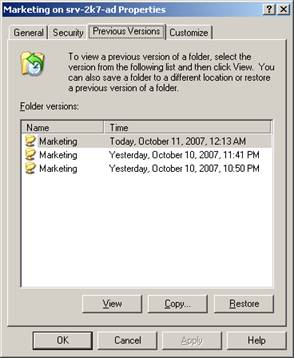
Figure 04: The Previous Versions available of a shared folder located in a protected computer
We can also work at file level; in Figure 05 we can see that a specific file has two older versions that can be restored easily by the client.
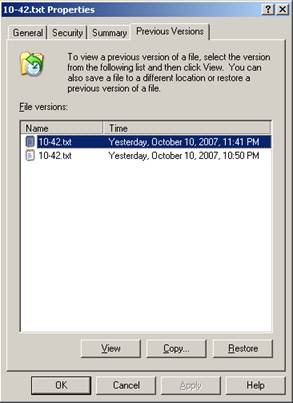
Figure 05: The previous versions available for a specific file
Configuring Auto Discover
The Auto Discovery tab allows us to choose the time of day DPM runs the Auto discover service and add the new servers on the Agent installation list. By default Auto Discovery runs at 01:00AM, as shown in Figure 06.
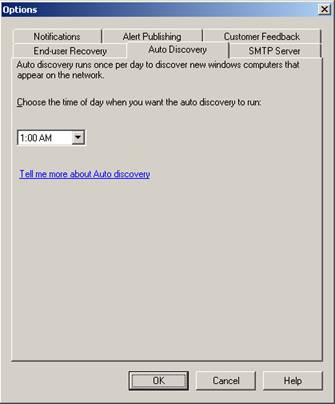
Figure 06: DPM Auto Discovery settings
When Auto Discovery is on you can validate new servers by clicking Install Agents (Figure 07). All new servers and current servers without the agent installed will be added to that list.
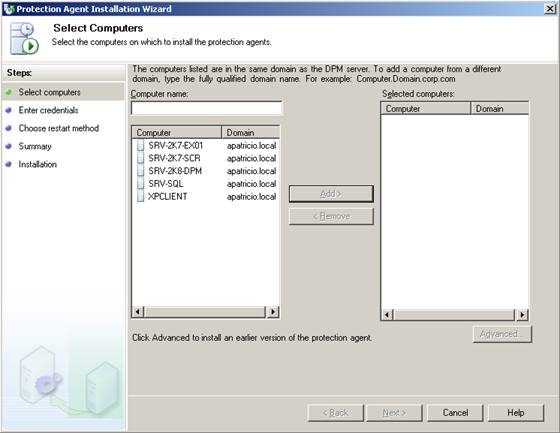
Figure 07: The computers that are able to receive an Agent installation
Configuring the SMTP Server
DPM uses an SMTP server to send reports and notifications. We can configure the SMTP Server as follows:
- Open the DPM Administrator Console.
- In the Actions Pane, click on Options.
- Click on the SMTP Server tab (Figure 08).
We have to add our Exchange Server name or IP address, port (Default port is 25) and the e-mail address that all messages from DPM will have in the From: field.
If we are going to send messages from DPM to internal users only and if we are running Exchange Server 2003, authentication might not be necessary. However, if we are using Exchange Server 2007 authentication is necessary.
Note: If you are running Exchange Server 2007 with distributed server roles, fill the SMTP Server Name field with the server that includes the Hub Transport role.
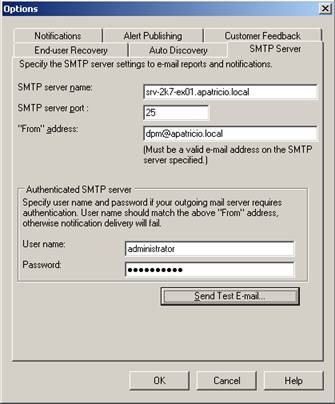
Figure 08: Configuring the SMTP Server settings
- A test can be done clicking on Send Test E-mail…
- A message box asking about an SMTP address will appear. Type in an internal valid SMTP Address and click on Send. If there is a credential error you will receive a message in the SMTP address specified previously.
- The result expected is a message with the SMTP address specified in the last step, as shown in Figure 09. This message will have a brief explanation about the test that was carried out.

Figure 09: The test message sent by DPM Server
Now we can configure reports and Alert notifications to be sent by SMTP.
Configuring DPM to support MOM
DPM can be monitored in three different ways:
- Using the DPM Administrator Console we can monitor Job and Alert status.
- Using the Alert Notification Option to send information to a specific SMTP address.
- Using Microsoft Operations Manager 2005 or System Center Operations Manager to monitor the DPM server.
We can monitor DPM using the Notifications tab which allows us to receive specified types of messages in one or multiple mailboxes defined by the DPM Administrator. To configure the Notifications option, we must make sure that SMTP Server is configured properly. If it is, we can continue:
- Open the DPM Administrator Console.
- In the Actions Panel, click Options.
- Click the Notifications tab (Figure 10).
- We can select which alert types we want to receive. You can send notifications for Critical, Warning and Informational alerts. We have to define the e-mail address that will receive the notifications.
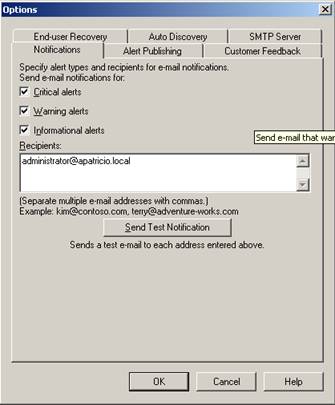
Figure 10: Configuring and testing the Notifications option
- To test the notifications click Send Test Notification.
- The expected result will be a test message, as shown in Figure 11.
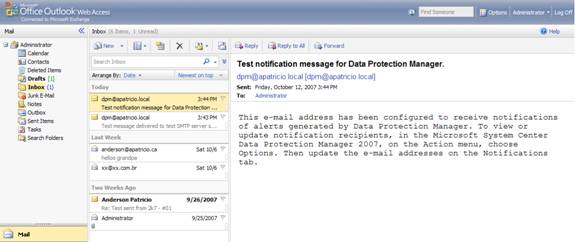
Figure 11: Receiving a test message from the Notifications option
If there is either MOM (Microsoft Operations Manager) or SCOM (System Center Operations Manager) installed we can download the Management Pack for DPM 2007 and install it on MOM. The next process would be installing a MOM agent on the DPM Server.
Even with the DPM Management Pack and the agent installed on the DPM Server, we must publish the DPM Alerts in the Event Viewer (Figure 12) to enable MOM to monitor the DPM Server. To enable it, click the Alert Publishing tab and click Publish Active Alerts.
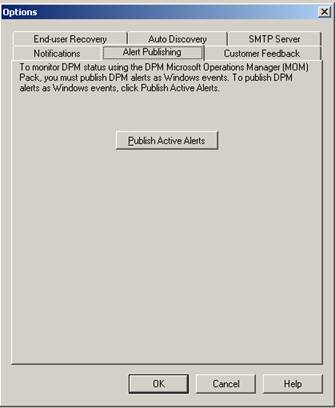
Figure 12: Configuring DPM to be monitored by MOM or SCOM
Conclusion
In this article we went over DPM 2007 Options. Some of options covered in this article are disabled by default and we should consider configuring them as soon as we complete DPM Deployment.


