If you would like to read the other parts in this article series please go to:
Introduction
The majority of Exchange Administrators and Operators know how to create Distribution Groups and when they should be used in an organization. The objective of this article is to do an overview of the process and also give some hints how to benefit from some of the new Exchange Server 2010 features.
If you are a newbie on Exchange and want to learn about Distribution Groups, great! If you are an experienced administrator we may have something for you here as well, such as how to manage group name creation in Exchange Server 2010 SP1. These are the main topics that will be covered inn this article series:
- Creating Distribution Groups
- Creating Dynamic Distribution Groups
- Managing Distribution Group Security
- Managing Distribution Group Name Policy
- Managing Moderation
- Managing Groups Membership approval
Let’s use a simple scenario for this article where we have a company in three different locations, we are going to use three countries: Canada, Gaucho Country, and Uruguay. In Active Directory we are going to have an OU for each location and inside of that OU it’s up to the location administrator to organize users, computers, groups, Organization Units and contacts. Finally, in each location I created a couple of users and each account has its last name matching their respective location OU.
One last thing, when talking about Distribution Groups you will realize that they have a direct impact on the Global Address List and it may be a good idea to plan a good naming convention for your Distribution Groups in order to improve the end user experience. Here are a couple of common scenarios that may shed some light on your Distribution Group strategy from now on:
- All Distribution Groups being displayed at the beginning of the Global Address List. A simple way to do it is using special characters on the Group Name. The following syntax can be used: #Group name
- All Distribution Groups being displayed at the end of the Global Address List. In order to use this strategy just make sure that your groups have a prefix to put them on the bottom, such as: zz_<Group Name>
- Each group has its own name and they are unique throughout the Global Address List
In this article series we are going to use the strategy to list all Distribution Groups in the beginning of the Global Address List, and we also want the location to be part of its name. Based on the requirements, we are going to use the following naming convention:
#<Location>-<Group Name>
Managing Distribution Groups…
Before going any further let’s check out a normal Distribution Group creation process. The main difference between Distribution Groups and Dynamic Distribution Groups is that using the Distribution Groups, you or the Group owner are able to manage the group members. Another difference between Distribution Groups and Dynamic Distribution Groups is that Distribution Groups are able to use additional features such as: Moderation and Membership approval as well.
Let’s say that our Canada location wants to create an IT Department group for a small department. In order to create that Distribution Group we can run the following steps:
- Open Exchange Management Console
- Expand Microsoft Exchange On-Premises (<Server-Name>)
- Expand Recipient Configuration
- Click on Distribution Group
- Click on New Distribution Group in the Toolbox Actions
- In the Group Information page. Because we have different locations, let’s check the option Specify an Organization Unit rather than using a default one and let’s click on Browse and select the Organization Unit (In our example Canada).
Based on our naming strategy the name will be #Canada-IT Department and let’s click on Next. (Figure 01)
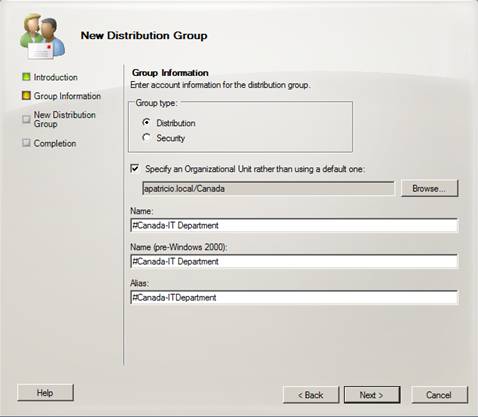
Figure 01
- In the New Distribution Group page. A summary of what we have done so far will be displayed, let’s click on New.
- In the Completion page. The results of the operation will be displayed; a green icon and a Completed status indicate that the group has been created successfully.
Now, in order to manage that group we can rely entirely on our Active Directory administrator, where any future changes on that group membership can be done either using Active Directory Users and Computers or using Exchange Management Console/Shell. However, if you are using Exchange Server 2010 you can delegate the group administration to the end-users and depending on your scenario it could save you a lot of administration time.
Let’s say you want to allow end-users to manage Distribution Groups, we can accomplish this task in a couple of simple steps. The first one is to make sure to define which user will be responsible for managing the group. Let’s double click on the desired group and click on Group Information tab and click on Add… and pick a mailbox up from the list (we are going to use a normal user called Anderson.Canada), as shown in Figure 02.

Figure 02
However if you go to Outlook Web App and click on Options, and then See All Options to check the Exchange Control Panel. Click on the Groups item that will be available on the left-hand side, still you won’t be able to manage any group; the only available option would be the groups that you belong to.
By default users cannot manage groups, in order to enable them we need to log on with an account that is able to manage user Roles in the Exchange Organization. I’m going to use Administrator account for this tutorial, let’s log on Outlook Web App, then click on Options and then See All Options, then hover the mouse over Manage Myself and then click on My Organization. After that, click on Roles & Auditing, and finally click User Roles (Figure 03). Initially, all users are assigned to Default Role Assignment Policy however you can create a different Role Assignment Policy and assign to different users if you need more flexibility. In this tutorial we are going to allow all users to manage groups, let’s double click on Default Role Assignment Policy
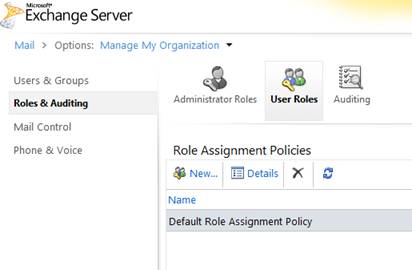
Figure 03
Let’s check the option My Distribution Groups as shown in Figure 04. That is the option that allows all users covered by that policy to be able to manage Groups from their Outlook Web App sessions.

Figure 04
Because we are changing the Default Role Assignment Policy a dialog box stating Changes to this policy may affect many users. Are you sure you want to make this change? will be displayed, click on Yes.
Now, the regular user can go to his Options and on the right-hand side the Public Groups I Own will show up (Figure 05). Only groups where his/her account is configured as Manager will be displayed in that section.
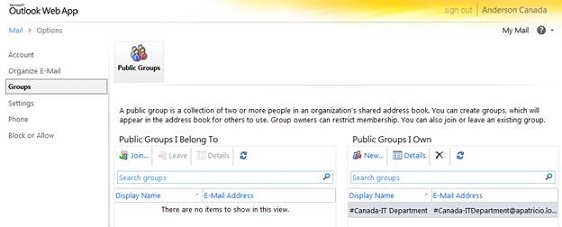
Figure 05
In order to manage a group that a normal user is an owner, he/she just needs to double-click on the desired group and a bunch of sections will be displayed to help with the group management. You may have noticed that the language of the web interface is much easier to understand than the text in the Exchange Management Console. Here are the sections available:
- General – In this section the Group Display Name, Alias, description and whether the group will be displayed in the Global Address List can be configured.
- Ownership – In this section we can define the group owner.
- Membership – In this section we can pick up members from the GAL and add to the group.
- Membership Approval – In this section we can define the membership approval process for this group. We are going over that process in the next article of this series.
- Delivery Management – In this section we can define restrictions such as, which users are allowed to send messages to this group.
- Message Approval – We can moderate the group and create exceptions as well. We are going to talk about this in the second article of this series.
- E-mail Options – This is a read-only section where the user can check the SMTP Address of the group.
- Mailtip – This section allows us to create a Mail tip. When someone tries to send a message the message specified in this section will be displayed.
Conclusion
In this article we covered how to create a Distribution Group and allow end-users to manage groups. In the next article we will be reviewing the membership approval process and the group naming policy.
If you would like to read the other parts in this article series please go to:


