E-mail address policies which were known as Recipient Policies back in Exchange 2000 and 2003, define the proxy addresses that are stamped onto recipient objects in the Exchange 2007 organization. E-mail address policies are added on an organization level meaning they apply to the whole Exchange 2007 organization. With Exchange 2007, the recipient policies have been split in two: Accepted Domains and E-mail Address Policies.
Those of you with Exchange 2000 and/or 2003 experience know that recipient policies also controlled which SMTP namespaces were accepted by the Exchange organization. Some of you probably wonder why these two features were split in Exchange 2007. There were three primary reasons why the Exchange Product group made the split. First, if a domain was specified for an e-mail address recipient policy, but wasn’t configured as the authoritative domain, the e-mail sent to the recipients with e-mail addresses defined by the policy would not be routed within the Exchange organization for this domain. Even though this is an invalid scenario, the Exchange 2000 and 2003 System Manager allowed this type of configuration. Secondly, the authoritative domain concept was hidden under the e-mail address recipient policy GUI, which wasn’t very intuitive for administrators. Lastly, relay domains were controlled via the SMTP connector’s GUI, allocated in a completely different location from where the authoritative domains (Recipient Policies) were controlled.
The separation of Accepted Domain and E-mail Address Policies are not the only design change that has been made in Exchange 2007. The infamous Recipient Update Service (RUS), which most of us know from Exchange 2000 and 2003, is also no longer part of the Exchange 2007 product. RUS was responsible for stamping E-mail addresses on AD objects, in addition to address list membership, along with a few other things, it didn’t always work as expected and was very difficult to troubleshoot when it acted up. With Exchange 2007, the RUS (and thereby the asynchronous behavior used to provision objects) has been replaced by a new synchronous process (EmailAddressPolicy cmdlet), used to stamp E-mail addresses onto objects immediately! Yes, you no longer have to wait for several minutes to see email addresses on your objects as was often the case with the antiquated RUS.
Note:
For a detailed explanation about the removal of RUS, read the following post on the MS Exchange Team blog.
Accepted Domains
Before you can begin creating a new E-mail Address Policy, you must first add the respective domain name under the Accepted Domains tab. Under the Accepted Domains tab, we specify the SMTP domains for which our Exchange 2007 organization should either be authoritative, relay to an e-mail server in another Active directory Forest within the organization, or relay to an e-mail server outside the respective Exchange organization. The difference between internal and external relayed domains is that internal relaying simply sends the e-mail messages directly to the e-mail server in the organization. Messages sent to an external relayed domain will first be delivered to the Edge Transport server in the perimeter network, and from there be routed to the respective external e-mail server on the Internet.
When the first Hub Transport server is deployed in the Exchange 2007 organization, the domain name of the Active Directory Forest root domain is configured as an authoritative domain by default. Since the Hub Transport server used as an example throughout this article has been installed into an Active Directory Forest named exchangedogfood.dk, this domain name is the authoritative domain for this Exchange 2007 organization by default (Figure 1). Since we use a split-DNS setup, where the internal and external domain names match, we don’t need to do any configuration changes after the Hub Transport server has been deployed. Many organizations use an internal domain name that differs from the external domain name, which among other things are used for inbound mail. For example, it’s common to use a domain.local domain internally. If this is the case in your organization, you must manually create an accepted domain matching your external domain name.
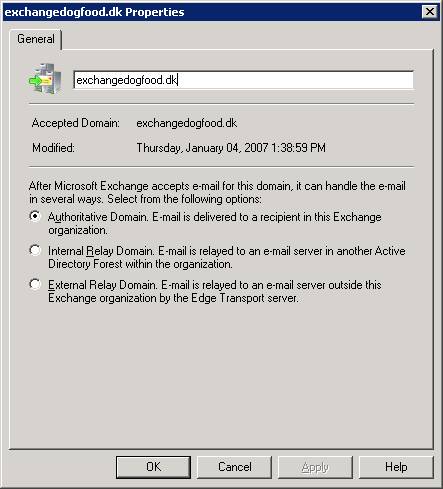
Figure 1: Property page for an Accepted Domain
Creating a new Accepted Domain
Creating a new accepted domain is a straightforward task. You simply click New Accepted Domain in the Action pane. In the New Accepted Domain wizard, enter a name for the accepted domain entry and the domain for which you want to receive e-mail.
Note:
Any accepted domain which is added under the Accepted Domains tab can be linked to an E-mail Address Policy (EAP), such that it will generate recipient e-mail addresses for the accepted domain. As a matter of fact, every EAP must link to an accepted domain, such that e-mail messages sent to e-mail address specified in an EAP are allowed to be routed by the Hub Transport servers in the organization. You’ll see what I mean when we cover E-mail Address Policies later in the article.
As we already talked about, the Hub Transport server can handle messages for a particular domain in several different ways (shown in Figure 2). Choose the desired option and click New and then Finish.

Figure 2: New Accepted Domain Wizard
If you’d rather create an Accepted Domain entry using the Exchange Management Shell, you can do so using the New-AcceptedDomain cmdlet. For example, to create an accepted domain entry similar to the one we created in Figure 2, you would need to run the following command:
New-AcceptedDomain –Name “Exchange-faq” –DomainName “exchange-faq.dk” –DomainType “Authoritative”
As you can see in Figure 3, we have several E-mail Address Policies in our Exchange 2007 organization, listed in prioritized order (the lower the number, the higher the priority) as was also the case in Exchange 2000 and 2003. If you want to move a particular policy up the list, highlight the policy and click Change Priority in the Action pane. You must have at least two EAPs aside from the default in order to see the Change Priority Action pane option
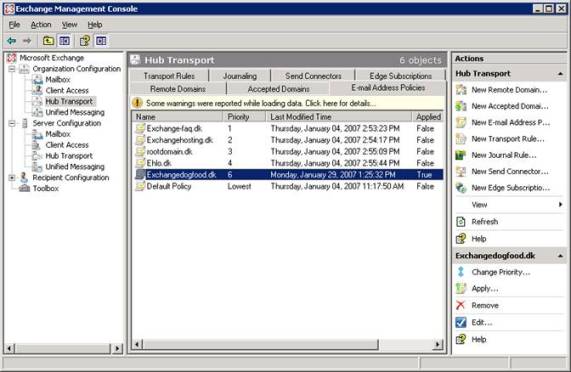
Figure 3: Prioritized List of the E-Mail Address Policies in the organization
Creating a new E-mail Address Policy
Creating a new E-mail address policy is a straightforward task, although much different from Exchange 2000 and 2003. In order to do so, click New E-mail Address Policy in the Action pane. On the Introduction page of the New E-Mail Address Policy wizard, enter a name for the new policy, and then specify what type of recipients should be included (Figure 4) and then click Next.
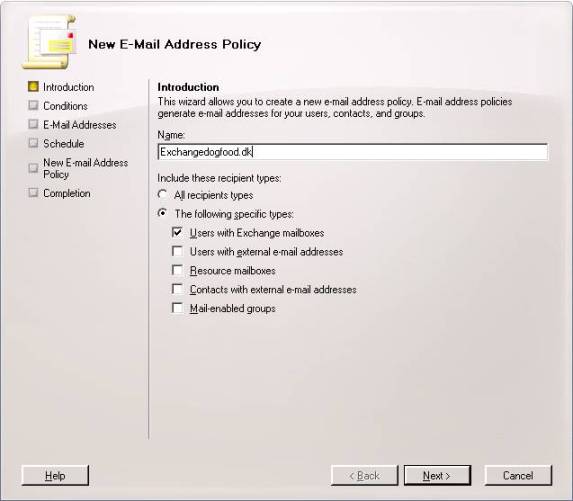
Figure 4: The New E-Mail Address Policy Page
You can now be a bit more selective when defining your target group by using the filter and selecting one or more conditions as shown in Figure 5. When you have configured any conditions you want applied to the policy, click Next.
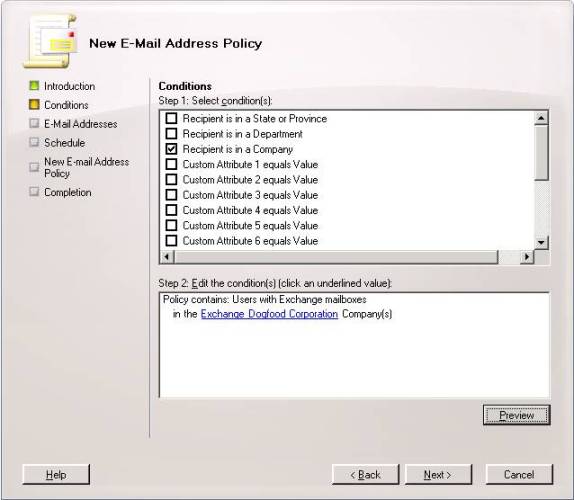
Figure 5: The New E-Mail Address Wizard Conditions Page
Now click Add and select the E-mail address local part to be used to create the username portion of the e-mail address, then choose an e-mail domain from the E-mail address domain in the drop-down box as shown in Figure 6. When ready click OK and Next.

Figure 6: Specifying the Local Part of the E-Mail Addresses and the E-Mail Address Domain
As you can see in Figure 6, you can choose between 7 local E-mail address parts. The local part of an e-mail address is the name format appearing before the “at sign (@)”. If none of the default 7 local parts fit what you need to use for your E-mail address Policy, you can use the variables listed in Table 1 below.
Variable | Description |
%g | Used for given name (first name) |
%i | Used for middle initial |
%s | Used for surname (last name) |
%d | Used for display name |
%m | Used for Exchange alias |
%xs | Uses the x number of letters of the surname. For example if x=2, then the first two letters of the surname are used. |
%xg | Uses the x number of letters of the given name. For example, if x=2, then the first two letters of the given name are used. |
Table 1: Available E-Mail Address Parameters
On the Schedule page, specify when the e-mail address policy should be applied and the maximum length of time it is permitted to run (Figure 7). Then click Next.
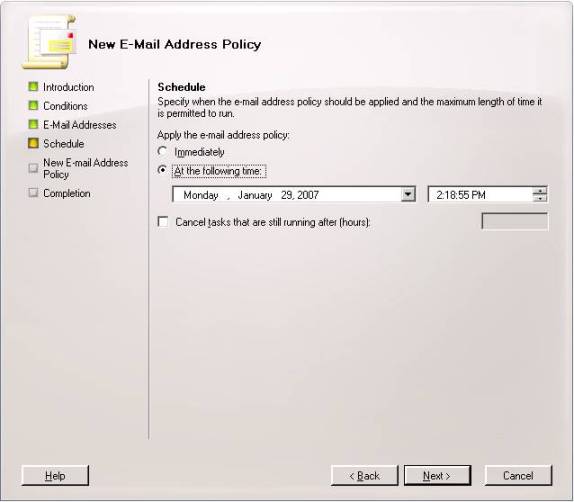
Figure 7: New E-Mail Address Wizard Schedule Page
On the Configuration Summary page click New. If you selected to apply the policy immediately, the proxy address will now be applied to all recipients matching the filter. When this task has completed, click Finish on the Completion page.
Tip:
To create a new e-mail address policy via the Exchange Management Shell, you need to use the New-EmailAddressPolicy cmdlet. For example, to create a policy similar to the one we created using the GUI wizard; you would need to run the following command:
New-EmailAddressPolicy -Name “Exchangedogfood.dk” -IncludedRecipients “MailboxUsers” -ConditionalCompany “Exchange Dogfood Corporation” -Priority “Lowest” -EnabledEmailAddressTemplates “SMTP:%g.%[email protected]”
When a new E-mail address policy has been created and applied to the recipients, you can verify the proxy address has been stamped on the respective user objects under the E-Mail Addresses tab on the property page of a recipient object, as shown below Figure 8.
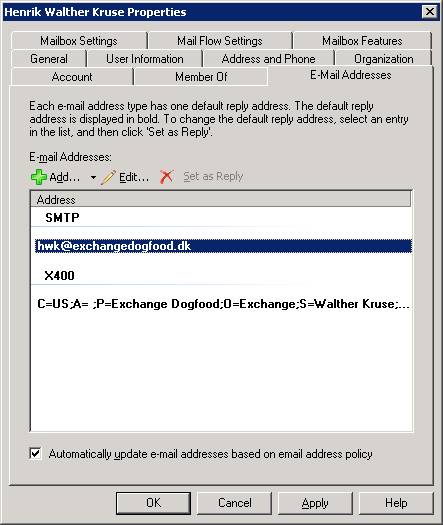
Figure 8: E-Mail Address Tab on the User Mailbox Property Page
When a recipient has “Automatically update e-mail addresses based on email address policy” enabled, all primary e-mail addresses (default reply addresses) of e-mail address types will always be set from the e-mail address policy. This means that if you edit the primary address to be a different e-mail address, it will always revert back to the one specified in the e-mail address policy.
Goodbye LDAP! Hello OPATH
Instead of LDAP which was the recipient filter used in Exchange 2000 and 2003, Exchange now uses OPATH for filtering recipients, address lists etc. The syntax used in OPATH is much less complex that LDAP filters, which means that it’s easier to create filters in Exchange 2007 than was the case in previous versions of Exchange Server. Delving into the intricacies of OPATH filtering is outside the scope of this article, instead I can recommend you read this blog entry on the MS Exchange Team blog as it does a very good job of describing how to get started with OPATH filtering.
Managing SMTP Proxy addresses manually
In some scenarios you might want to have the SMTP proxy addresses managed via a separate provisioning tool used in the IT service desk. If this is the case, you might need to disable the Automatically update e-mail addresses based on email address policy option found on the E-Mail Addresses tab on the property page of an Exchange 2007 user mailbox (Figure 8). If your organization consists of several thousand user mailboxes, you do of course not want to do this via the Exchange Management Console (EMC), since the EMC doesn’t allow you to make this type of change on user mailboxes in bulk. Okay, so what do I do in this situation then? Well you turn to the Exchange Management Shell and run a one-liner command. For example, if you want to disable this option on all Exchange 2007 user mailboxes, you could use the following command:
Get-Mailbox | Set-Mailbox -EmailAddressPolicyEnabled $False
If you instead prefer to do this per mailbox server, you would use:
Get-Mailbox –Server “Mailbox Server” | Set-Mailbox -EmailAddressPolicyEnabled $False
Or perhaps you want to do so for users in a specific OU:
Get-Mailbox –OrganizationalUnit “Name of OU” | Set-Mailbox -EmailAddressPolicyEnabled $False
That was all for this time, I hope you learned something new!


