Introduction
In Exchange Server 2010 with RBAC (Role Based Access Control) introduction, a major change was made in the architecture where by default all new objects created using Exchange Management Tools are created by the Exchange Trusted Subsystem, and not the current administrator credential that is performing the action. Since Exchange Server 2010 enforces that all changes are performed by Exchange Management Console, Exchange Management Shell or Exchange Control Panel (ECP web interface) the RBAC will take care of users’ privileges to perform any action. The Exchange Trusted Subsystem is member of the Exchange Windows Permissions group which is responsible to allow Active Directory management.
This is not a problem in the vast majority of cases since RBAC enforces who, what and where (the famous triangle of power well described in the following link by the MSExchange Team) before doing any changes. However, you may have noticed that after introducing Exchange Server 2010 in your network, when you create any new user using Exchange Management tools, the traditional 4720, 4738, 4724, 4738 and 4722 event ids will be generated in Active Directory (Figure 01). But, if we pay attention to the information provided we notice that the Exchange Server is performing the action to create/delete those objects, not the logged on user. If you create the user using Active Directory management tools you will see your name stamped in the same event logs.

Figure 01
If IT Auditors are monitoring users created and removed, they may have a hard time explaining the server name in those logs. Also, the SCOM (System Center Operations Manager) Audit report is based on those entries and they won’t be useful. You as an Exchange Administrator can always run Search-AdminAuditLog in Exchange Management Shell to retrieve the information but again you may have to come up with two reports to satisfy your requirements.
Before finishing up the introduction section we can summarize the 3 (three) security models available in Exchange Server 2010, as follows:
Shared Permission Model
This is the default model and users can be created using either Exchange Management Tools or Active Directory tools, by default only the Recipient Management and Organization Management role groups can create objects in Active Directory.
Split Permissions (Active Directory)
In this model there is a total segregation between object creation in Active Directory and Exchange. There are no RBAC permissions to create this kind of objects through Exchange Management Tools. This model is achieved by running Exchange setup program.
Split Permissions (RBAC)
This method basically changes the default (Shared Permission) to allow only certain groups specified to be able to manage Active Directory objects, and the Exchange Servers will continue to manage objects. This process is manual and it is a topic for a future article.
In this article series we will cover the Active Directory split permissions. While, in the following sections we will show how to enable and disable such feature.
Using Active Directory split permissions model…
If for any of the reasons explained before or if you have a larger organization where the Exchange administration is not performed by the same resources that manage Active Directory objects, then you can be looking at Active Directory split permission where we can segregate the object creation using Active Directory tools from Exchange management tasks.
When using Active Directory split permission model, the New and Remove verbs for the most known nouns of Exchange Management Shell world (Mailbox, MailContact, MailUser, RemoteMailbox) won’t be available and it may cause some bizarre issues for a regular Exchange/Active Directory administrator. For instance, a user that belongs to both Domain Admins and Exchange Management trying to create a simple new mailbox will receive the error shown in Figure 02. If we look closer at the error message we will realize that the New-Mailbox is not available for us due to the Active Directory delegation.

Figure 02
Another good example is the message displayed in Figure 03, when the same user which is able to perform all other tasks at organization and server levels, tries to remove a group.

Figure 03
The administrator may think that this is a glitch in the system, and when he tries to access ECP he will notice that the option to create a mailbox is gone, as shown in Figure 04.
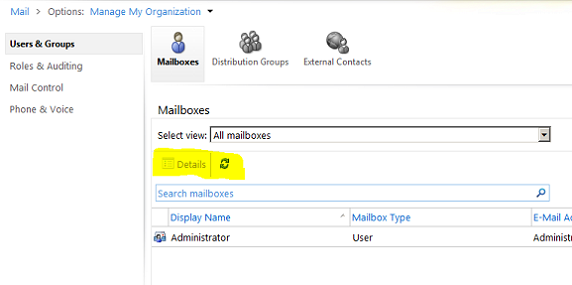
Figure 04
The thumb rule when using such feature is that using Active Directory split permissions, Exchange Administrators won’t be able to manage anything on Active Directory through the Exchange Management interface but they must use Active Directory management tools to manage such objects. Another good example that may scare you a little bit, is that even a simple group membership change cannot be done via the Exchange Management interface.
How to enable Active Directory split permissions
Now, that we understand how the RBAC works to manage exchange objects and how the administrator experience is when using Active Directory split permissions in an Exchange Server 2010 organization, we can start working on enabling such feature.
The feature can be enabled during the Exchange Server 2010 setup. In Figure 05 we are building a new Exchange organization and we have the option Apply Active Directory split permissions security model to the Exchange Organization which comes by default unchecked. Let’s check such option and proceed with the setup.
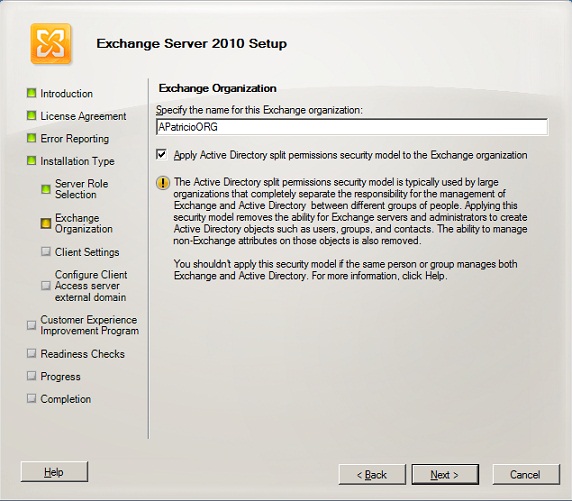
Figure 05
If you want to enable this feature afterwards, you can always use setup.com utility as follows:
Setup.com /PrepareAD /ActiveDirectorySplitPermissions:True
There are a couple of changes applied in the organization after enabling Active Directory split permissions. The first one is that we have a new Organization Unit (OU) called Microsoft Exchange Protected Groups (Figure 06). It will contain a single group named Exchange Windows Permissions, and the Exchange Trusted Subystem is not part of the Exchange Windows Permissions group.

Figure 06
Also, the Management Roles Mail Recipient Creation Role and Security Group Creation and Membership Role which are the management roles that empower the Organization and Recipient Management Role groups in a default installation are removed or not created (in case of a new deployment).
Finally, Active Directory permissions at domain level assigned to Exchange Windows Permissions are removed or not set (in case of a new deployment), as shown in Figure 07.

Figure 07
Note:
If the Active Directory split permission is being enabled in an existent Exchange Organization, all servers must be restarted and if you have a large organization wait for the replication time to complete.
Reverting back to Shared Permission model…
If for some reason you didn’t like the Active Directory split permission model you can always go back. The process is pretty straight forward. First we need to run the following command line using setup.com (Figure 08).
Setup.com /PrepareAD /ActiveDirectorySplitPermissions:False
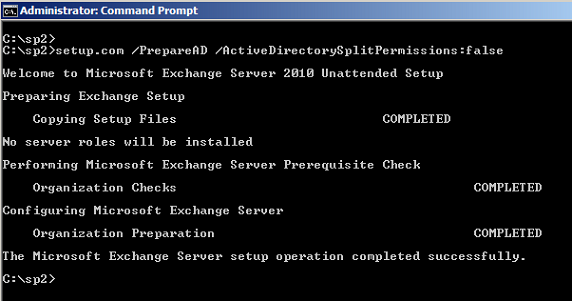
Figure 08
As expected the changes added to the organization will be reverted such as:
Microsoft Exchange Protected Groups OU will be removed and the group Exchange Windows Permissions will be moved back to Microsoft Exchange Security Groups OU.
Exchange Trusted Subsystem will be part of the Exchange Windows Permissions group.
At domain level the group Exchange Windows Permissions will be added to the permissions (Figure 09).

Figure 09
The only piece missing is the RBAC Role Assignment to restore the previous permissions and the three following cmdlets should be run on your Exchange Management Console:
New-ManagementRoleAssignment “Mail Recipient Creation_Organization Management” -Role “Mail Recipient Creation” -SecurityGroup “Organization Management”
New-ManagementRoleAssignment “Security Group Creation and Membership_Org Management” -Role “Security Group Creation and Membership” -SecurityGroup “Organization Management”
New-ManagementRoleAssignment “Mail Recipient Creation_Recipient Management” -Role “Mail Recipient Creation” -SecurityGroup “Recipient Management”
After that you should have your permissions model like you had it before the initial installation.
Conclusion
In this article we went through the process of how to enable the Active Directory split permission model, and how to revert to the shared permission default model.


