If you would like to read the other parts in this article series please go to:
- Managing Hyper-V From the Command Line (Part 1)
- Managing Hyper-V From the Command Line (Part 2)
- Managing Hyper-V From the Command Line (Part 3)
- Managing Hyper-V From the Command Line (Part 4)
- Managing Hyper-V From the Command Line (Part 5)
- Managing Hyper-V From the Command Line (Part 6)
- Managing Hyper-V From the Command Line (Part 7)
Introduction
Throughout this article series, I have shown you how to perform various virtual machine management tasks from the command line. I have even walked you through the process of creating a brand new virtual machine from scratch and then modifying that virtual machine’s hardware allocations, all from the command line.
Although I think that I have covered all of the basics at this point, there is one last topic that I wanted to talk about before I conclude this series. Just as you can create and manage virtual machines from the command line, you can also create and manage virtual machine snapshots through PowerShell. In this article, I will show you how.
Before I Begin
Before I get started, I want to quickly mention for the benefit of anyone who is just joining this series that the commands that I will be discussing are not native to Hyper-V. They are a part of a Hyper-V management library. Furthermore, this library must be imported into PowerShell each time that you plan on using any Hyper-V related commands. The import command is:
Import-Module “C:\Program Files\Modules\Hyperv\Hyperv.psd1”
The full instructions for downloading and installing the Hyper-V management library are provided in Part 1 of this series.
Incidentally, manually downloading the Hyper-V module for PowerShell and manually importing it will not always be necessary. The Hyper-V module is going to be included in Windows Server 2012.
Working with Snapshots
One of the first tricks that I want to show you involves getting a list of all of the snapshots that exist on a particular Hyper-V host. You can accomplish this by entering the Get-VMSnapshot command. When you do, Hyper-V will display a table listing the snapshot description, the virtual machine for which the snapshot was created, the virtual machine’s boot order, and when the virtual machine snapshot was created.
While it is sometimes handy to be able to look at the virtual machine snapshots at the host level, it is often more helpful to be able to view snapshots on a per VM basis. The easiest way to accomplish this is to append the name of a virtual machine to the Get-VMSnapshot command. For example, to see all of the snapshots for a virtual machine named Storage you would enter: Get-VMSnapshot Storage
Figure A shows examples of retrieving snapshot information for an entire Hyper-V host and for a single virtual machine.
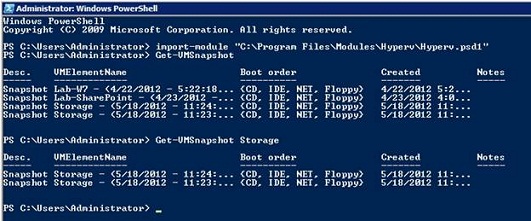
Figure A: You can use the Get-VMSnapshot command to retrieve snapshot information.
As you can see in the figure above, snapshot information is listed for the specified virtual machine. However, snapshots are normally displayed in a tree view so that it is easier to tell how the snapshots relate to one another. If you prefer to view your snapshots as a tree you can easily do so by using the Get-VMSnapshotTree command. The syntax for this command is identical to that of the Get-VMSnapshot command. In fact, Figure B shows both the Get-VMSnapshot command and the Get-VMSnapshotTree command being used so that you can see the difference in the command’s output.
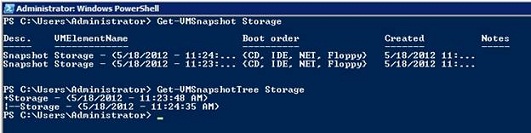
Figure B: The Get-VMSnapshotTree command displays snapshot information as a tree.
Creating a Snapshot
The Hyper-V module for PowerShell really provides some nice options when it comes to snapshot creation. At its most basic you can create a new snapshot by entering the New-VMSnapshot command, followed by the name of the virtual machine that you want to snapshot. If you want, you can even append the Note parameter as a way of leaving yourself a note about the snapshot’s purpose. Of course creating a note is completely optional.
To show you how this works, suppose that I wanted to create a snapshot for a virtual machine named Storage. To do so, I would enter the following command:
New-VMSnapshot Storage –Note “Snapshot Demo”
When you execute this command, PowerShell will prompt you as to whether or not you want to perform the action. You will then see a warning message indicating that the operation is occurring in the background. You can use the Get-VMSnapshot command to verify that the snapshot was created, as shown in Figure C.
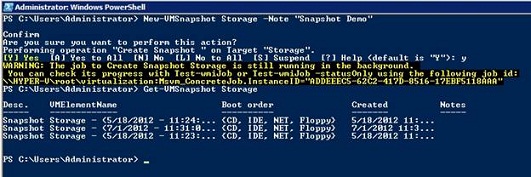
Figure C: Snapshots can be created from the command line.
Another cool thing that you can do is to create multiple snapshots in sequence. For example, I have a host server on which most of the virtual machines are named Lab- something. If I wanted to, I could create snapshots of all of my Lab virtual machines through the use of wildcards. The trick is to combine the New-VMSnapshot command with the Get-VM command that I showed you in a previous part of this series. The full command looks something like this:
Get-VM “Lab%” –Server “Hyper-V” | New-VMSnapshot –wait
You will notice that I had to specify the name of my Hyper-V host, which was named Hyper-V. More importantly, I had to specify the –Wait parameter at the end of the command. This causes Hyper-V to wait for one snapshot to be created before starting the next one. You can see the command and its output in Figure D.
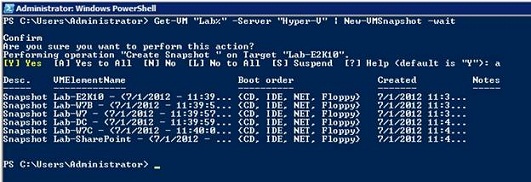
Figure D: You can create multiple snapshots through a single command.
Rolling Back a Snapshot
So what happens if you want to roll back a virtual machine to a previous state? Well, you can easily perform a virtual machine rollback by using the Restore-VMSnapshot command.
Before you can use this command, you have to select the snapshot that you want to remove. This is accomplished by using the Select-VMSnapshot command. Once you have selected the desired snapshot, you can roll the virtual machine back by using the Restore-VMSnapshot command.
To show you how this command works, consider that earlier I created a snapshot for a virtual machine named Storage. As you will recall, a couple of snapshots already existed for that virtual machine. Therefore, if I want to roll the virtual machine back to a previous state then it is necessary to choose which snapshot I want to use.
The command for doing so is:
Select-VMSnapshot Storage | Restore-VMSnapshot
When I execute the command, PowerShell asks which snapshot I want to use. When I make my selection, the virtual machine is rolled back, as shown in Figure E.

Figure E: You must select which snapshot you want to roll back.
Removing a Snapshot
You can use a very similar technique to remove a snapshot. The removal process uses the Remote-VMSnapshot command. The syntax for this command is identical to that of the Restore-VMSnapshot command. For example, if you wanted to remove a snapshot from the virtual machine named Storage, you could use the following command:
Select-VMSnapshot Storage | Remove-VMSnapshot
This command also gives you the option of removing an entire snapshot tree. To do so, simply append the –Tree switch to the end of the command like this:
Select-VMSnapshot Storage | Remove-VMSnapshot -Tree
Conclusion
As you can see, it is possible to fully manage your Hyper-V virtual machines from the command line. Although the techniques that I have discussed do require an add-on module, Hyper-V 3.0 will include native PowerShell functionality.
If you would like to read the other parts in this article series please go to:
- Managing Hyper-V From the Command Line (Part 1)
- Managing Hyper-V From the Command Line (Part 2)
- Managing Hyper-V From the Command Line (Part 3)
- Managing Hyper-V From the Command Line (Part 4)
- Managing Hyper-V From the Command Line (Part 5)
- Managing Hyper-V From the Command Line (Part 6)
- Managing Hyper-V From the Command Line (Part 7)


