Introduction
CPU, RAM, disk and network: These are the four resources that form the building blocks for today’s robust virtualized environments. You’ve probably heard before that virtualization requires an understanding of the broad skills in each of these areas. In this article, we will focus on one of these four building blocks: the network component. Specifically, we will take a look at the network configuration options that are available in Hyper-V.
For the purposes of this article, I’m running Hyper-V on two servers:
- A physical Windows Server 2008 R2 server running on a Dell PowerEdge 2950 server.
- A virtual Windows Server 2008 R2 SP1 server. The server is running as a guest inside a virtual machine.
Virtual Network Manager
From the perspective of the Hyper-V server itself, most network functionality is configured through the use of the Virtual Network Manager. To use the Virtual Network Manager, open the Hyper-V Manager, right-click your Hyper-V server and, from the shortcut menu, choose Virtual Network Manager. This will open a screen like the one below. In this Figure, I’ve selected the only physical network adapter currently in my Hyper-V machine so that you can see the current properties of this adapter.
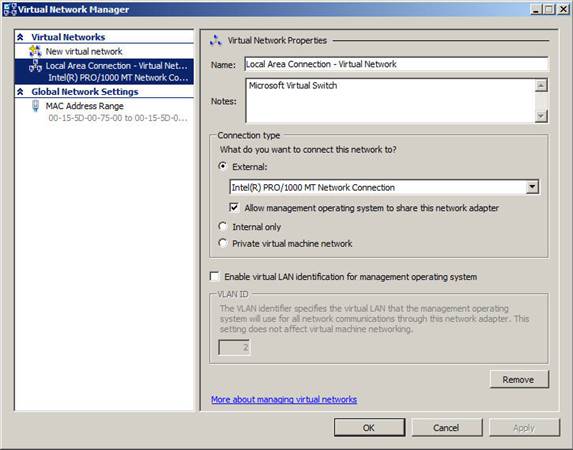
Figure 1: The Hyper-V Virtual Network Manager
Let’s run through the options that are at your disposal in the previous figure.
The Name and Notes fields are pretty self-explanatory. They provide you with a place to provide a descriptive name for the virtual switch as well as note about it.
In the Connection Type area, you will find three primary options from which to choose. There are three types of virtual networks from which to choose when you create a new virtual network. Every virtual network has to be one of these types.
- External. This kind of virtual network binds to a physical network adapter and allows virtual machines to communicate with systems on the physical network and the Internet, if routing to the Internet is in place.
o When the switch is of the external type, you need to choose which physical adapter to which the switch should be connected. From the drop down list, choose the associated physical network adapter. By default an external network switch is created for you.
o Allow management operating system to share this network adapter. This setting controls whether you can use the selected physical network adapter to access to the management operating system that is running on the Hyper-V host. By deselecting this option, you add a bit of additional security to your infrastructure as you’re effectively isolating the management operating system from communications between virtual machines and other computers on a physical network. On the downside, deselecting this option means that you cannot connect to the management operating system remotely through this physical network adapter. This makes it more difficult to manage the host.
- Internal. An internal virtual network allows communication only between virtual machines on that same virtual network and between virtual machines and the Hyper-V host. These are useful when you need to isolate a network from others. Here’s an example: I’m currently creating a Microsoft Forefront Threat Management Gateway 2010 course. All of my labs are built out on virtual machines, including the TMG 2010 server, the domain controller and my test desktops. Obviously, if I simply placed all of the lab machines on the external network so that they could all communicate with the Internet, I would not be able to test the functionality of Forefront TMG. So, I added two network adapters to the virtual TMG server – one connected to the external network and one connected to an internal network – and the other machines are all on the same internal network as the internal TMG adapter. By doing so, I can fully replicate a network wherein I have a real TMG server connected to real networks and adequately test all functionality.
- Private. A private network is similar to an internal one but does not allow communication between the Hyper-V host and the individual virtual machines on the private network. This adds an additional layer of security to both the Hyper-V host and the virtual machine.
At the bottom of the window, you’ll see the option labeled Enable virtual LAN identification for management operating systems. This option specifies a VLAN ID number so that you can use VLANs to isolate network traffic from the management operating system. This option works only when the physical network adapter in the Hyper-V host supports VLANs.
To remove a previously created virtual network, click the Remove button.
Creating a new virtual network
Most enterprise networks are pretty complex affairs. As such, particularly in larger environments, you may find it necessary to create additional virtual networks to support your organization’s needs. In the Figure below, you’ll notice that there are three virtual networks on this particular Hyper-V system.
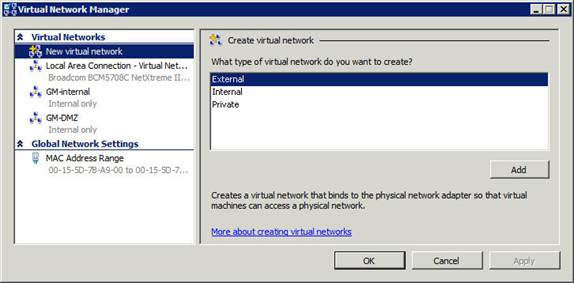
Figure 2: Create a new virtual network
To create a new virtual network, make sure that the New virtual network option is selected in the left-hand pane. Then, in the right-hand pane, select the type of virtual network you’d like to create and click the Add button. Refer to the previous section of this article for information about the different types of networks. Click the Add button once you’re made your selection.
That’s how easy it is to add a virtual network in Hyper-V.
Global Network Settings
In the Virtual Network Manager, you’ll also notice the Global Network Settings section under which exists the Mac Address Range setting. Every network adapter, virtual or physical, needs a Media Access Control (MAC) Layer 2 address in order to be able to appropriately function with Ethernet switches, which track computer locations in switch tables through the use of this address.
To change the MAC addresses that are distributed to virtual network adapters, choose the MAC Address Range setting, which opens the screen like the one shown below.
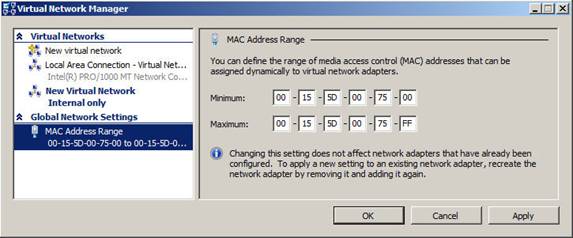
Figure 3: If desired, change the MAC address range
Once you have this window open, provide the new MAC address ranges that you’d like to use. Bear in mind that MAC addresses must be unique in your organization; so be careful about overlapping with existing ranges. It also helps to have a high level understanding of how MAC addresses are formed. In the Figure above, the first three boxes represent the identifier that Microsoft had to obtain for the purposes of Hyper-V. Every network adapter manufacturer has such an ID, which helps prevent overlap between addresses.
To change settings, provide new values and click OK. Note that any virtual adapters that have been created up to the point of the change will not get the modified settings. You will need to recreate network adapters if you need them to get the new settings.
Virtual machine network settings
The Hyper-V server side is only one-half of the overall networking configuration equation. You also have at your disposal settings on the virtual machine side as shown in Figure 4.
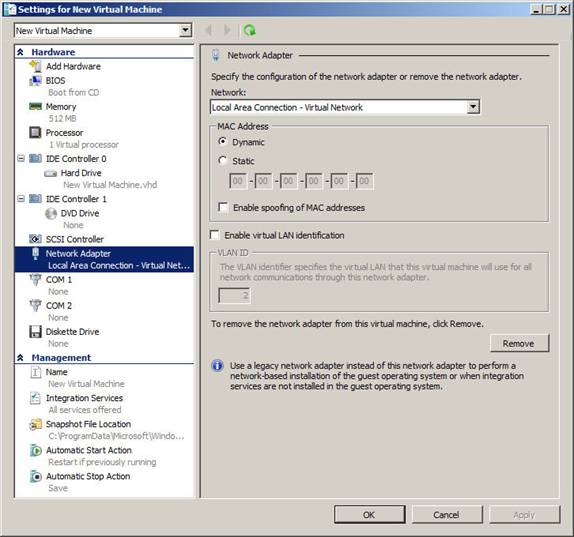
Figure 4: Virtual machine network settings
In most cases, you won’t have to make changes to the default settings, but in case you do, here is what the different options do for you.
- Network. Choose the virtual network to which this network adapter should be connected. Remember, if you choose a network connected to an internal or proviate network, the selected adapter can’t communicate directly with the Internet.
- MAC address.
o Dynamic. Let Hyper-V manage your MAC address.
o Static. Provide a MAC address that you specify.
- Enable spoofing of MAC addresses. In general, allowing the spoofing of any kind of address on the network is considered a security issue. However, in certain scenarios, such as when using Network Load Balancing or security products such as Unified Access Gateway, enabling this option allows a feature or product to operate as expected. This option allows the guest operating system to override the adapter’s MAC address.
- Enable virtual LAN identification. Allows a Hyper-V administrator to choose the VLAN on which this adapter will operate. When selected, make sure also to provide the right VLAN ID.
What is a legacy network adapter?
You’ll notice that we’ve looked at only one kind of network adapter so far. There is a second type of adapter available for additional to Hyper-V virtual machines: A legacy network adapter. A legacy network adapter is different from the default network adapter in a couple of key ways:
- It’s slower. The legacy network adapter runs in a different area of the host operating system than the default network adapter. Because of the location of which it runs, it’s slower than the default.
- It can do PXE boot. If you need your virtual machine to boot to a PXE server, the legacy network adapter is right for you.
- Drivers. The default network adapter begins working once you’ve installed the Integrated Components tools. These tools add a synthetic driver to enable the network adapter. The legacy network adapter emulates a well-supported hardware device that enjoys broad operating system driver support. The legacy network adapter is based on a DEC 21140 10/100 TX 100 MB Ethernet adapter.
- Limitations. Besides the fact that the legacy adapter is a bit slower than the default, also understand that the legacy adapter is not supported on the 64-bit versions of Windows Server 2003 and XP.
Other notes
There are some other limits to bear in mind when it comes to networking and Hyper-V. Here is an excerpt from Microsoft documentation regarding the maximum number of virtual network adapters that you can add to a Hyper-V virtual machine:
Maximum virtual network adapters: 12
- 8 can be the “network adapter” type. This type provides better performance and requires a virtual machine driver that is included in the integration services packages.
- 4 can be the “legacy network adapter” type. This type emulates a specific physical network adapter and supports the Pre-execution Boot Environment (PXE) to perform network-based installation of an operating system.
And, for some encouraging information, here are limit excerpts associated with the host side of the Hyper-V networking coin:
- Physical network adapters. No limits imposed by Hyper-V.
- Virtual networks (switches). No limits imposed by Hyper-V. The practical limit depends on the available computing resources.
- Virtual network switch ports per server. Varies; no limits imposed by Hyper-V. The practical limit depends on the available computing resources.
In other words, from the Hyper-V side, there are very few limits.
Summary
Virtual network management in Hyper-V isn’t too difficult once you’ve been able to decipher some of the nomenclature and understand the limits that are in place on both the Hyper-V Server and virtual machine fronts.


Great review of virtual switch setup. I am setting up my first Hyper-V server and using the external switch option gets the users in the network connected to the virtual server, but connectivity is spotty where the network loses communication and Internet will intermittently cut out. I also have issues with DNS. Do I also need to add an Internal switch to communicate between the host and the virtual server? I can’t really find a clear answer to that. Thanks!