If you would like to read the other parts in this article series please go to:
Introduction
So far we have a general idea of the Multi-Mailbox Search concept and the requirements related to permissions, how to create the Multi-Mailbox Search request and how to validate the default Discovery Mailbox. In Today’s article we will be performing our first search and analyze the results.
Performing a simple Mailbox Search request…
Let’s do a recap before performing our first Multi-Mailbox Search. Let’s say that the legal department has identified a possible leakage of information. We decided to create a mailbox called legal so that they can search for the words Project <something> and “top secret” using the steps that we validated in our previous article.
Bear in mind that Mailbox Search request creates a copy of the original message, and any changes performed at Discovery Mailbox level won’t update the original message.
For this first exercise I created a thread between two mailboxes using the words mentioned previously. Also in two different threads, I added some information from Wikipedia about Canada Day (for any special reason) on the initial message just to add more content, as shown in Figure 01.
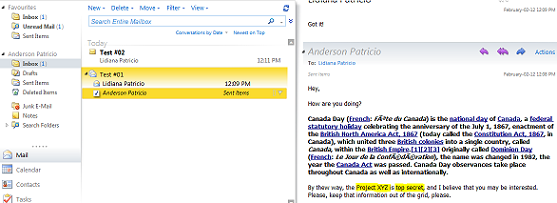
Figure 01: Regular messages however, have the keywords that will be used in the Discovery process
Let’s log on using legal credentials through Exchange Control Panel, and define the items we require for the initial search:
- Key words section: “Project*” AND “top secRet”. Note that I used the capital R on the word secret to make sure that it is not case sensitive.
- Mailboxes to Search: Let’s use Search All mailboxes (we are in a controlled environment)
- Search Name, Type and Storage: Search Name Case 001 – Project XYX, the results we selected Estimate the search results and also Send me an e-mail when the search is done.
After doing that, just click Save. In the main page, our Multi-Mailbox Search request will be listed and on the right-hand side (Figure 02), a summary of that specific search will be displayed. For starters, it gives you the number of items found, and the keywords by hits and mailboxes. Pretty cool, isn’t it?

Figure 02
We have configured the system to send a message, and we will be receiving a message with a summary of the operation containing more information than the entry that we have just seen at the Exchange Control Panel. We will have all mailboxes searched, estimated number of items, how long it took to complete, and Keyword hits summary with the number of hits and mailboxes, as shown in Figure 03.

Figure 03
It seems that we have hit the jackpot however, we can change the same Multi-Mailbox Search tasks to save the data for further analysis and it can be done very easily. Let’s select the search name Case 001 – Project XYX search and click Details, and let’s change to Copy the search results to the destination mailbox and click Browse. Then select the only mailbox that is being displayed which is Discovery Search mailbox. This Discovery Mailbox is created during Exchange Server 2010 deployment and by default there is just one for organization however, we can add and manage this type of mailboxes which we will be doing in this article series.
When we enable the option to copy the content to a discovery mailbox we have two additional options (Figure 04): Enable deduplication option which allows to have duplicate copy of the messages (if disabled); and Enable full logging which gives additional information on each item found and a .CSV file will be attached to the message in the Discovery Mailbox, then click Save and the Multi-Mailbox Search will start automatically.
Note:
Deduplication is a feature of Exchange Server 2010 SP1, if the Discovery Mailbox is not located on an Exchange Server 2010 SP1 or higher the capability won’t be used.

Figure 04
Now, we just need to wait for the Search to complete and we expect a similar summary like we had before however, this time we should have the Results for the Discovery Mailbox that we are using, and a link to open it, as shown in figure 05. Let’s click [open].
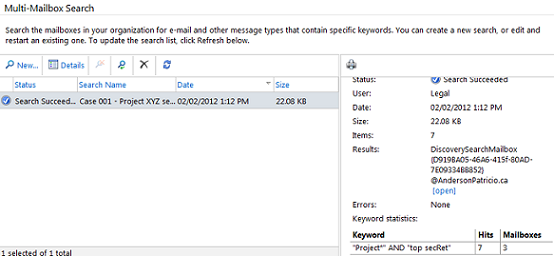
Figure 05
Now we are talking, we can notice that the Outlook Web App session that we are using is Discovery Search Mailbox (we covered why this happens in our previous article), and the most important thing for us is a folder containing the name of the Search that we have just created. Below we have a folder for each mailbox where information was found and if we go a little bit deeper we can see on which folders they were found (Figure 06).

Figure 06
Awesome! We have in a single view the Search and underneath a folder for each mailbox, and each folder inside of each mailbox where it was found. It can’t get better! Well, hold on as we have a couple of extra features in our sleeves:) The first one is the option Enable Full Logging which will provide a CSV within a zip file in the root of the folder that contains the Search Name. It will contain almost the same information that was received by e-mail and all fields used for the query. This information could be used for your compliance department to identify the criteria and the results in a log file.
Note:
If you cannot see the .zip file using Outlook you can in your Outlook Web App, make sure that you allow such extension in your Outlook client.
In figure 07 we can see the message left on the root of the folders and in Figure 08 we can see the content of the text file attached to the message.
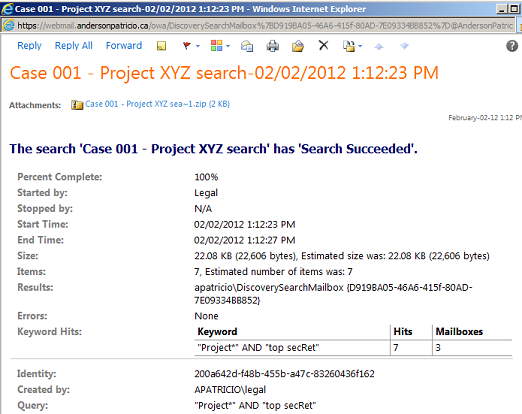
Figure 07

Figure 08
If a Mailbox Search request is deleted, a dialog box asking for confirmation will be prompted and as soon as the user hits Yes, the folder created by the same Mailbox Search Request will be removed from the Discovery Mailbox (Figure 09).

Figure 09
Analyzing the data and few hints to improve the Search experience…
There a couple of hints that can help the user performing Discovery Searches and save some time to find and track down information.
The first hint is to use Conversation View which gives a bird’s eye view of the thread. For example, in the scenario shown in Figure 10 the user replied and the original message is in the Inbox. That makes it easier to track down the information in a few clicks.
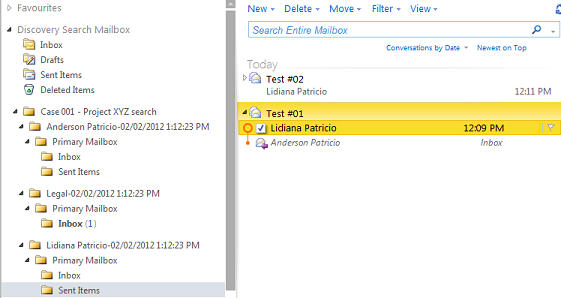
Figure 10
If you are using Exchange Server 2010 Service Pack 1 or higher, there is a nice feature called Annotation (Figure 11) which can be used on the messages listed in the main page or when the message is open. Basically, it opens a Message Annotation box where the information can be added for future review or for a different team to keep track what was analyzed in the process.

Figure 11
Since, we are using the annotation feature we can search the Discovery Search Mailbox using the content that we inserted previously. For example, looking for evidence yada, yada, yada as we wrote in the Annotation windows we can go back to the message that we analyzed before (Figure 12).
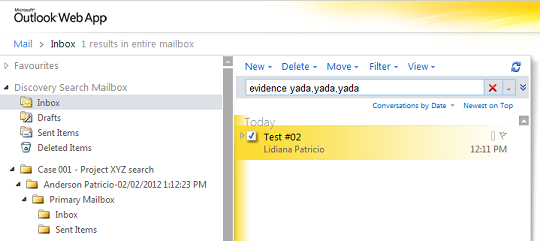
Figure 12
Conclusion
In this third article we completed a Multi-Mailbox Search request, analyzed the resultant data and went through one of the new features of Exchange Server 2010 SP1 which is the annotation feature.
If you would like to read the other parts in this article series please go to: