If you would like to read the other parts in this article series please go to:
- Managing Unified Messaging Auto Attendant (Part 2)
- Managing Unified Messaging Auto Attendant (Part 3)
- Managing Unified Messaging Auto Attendant (Part 4)
Introduction
Exchange Server 2007 introduced a new role called Unified Messaging (UM) which allows integration between the messaging system and telephone system. By using the UM role we can now receive fax, OVA (Outlook Voice Access), voice mails, etc. All the information like missed calls, voice mails, etc will now be stored in the mailbox store.
With these new capabilities Exchange Server 2007 is able to receive calls from internal or external sources and work on this incoming call playing voice prompts and recognizing voice commands or telephone keyboard (touchtone) input. This feature is known as Auto Attendant and we will see how, through Auto Attendant, we can use an Automatic Speech Recognition (ASR) interface or a touchtone. We can provide the company available resources such as departments, business hours, search an employee name in a specific address list and then redirect them to the right resource without using human resources to give them this information.
By default the auto attendant feature has a set of voice prompts that are said during the incoming calls however we can configure special greetings for Business and non-business hours, and informational messages; we can also define holiday prompts, allow users to transfer to an operator, place a call, leave a message, look up either the Global Address list, users in the same dial plan or specific Address List, create a customized menu prompt and create key mapping where the caller can say or type some information and the Auto Attendant will evaluate this information and take an action based on a set of pre-existent rules.
Note:
We will use square brackets to represent voice messages in this article []. When you see something like: [Hello World!] it is voice content.
I assume that you have configured all requirements related to Unified Messaging before creating the Auto Attendant, these requirements include: IP-PBX or VoIP gateway routing to Exchange Server or an OCS/Exchange 2007 integration; the Exchange setup has also been completed, such as: dial plan, IP gateway, hunt group, and the association of UM Server with a dial plan.
Recording the Voice Prompts to be used with UM Auto Attendant
First of all, find a person with a good voice in your company to record the greetings message. You can use any Audio Recorder that allows choosing the Audio Format, the requirements in order to record Exchange Server 2007 voice prompts are recording in WAV format and the following attributes: Linear PCM (16 bit/sample), 8 kilohertz (kHz) and .wav extension.
We are going to use the most common voice recorder: the sound recorder that comes with Windows XP and Windows 2003. In order to record the customized voice prompts follow these steps:
- Click on Start, Programs, Accessories, Entertainment.
- Click on Sound Recorder.
- Click on the Rec button to record and start speaking at the first Custom Voice Prompt.Click on the Stop button as soon as you finish the first prompt.
- Click on File menu, and then click on Properties.
- Click on Convert now…
- Configure the format and attributes for PCM, 8 kHz, 16 Bit, Mono (Figure 01) and click on OK.

Figure 01
- Now you can save your recorded voice prompt with an appropriate name to be used in the Auto Attendant.9.Repeat these steps for each prompt that you want to record.
Now, that we know the process to record the message we can start recording some initial Greetings and Main menu prompts to customize our Auto Attendant, the following table shows the available greetings in Auto Attendant and the default example used by Exchange Server 2007. The third and fourth columns have some examples of customized prompts that can be recorded and the file name that we are going to use in this article. You can use this table to define the file names and text that will be used in your environment.
|
Greeting |
Default example |
Customized Prompts |
File Name |
|
Business hours greeting |
“Welcome to the Exchange auto attendant.” |
[Welcome to CompanyName.] |
MainAA_Greeting_business.wav |
|
Non-business hours greeting |
– |
[Thank you for calling CompanyName |
MainAA_Greeting_non-business.wav |
|
Informational announcement |
– |
[To continue using this Auto Attendant you must be aware of our internal security rule SEC-171] |
MainAA_Greeting_informational.wav |
|
Business hours main menu prompt |
– |
[You can use the following options: For the Sales Department, press 1 or just say Sales. For the Support Department, press 2 or just say Support. For information about business hours and locations, press 3 or just say business hours and locations. If you know your party’s name, just say it.] |
MainAA_Greeting_mainbusiness.wav |
|
Non-business hours main menu prompt |
– |
[You can use the following options: For 24×7 support, press 1 or just say support. For information about business hours and locations, press 3 or just say business hours and locations.] |
MainAA_Greeting_mainNonbusiness.wav |
Table 1
This table above is only to get the general idea, be aware that you can create and probably you will need more personalized voice prompts to customize your Auto Attendant deployment.
Okay, now we have our customized prompts in .wav files. Let’s put all those files in a local directory called C:\RecordedVoicePrompts in our UM Server. Our next step is to create an UM Auto Attendant pilot to validate the UM Auto Attendant and then start working on the customization of some of the features.
Creating a Unified Messaging Auto Attendant
After recording the voice prompts that will be used by our first UM Auto Attendant, we can create our first UM Auto Attendant:
- Open the Exchange Management Console.
- Expand Organization Configuration.
- Click on Unified Messaging.
- Click on the UM Auto Attendants tab.
- In the Toolbox Actions click on New UM Auto Attendant…
- B>New UM Auto Attendant
. This wizard defines (Figure 02) the UM Auto Attendant name and extension numbers which callers will use to reach the UM Auto Attendant. We also have two options at the bottom of the wizard: the first one (Create auto attendant as enabled) is self explanatory and the second option (Create auto attendant as speech-enabled) will allow the UM Auto Attendant to receive voice commands from the callers to improve the user experience. By default a UM Auto Attendant is not created as speech-enabled, this means we can only use the touchtone to interact with the UM Auto Attendant.
Note: We have a limit of 16 extension numbers per UM Auto Attendant.
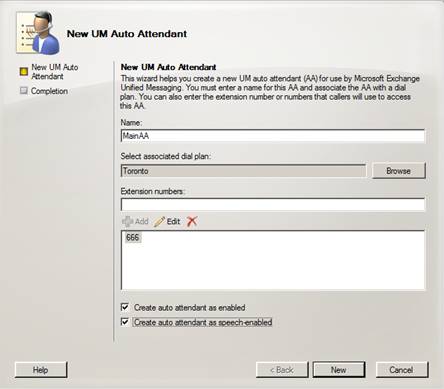
Figure 02
- Completion. Final screen of the UM Auto Attendant wizard, just click on Finish. (Figure 03)
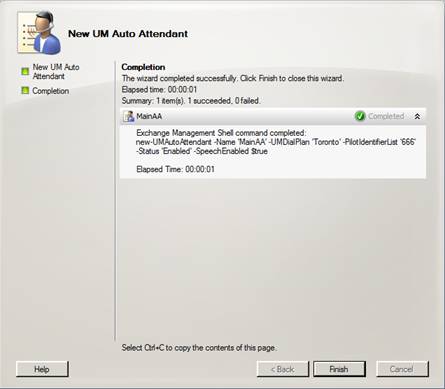
Figure 03
We can also create UM Auto Attendant using Exchange Management Shell. The cmdlet to be used is New-UMAutoAttendant, and it can be used in the following way:
New-UMAutoAttendant –Name <UM Auto Attendant name> -UMDialPlan <an existent Dial Plan> -PilotIdentifierList <Extensions number, If more than one number is required just add comma between them) – SpeechEnabled <$True or $False>
Conclusion
In this first article we saw a high overview of the UM Auto Attendant feature, how to record our personalized voice prompts and how to create an Auto Attendant.
In the next article we will configure UM Auto Attendant to increase the caller experience using Exchange Server 2007 Unified Messaging.
If you would like to read the other parts in this article series please go to:


