Back to Mark Fugatt’s section
Back to the ‘Learning Zone‘
One of the big problems that Exchange Administrators have is controlling the size of user’s mailboxes. Well never fear help is at hand; with a few simple steps you can have a lot more control.
The first thing you will need to consider is, what is an acceptable size for a user’s mailbox? The only person who knows what this should be is you; every organization will have a different need. For example, a company who really only sends out simple text message will have a relatively small mailbox limit, whereas a firm of architects who send large drawings to each other will have a large mailbox size.
So, once we have decided what a practical size would be for the user’s mailboxes, we can now set these limits. It is possible with Exchange to set these limits on a user by user basis, we can use a policy to set them for a complete mailbox store or we can have a policy that applies to a particular server.
We are going to start looking at how to set them for an individual mailbox.
1. Open Active Directory Users and Computers.
2. Right click on the user who you would like to set a mailbox limit.
3. Select Properties from the menu.
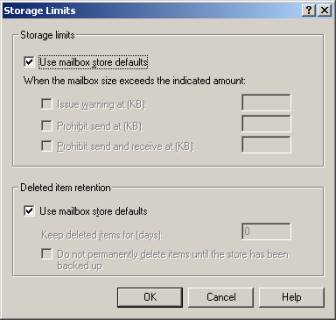
Figure 1
4. Select the Exchange General tab and then pick the Storage Limits button, you will now be presented with the dialogue box shown in Figure 1.
You will notice that the default set is to Use mailbox store default, so if we want to set a limit for this user only we must clear this checkbox.
The three options that are available to use are:
Issue Warning | The user will still be able to send and receive mail, but they will receive a system generated warning message. |
Prohibit Send | The user will no longer be able to send emails, but will continue to receive mail addressed to them. |
Prohibit Send and Receive | The users will no longer be able to send or receive emails. |
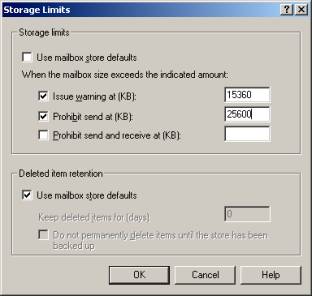
Figure 2
We are going to give our user a warning when their mailbox gets to 15Mb and then stop them from sending mail when they reach 25Mb, so we will configure it as shown in Figure 2. Remember the sizes we enter into the dialog box are in KB (1024Kb = 1Mb).
So, we have now set the limits for this user. Imagine having to do that for 1000 users, well as I said in my intro we have a number of other options open to us when it comes to setting mailbox limits.
Let’s say we want to apply a limit to all users who have a mailbox in a particular store, this is quite a simple tasks.
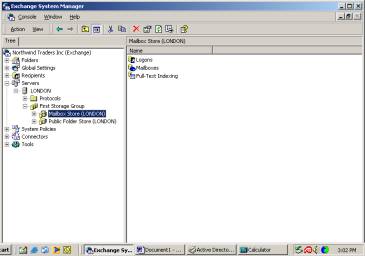
Figure 3
1. Open the Exchange System Manager
2. Locate the Mailbox store that you would like to apply the limits to (Figure 3).
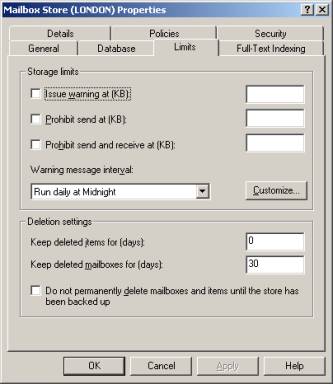
Figure 4
3. Right click and select Properties. Select the Limits tab and you will see the dialogue box shown in Figure 4.
Notice that the options here are very similar to the options that we saw on the individual user’s mailbox, but we also have an option to specify when the user will receive the notification messages.

Figure 5
By default the notification messages will be generated at midnight each day, we can customize this to meet our own needs. We can either select a predefined time from the drop down list or click on the Customize button to set our own schedule (Figure 5). Be aware that setting the schedule to occur too frequently will degrade your server performance as it has to check each user’s mailbox against the limits you have set.
Now let’s suppose you have 10 Mailbox stores spread across 5 Exchange servers and you want to enforce a consistent limit across all of these stores. What we need to do is create a Mailbox Store policy. However, before we can create a Mailbox Store Policy we need to have a System Policy Container.
To create a System Policy Container we need to select an Administrative Group and by default these are not displayed in the Exchange System Manager. To display the Administrative Groups:

Figure 6
1. Open the Exchange System Manager.
2. Right click over your organizations name and choose Properties from the menu.
3. Select the Display administrative groups checkbox as shown in Figure 6.
When you return to the Exchange Systems Manager you will now be able to see the Administrative groups listed.
1. Expand the Administrative Groups and locate your administrative group, in many installations, the only Administrative Group available will be the default one (First Administrative Group).
2. Right click over the Administrative Group and select New > System Policy Container.

Figure 7
You should now see a System Policy Container as shown in Figure 7.
1. Right click over the System Policies container, select New > Mailbox Store Policy.
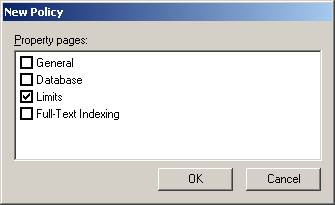
Figure 8
The dialog box shown in Figure 8 will be displayed. We are going to be creating a policy that applies to mailbox limits so:
1. Select the Limits check box only.

Figure 9
2. The Properties dialog box for our policy will now be displayed, so the first thing we need to do is give the policy a meaningful name (Figure 9).
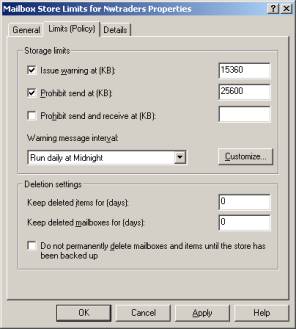
Figure 10
3. Now select the Limits (Policy) tab and enter the limits that you would like to set (Figure 10)
4. Click OK to return to the Exchange System Manager. You should now notice the existence of your new policy.
Once we have created the policy we must now tell Exchange what to apply it to.
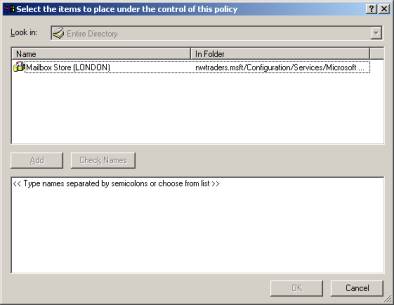
Figure 11
1. Right click over the policy that we just created and select Add Mailbox Store. The dialogue box shown in Figure 11 will now be displayed.
We can now select the Mailbox stores that we want this policy to be applied to.
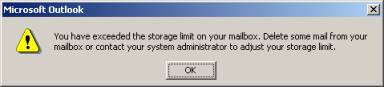
Here are some examples of the messages that users receive when they reach these limits (these cannot be customized).
Your mailbox has exceeded one or more size limits set by your administrator.
Your mailbox size is 1175 KB.
Mailbox size limits:
You will receive a warning when your mailbox reaches 1024 KB. You may not be able to send or receive new mail until you reduce your mailbox size.
To make more space available, delete any items that you are no longer using or move them to your personal folder file (.pst).
Items in all of your mailbox folders including the Deleted Items and Sent Items folders count against your size limit.
You must empty the Deleted Items folder after deleting items or the space will not be freed.
See client Help for more information.
When they reach the Prohibit Send limit:
What we shall cover in the next article is how to use the Exchange Mailbox Manager to clean out user’s mailboxes.


