Innovation is the name of the game, and Microsoft undoubtedly knows how to make the most of it. The COVID pandemic has moved a good part of life online, including work and entertainment, and this has led to a paradigm shift in connectivity and productivity. Since a bulk of office work, if not all, is done online, it’s become important to empower workers with tools that would enhance their productivity. Some companies like Microsoft were able to foresee this trend and come up with new products and services that would support this transition. Thus was born Microsoft 365 Office Delve, a unique user experience in Microsoft 365 that displays relevant content to users.

What’s Microsoft 365 Office Delve?
On March 16, 2015, Microsoft’s CEO Satya Nadella made the first announcement about Microsoft 365 Office Delve at Convergence 2015, Microsoft’s annual conference for its business customers.
In this announcement, Nadella brought up the need for advanced products and services that would empower users with machine learning and predictive analysis to make more sense of the available data, so they could leverage it to make better decisions.

Nadella talked about a slew of tools and services, and Microsoft 365 Office Delve was one of them.
This tool was designed to make it easy for users to find documents, connections, conversations, and other data related to the content being typed and viewed on Microsoft 365 products, including Exchange Online and Yammer. The idea behind Microsoft Office 365 Delve is to give users a comprehensive view of all available content related to a context or situation so that they can make better sense of the context and future steps.
Using Microsoft Office 365 Delve
Next, we’ll talk about using Microsoft Office 365 Delve. To access it:
- Go to delve.office.com and sign in if required with your credentials. Be aware that the Office Delve for Windows 10 standalone app is no longer supported and has been removed from the Windows Store. You can still, however, use the web version.
- The dashboard will display relevant content such as the minutes of the last meeting, an Excel doc with goals for this quarter, and more.
- On the left-hand side, you can see your team members. Click on their profiles to see what they’re working on, including the associated documents. You can even know more about them and their role in your team/organization
- You can add documents to your favorites list or board, so you can read through them later
- Microsoft Office 365 Delve makes it easy to search for anything — people, documents, specific content, and more.
Let’s now take a deep dive to know more about doing specific actions on Delve.
Navigating Microsoft Office 365 Delve
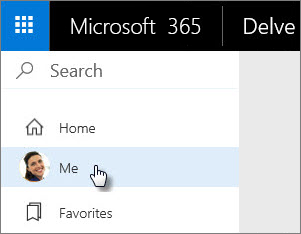
Click on the four blue dots on the left-hand top corner of the page and choose “home” to view personalized updates and to get an idea of what others in your organization are working on. This homepage also shares new documents that you may like based on your role and past viewing behavior.
Microsoft Office 365 Delve uses advanced algorithms to determine what would interest you the most and displays documents accordingly. The same principle is applied in all your searches too. What could be most relevant for you is displayed first.
To navigate to your profile, click the “Me” option below the home. Click the “Favorites” option below it to view your favorite documents.
An option called “Get back to your recent documents” takes you to the documents you’ve been viewing or editing and are stored in OneDrive or SharePoint.
You can also see the profiles of others and what they are working on. To do this, click a person’s name on your homepage or use the search box to find them.
Overall, the interface is intuitive and user-friendly, so working your way around it should be easy.
Store documents for collaboration
Delve is powered by content, so you must keep your documents in a shared drive or folder that your colleagues can access. This will ensure that the contents of the shared drive are indexed to provide a better context for your colleagues.
You have two options here — put in OneDrive and share the access or use Microsoft 365 SharePoint.
Note that your colleagues can only see the documents kept in the shared folder or when you choose to share them. This means, not all documents stored on OneDrive are accessible to everyone, so feel free to store your private documents on it as well.
Use boards to group/view documents
A key feature of Delve is, you can create boards to group or share your documents for a better experience. You can even add some documents to your Favorites or bookmark them for viewing later.
These boards are open to everyone in the organization, so watch out for what documents your share.
As a user, you can access the documents on other boards too. If you don’t have access to a particular document, that won’t be visible at all for you on the board.
So, what happens when you create a board and upload documents for only a few people? Can others see these documents?
No, they can’t. All that they will see is an empty board, so you have granular control over who sees your documents.
Let’s now see how you can create boards and use them.
Create a board
Open the card you want to add to the board, look for a board icon at the bottom left, and click on it. This will open a dialog box.
Look for a textbox called “Add to board” and start typing the name of the board. If it’s already existing, the board will come up as you type, and you can choose the one you want. On the other hand, if you want to create a new board, continue to enter the board name, and a new one will be automatically created for you.
Note that you can’t add attachments to a board and, for that matter, can’t search for email attachments in Delve.
Access a board from your favorites
To add a board to your favorites, click the “Add to Favorites” link you see at the top of the board.
To access this board at a later time, do any of these actions.
- Click “Favorites” on the left-hand pane.
- Look for a board icon on the bottom left-hand corner on a content card. When you click it, a box will open. Type the board name to access that board.
- Click the “Boards” option in the left-hand pane. Start typing the board name and click the one you want.
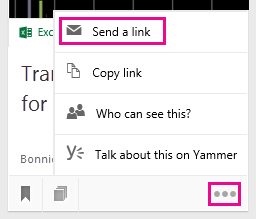
Share a board
To share with others, simply send the link to the board by email or IM. Look for an option called “Send a link” at the top of the board and click it. You can enter an email address directly to send it to the concerned person.
Alternatively, grant or share access directly from the board. Look for an option called “Who can see this?” below the “Send a link” option. Click that to grant access.
Delete documents from a board
To delete a document from a board:
- Click the board icon on the left-hand bottom left of a document.
- A dialog box opens and on it, look for the “X” symbol.
- Click that symbol to remove the document from the board.
Note that at the time of writing this piece, there’s no functionality to delete or rename a board. The workaround is to remove all the documents from it, so there’s no need for anyone to access this board.
How useful is Microsoft Office 365 Delve?
Microsoft Office 365 Delve is a handy tool to create a “social connection” with others in your team or organization. Since each individual has a unique profile page, you can visit it to know more about them and their role in your organization. This helps to create a personal touch in today’s remote working environment.
Also, Microsoft Office 365 Delve gives you a complete picture of what’s happening in your organization as you can view the different documents created and modified by others through a single pane. So, there’s no more searching through hundreds of documents to find what you want.
Overall, this is a good platform to connect with your coworkers and to enhance your productivity.
Have you tried it? What do you like/don’t like about it? Share your thoughts in the comments section.
Featured image: Shutterstock