Many companies still using Exchange Server are thinking of moving to Microsoft Office 365, now known as Microsoft 365, has been around for several years. In different IT departments, it is referred to as O365, 365, Office 365, or Microsoft 365. Microsoft 365, among other things, is email in the cloud that is hosted and managed by Microsoft. With Exchange 2010 support ending in October 2020, many companies have fast-tracked their migrations to Microsoft 365. This sounds great, but moving to Microsoft 365 from your on-premises Exchange —Exchange 2010, Exchange 2013, Exchange 2016, or Exchange 2019 — can be daunting. To get this ball rolling, you first need to create a tenant on Microsoft 365. A tenant is your company’s unique identifier with Microsoft.
Microsoft 365 tenant: Setting it up
Setting up a Microsoft 365 tenant is not difficult. Fortunately, Microsoft makes the process relatively easy to understand and you can set up a trial tenant if you want to test things out first and get familiar with it. To start with this process, head over to the Office 365 Trial Tenant, which can be found here.
Here is what the page looks like:
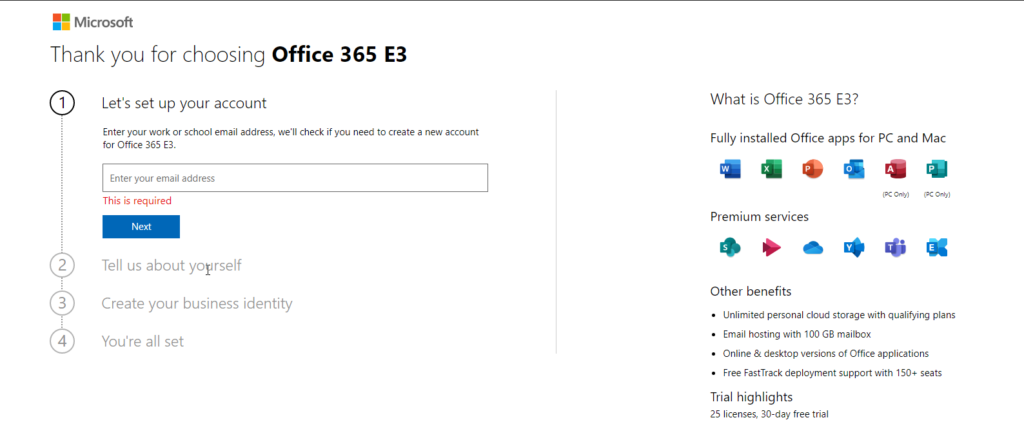
Step 1 asks you to enter in your email address; if it does not find it, then you need to create an account which will take you to step 2.
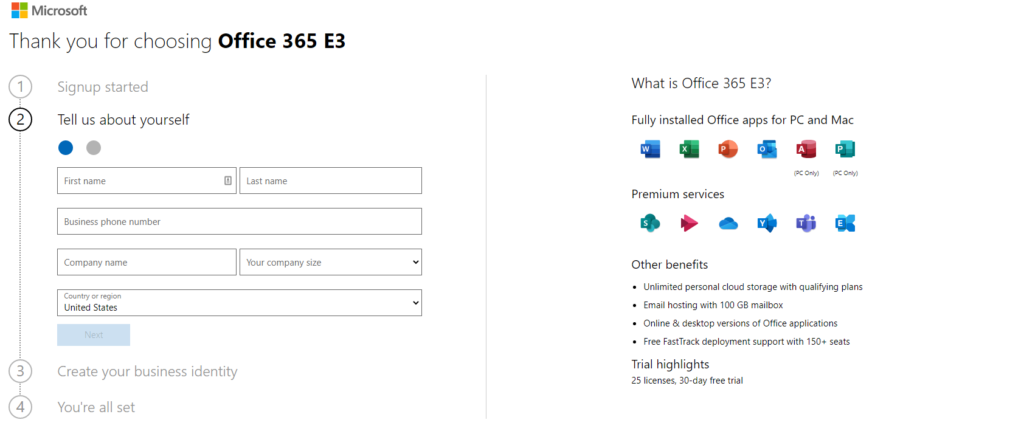
Next, you need to fill in the following details:
- First name
- Last name
- Phone number
- Company name
- Select the company size
- Select your country and then click Next
Once that has been filled in you will be asked to verify the phone number and you can do so by clicking the “Send Verification Code” blue button as shown below. (Take note that the number below is just for illustration purposes.):

Setting up your company’s domain
Once you have entered the code to verify that you are not a robot, you will be asked to set up your company’s domain, something like thexchangelab.com. Enter in the details as shown below to check if it is available:

In this example shown above, my domain thexchangelab.com is already used in Office 365, but I just enter a “za” at the end. Now click the Next button to move to the second part, and this is where you will create a user ID and password, as shown below:

Once you click “sign up,” the middle of the screen will say that the account is being created and you should not refresh the page until it takes you to the last part. When the page appears, you can…
- Go to Setup
- Manage your subscription

Click on the “Go to Setup” blue button, and a new tab will open, and this will take you to the home page of portal.office.com, where you can now perform some of the following functions, just to mention a few:
- Create users
- Create groups
- Manage resources
- Check billing
- Log a support ticket or view your tickets
- Settings: This is where you can specify additional domains, org settings, etc.
- Create reports
- View the health of Office 365 as any outage or problem will show on the message center
- Access the admin centers

If you go back to page one, you can now click on “Manage your subscription,” and a new page will open showing you the following:
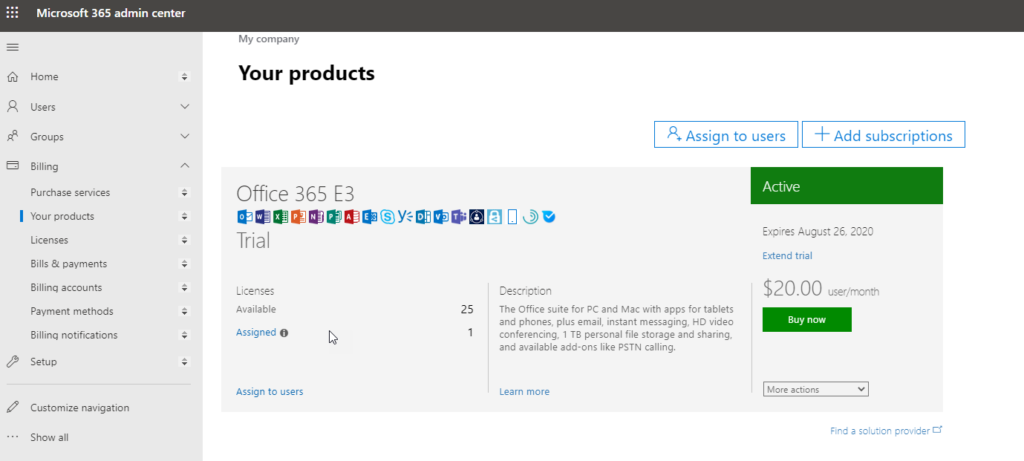
As you can see above, you have 25 licenses (Office 365 E3) licenses to play around with, and you can see that the trial is “Active.” Most companies I have done migrations for like to fiddle around in the portal to get used to how Office 365 works and to set up user accounts and download the Office Package that comes with the E3 license.
Extending your Microsoft 365 trial
Did you know that you are able to extend your Microsoft 365 trial by another 30 days? If your company needs more time, you can do this by expanding Billing, then clicking on “Your Products,” and in the middle, you have the option to “Extend Trial.”

If your company decides not to move ahead with this, you can click “Cancel Subscription” on the far right under Settings & Actions at any time.
If, however, you now want to move off a trial to the full-blown version of Microsoft 365, you can then click “Purchase Subscription” on the same page as shown above under Licenses. Once you do that, a bar will appear in the middle of the screen while it loads the page to complete the order. You will see a similar screen, as shown below:

You need to enter the following:
- Company
- City
- State
- Zip code
- Telephone number
Click next when done with this page, on the next page you will be asked for the number of users you want to purchase E3 licenses for. An example is shown below:
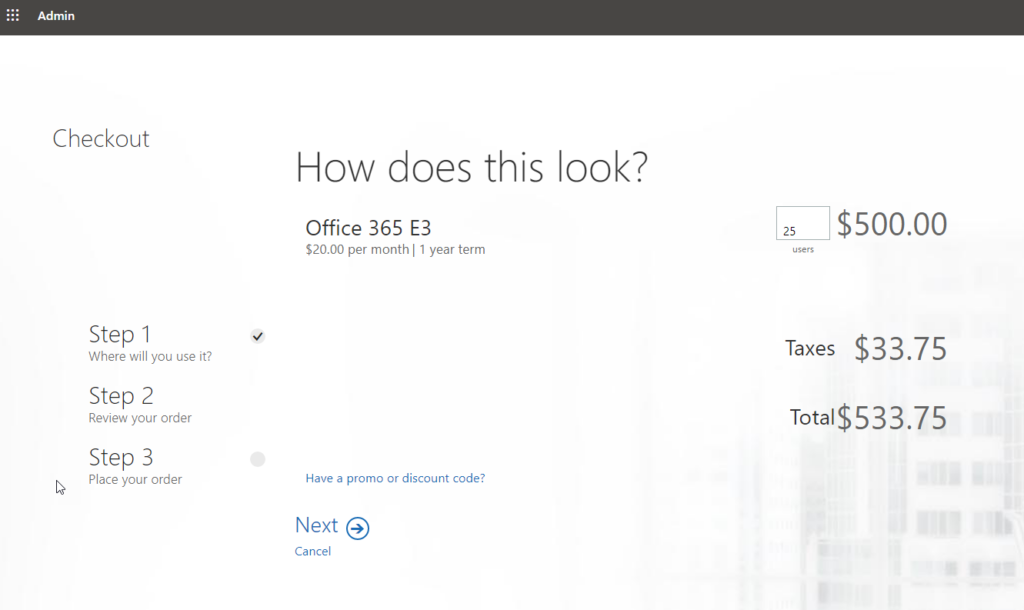
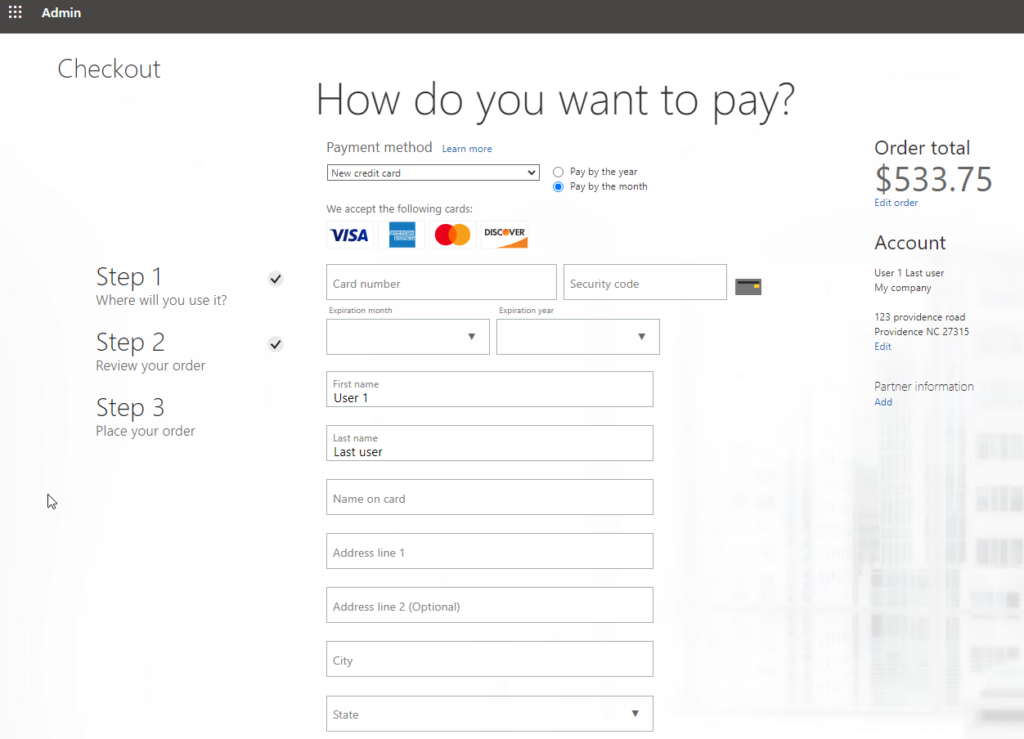
If you are happy with the amount or have a promo code you can enter, click Next to continue. Lastly, you will be asked how you want to pay for your order; this can be with a credit card or bank account, and you can also choose if you want to pay monthly or yearly. Once you have completed all the information, you can then click Place Order and your subscription will be updated to the paid one.
As you can see, setting up a trial tenant of Microsoft 365 is not difficult, and best of all you have the ability to make use of the full suite while on trial.
Featured image: Shutterstock / TechGenix photo-illustration