
Source: geralt on Pixabay
So, you’re interested in running PowerShell, but you’d like to do so on a Linux system. You might think this isn’t possible because PowerShell is only compatible with Windows systems. Indeed, PowerShell is most commonly associated with Windows, but you have a solution in the form of something called PowerShell Core. This is an open-source version of PowerShell that you can use in cross-platform environments, including macOS and Linux.
Interested in learning more? In this article, I’ll go over everything you need to know to start using PowerShell Core on a Linux virtual machine (VM). Before delving deeper, let me briefly review a few things you need to consider regarding package versions.
What You Need to Know About Package Versions
At one time, installing PowerShell onto a Linux machine meant that you needed to match the Linux distribution and the build number to the package repository. For instance, let’s say you were running Ubuntu 22.04. You’d have to download and install the package specifically for Ubuntu 22.04.
Thankfully, Microsoft has made things a little bit easier by introducing universal packages. You still have to use a suitable package for your Linux distribution, but you no longer have to match this package to the Linux version you’re running.
In this article, I’ll install PowerShell Core on the Linux distribution known as Ubuntu. That being the case, I’ll need to use a universal package designed for use with Ubuntu. It’s important to note that the version of Ubuntu no longer matters.
Ok, let’s go ahead and get started with installing PowerShell Core on Ubuntu.
How to Install PowerShell Core on Ubuntu
You have several options to consider when installing PowerShell Core onto a machine running Ubuntu. The most commonly used method involves downloading a package file and then telling the operating system to install it.
Of course, if you’re going to deploy PowerShell from a package, you need to know where to get that package. You can find this out here. As Microsoft releases new versions of PowerShell, you’ll need to keep checking that link for those new releases. If you’re interested, Microsoft lists PowerShell URLs here.
Now, without further ado, here’s a guide on how to install PowerShell Core on Ubuntu.
Step 1: Downloading a Package
To begin, you’ll need to download a PowerShell package. To download a PowerShell package to Ubuntu, you’ll need to use the following command:
Wget -q <URL and package name>
In the case of downloading PowerShell 7.2.6, you can use the following command:
Wget -q https://github.com/PowerShell/PowerShell/releases/download/v7.2.6/powershell-lts_7.2.6-1.deb_amd64.deb
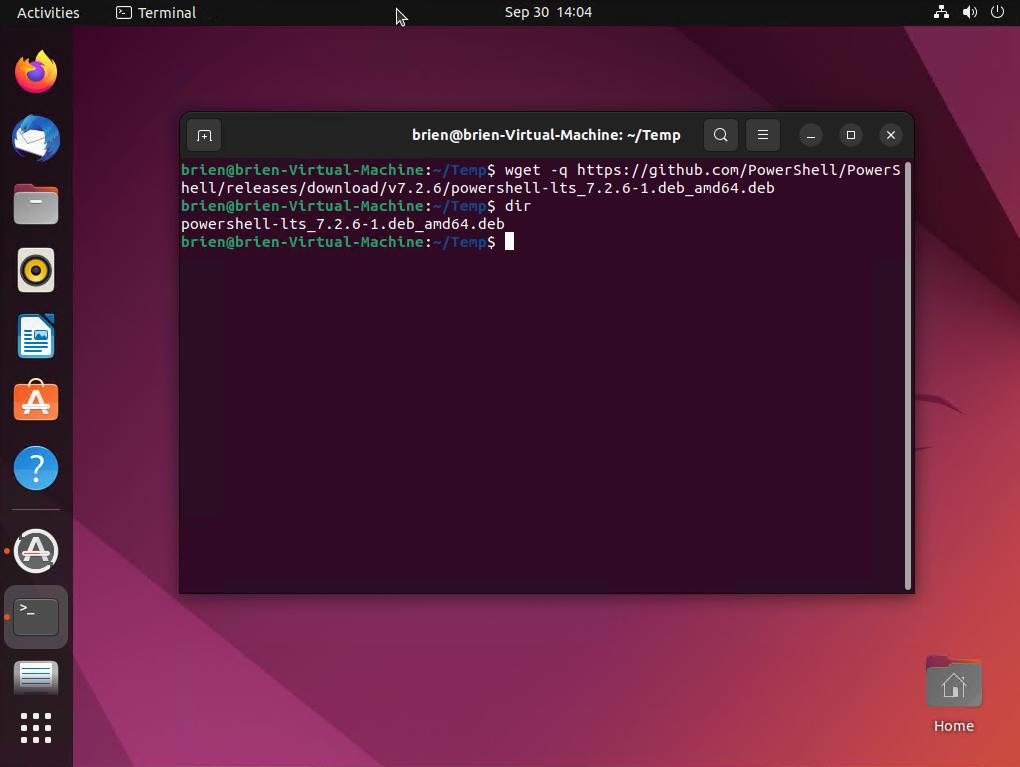
From the screenshot below, you can see that I’ve created a folder named “temp” and then navigated to that folder before initiating the download. You don’t necessarily have to do this. I just created a temporary folder to make the process less messy overall. If you want to create and use a temp folder, then just enter these commands:
Mkdir Temp
CD Temp
The screenshot below shows the command that I used to download the package. You can see that when I finished, I used the “Dir” command to confirm that the package was indeed downloaded. I did this because if you mistype the URL, you likely won’t receive an error message. Ubuntu simply won’t download the file. As such, it’s always a good idea to verify the download’s success.
Step 2: Unpackaging PowerShell
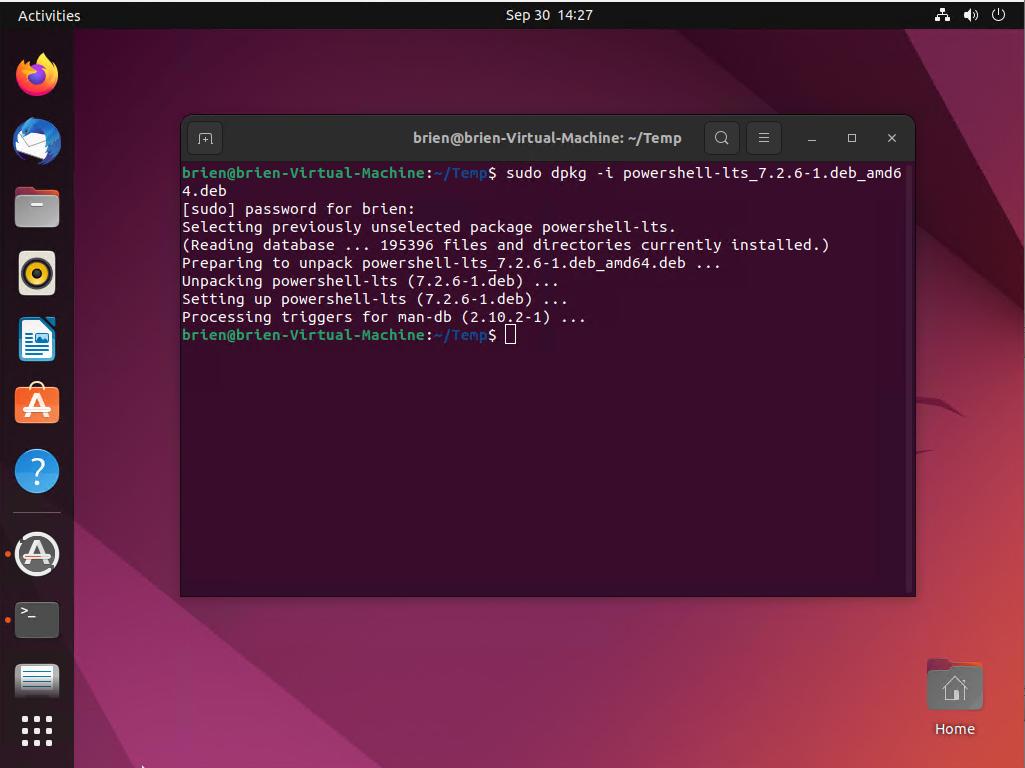
Once you’ve downloaded PowerShell, the next step is to unpack the package file that you just downloaded. Once again, the command will vary by PowerShell version. In the case of PowerShell 7.2.6, the command is:
Sudo dpkg -I powershell-lts_7.2.6-1.deb_amd64.deb
I included a screenshot below for you to use as a point of reference should you need it.
Step 3: Finalizing the Installation Process
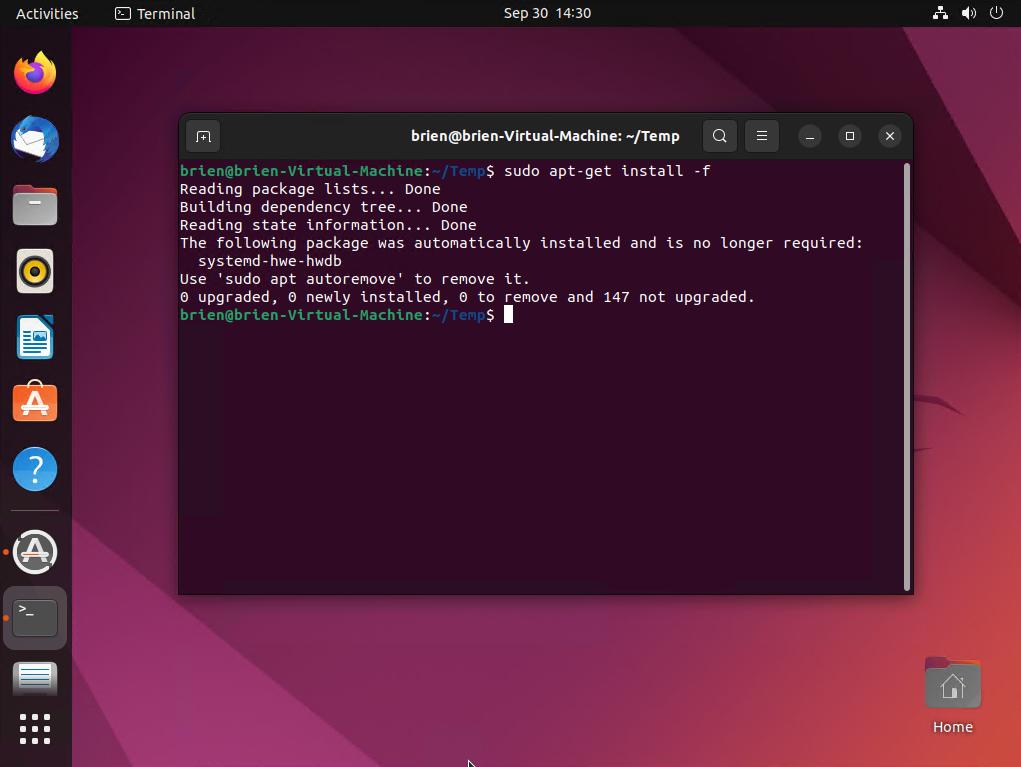
The last step in the PowerShell deployment process is to take care of any missing dependencies and complete the PowerShell installation process. This step isn’t always required, but it’s a good idea to perform it anyway, just in case you missed anything. You won’t cause any harm by running this command unnecessarily. Here’s the command used to complete the deployment process and check for any missing dependencies:
Sudo apt -get install -f
Again, feel free to refer to the screenshot below if you require a visual aid.
So, you just installed PowerShell onto a Linux system running Ubuntu, but how can you access it? The next section contains the answer!
Accessing PowerShell
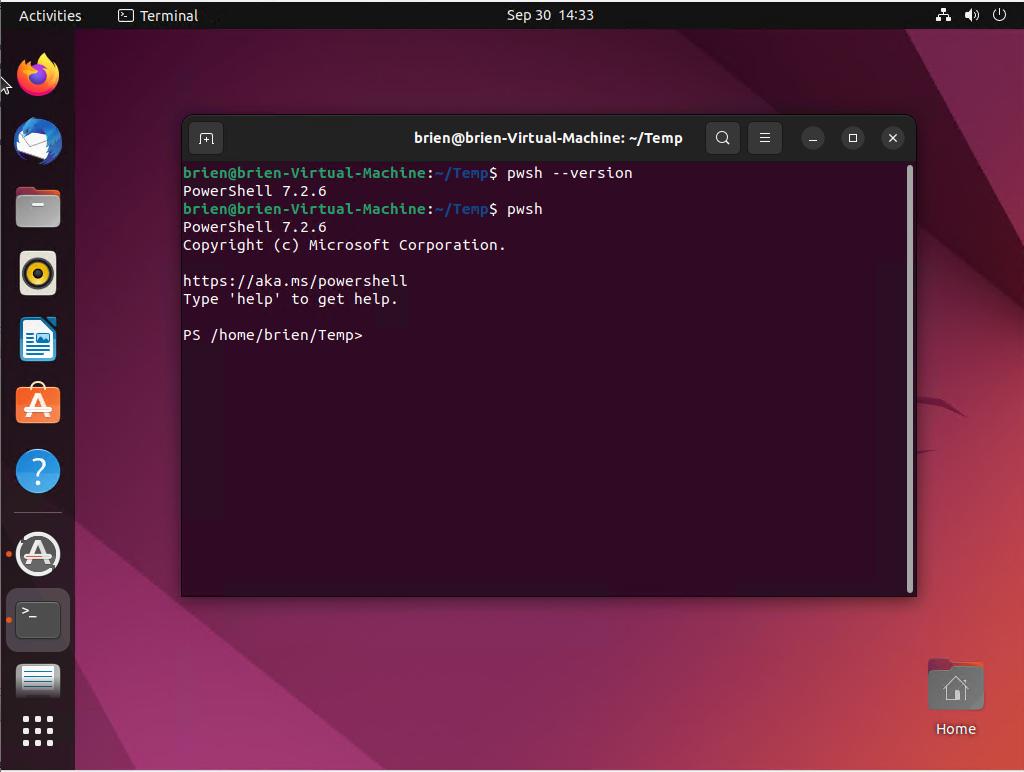
Now that you’ve installed PowerShell, you can begin to use it. The command used to launch PowerShell is “pwsh”. However, you can also use this same command to check your PowerShell version. All you have to do is include “–version” after the “pwsh” command. You can see examples of both of these commands in the screenshot below.
And that’s about it! It’s a simple process, wouldn’t you say? One thing I’d like to cover before wrapping up is how PowerShell Core differs from PowerShell itself. Let’s find out in the next section.
How Does PowerShell Core Differ from PowerShell?
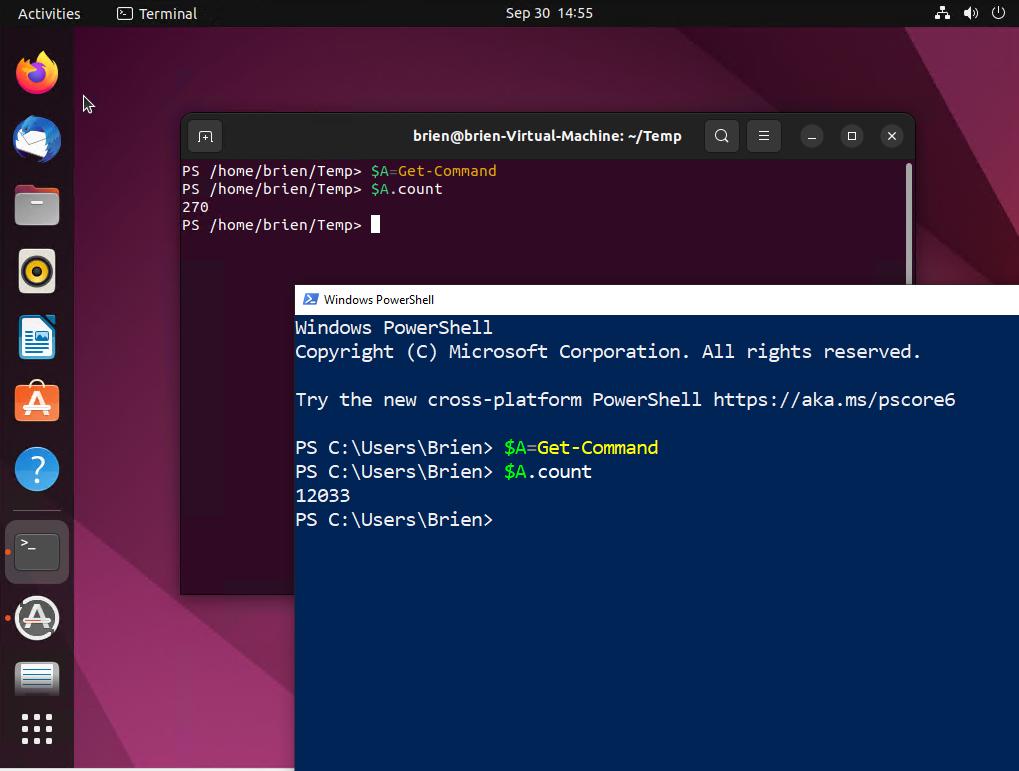
As mentioned, the cross-platform version of PowerShell is commonly referred to as PowerShell Core. The main difference between it and Windows PowerShell is that PowerShell Core supports fewer cmdlets. You can check to see the number of cmdlets supported by entering these commands:
$A=Get-Command
$A.count
The number of cmdlets that PowerShell recognizes in Windows will vary widely based on your Windows version and the features and modules installed. However, my Windows 10 PC reported just over 12,000 cmdlets available. In contrast, PowerShell Core running on my Ubuntu VM reported a mere 270 cmdlets.
Ok, now let’s have a quick recap of everything you’ve learned.
The Bottom Line
While PowerShell is commonly associated with Windows systems, you do have solutions out there if you’d like to use PowerShell on other platforms. PowerShell Core is one of these solutions.
Thanks to its cross-platform capabilities, you can run it on several environments, such as Linux and macOS. This article explained the process of deploying PowerShell on a Linux virtual machine.
It’s important to remember that PowerShell Core doesn’t include nearly as many cmdlets as Windows PowerShell. Even so, you can still use the nearly 300 available cmdlets of PowerShell Core to create sophisticated scripts that can work in cross-platform environments.
Do you have more questions about PowerShell Core? Check out the FAQ and Resources sections below!
FAQ
Where can I find information about installing PowerShell on Linux distributions other than Ubuntu?
Microsoft provides documentation for installing PowerShell on Alpine, Debian, Raspberry PI OS, RHEL, and Ubuntu. You can find out more here.
How can I find the specific cmdlets available in PowerShell Core running on Linux?
From within PowerShell, simply type “Get-Command”. PowerShell will display a list of the available cmdlets.
Is PowerShell Core extensible?
Yes, you can use modules to add additional cmdlets to PowerShell Core. You can use the Get-Module cmdlet to see the modules currently installed. You can also add additional modules by downloading them and then using the Import-Module cmdlet to load the module into PowerShell.
Because PowerShell Core supports a small number of cmdlets, what is the advantage of using it?
PowerShell Core includes much of the same functionality as Windows PowerShell. True, thousands of cmdlets are missing, but these cmdlets largely pertain to managing the Windows operating system. You can find the cmdlets used for general purpose scripting included with PowerShell Core. The main advantage to using PowerShell Core is that it allows you to develop PowerShell scripts that can work on several platforms.
What are the significant architectural differences between PowerShell and PowerShell Core?
The main architectural difference between PowerShell and PowerShell Core is that while PowerShell only runs on Windows, PowerShell Core can run on Windows, macOS, and Linux. At a more foundational level, the biggest difference between the two is that PowerShell depends on the .NET Framework, while PowerShell Core uses the .NET Core runtime.
Resources
TechGenix: Article on Using PowerShell and Linux Shell Bash to Read Text Files
Discover how to read text files with PowerShell and Linux Bash shell.
TechGenix: Article on Installing PowerShell on a Linux VM Running on Azure
Read more on how to install PowerShell on a Linux VM running on Azure.
TechGenix: Article on How to Create a Linux VM
Find out how to create a Linux VM.
Microsoft: Documentation for Installing PowerShell on Linux
Explore Microsoft’s documentation for installing PowerShell on Linux.
Microsoft: Documentation for Enabling PowerShell on Ubuntu
Educate yourself on enabling PowerShell on Ubuntu.
GitHub: PowerShell Cross-Platform Versions
Locate the different cross-platform versions of PowerShell on GitHub.