Purpose of the Toolkit
The Shared Computer Toolkit helps to keep information on shared computers secure so that one user can’t access the files or make changes to the configurations of other users. With the toolkit, you get the following tools:
- Windows Restrictions Tool
- Windows Disk Protection Tool
- Windows Accessibility Tool
You can use these tools to create user profiles that are restricted in the ability to change system settings, access configuration files, and so forth. You can prevent users from making changes through Control Panel or running command line utilities or the Registry Editor. You can also prevent user access to the data on specified partitions, and keep users from running software that’s not authorized. You can cause any changes made by users to be cleared when the computer reboots and enable or disable accessibility features.
Installing the Toolkit
At the time of this writing, the toolkit is in public beta. If you want to try it out, you can download version 1.0 at http://www.microsoft.com/downloads/details.aspx?familyid=7256D456-E3DA-42EA-857D-92B716077A84&displaylang=en. Remember that this is beta software and shouldn’t be installed on production machines. It installs on Windows XP Home, Pro or Tablet PC and SP2 is required.
Note:
The Toolkit does not run on XP Media Center Edition or XP Pro 64x Edition. It does run on Tablet PC Edition.
The download is relatively small (2237 KB) and takes about one minute with a 1.5Mbps broadband connection or about 6 minutes with a 56Kbps dialup connection.
Note:
To download the Shared Computer Toolkit, you will need to allow verification that your operating system copy is legal by allowing the Windows Genuine Advantage scan.
The downloaded file is a Windows Installer package named Shared_Computer_Toolkit_ENU.msi. Double click the saved file to start the Setup wizard.
You need about 5 MB of free space to install the Toolkit, but the Windows Disk Protection tool requires another 1 GB or more (depending on the size of the disk).
You’ll be asked to accept the EULA and to register your copy of the toolkit. You cannot continue the beta installation without registering. When you click the Register Now button, you’ll be taken to a Web site where you must sign in with a Microsoft Passport account. Then you’ll be asked to fill out an online form with information where Microsoft can contact you for a survey. When you submit the form, you’ll be given a registration number. Fortunately, you don’t have to go through this process every time you install the toolkit on a computer in your organization; you can use the same registration code for all of them.
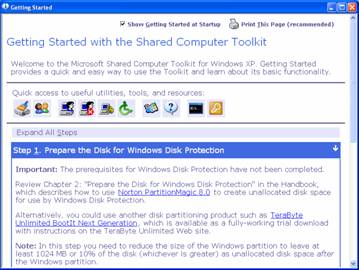
Once you have the code, enter it in the Customer Information page of the Toolkit’s Setup wizard (and save it to a file or write it down if you intend to use it for subsequent installations). The next page of the wizard informs you that it will be installed to c:\program files\Microsoft Shared Computer Toolkit\. You cannot change the installation directory. It takes less than a minute to install on a typical new computer. The Getting Started screen will display by default when you finish the installation. It will continue to display each time you start the tool unless you uncheck the box labeled “Show Getting Started at Startup” at the top of the screen, as shown in Figure 1.
Figure 1: The Getting Started screen
Note:
If the shared computer is a member of a domain, you’ll receive a warning and instructions to read Chapter 10 of the Handbook, “The Shared Computer Toolkit in the Enterprise Environment” before proceeding.
The Getting Started screen provides quick access to a row of icons that represent the following:
- Disk Management
- User Accounts
- User Profiles
- Windows Restrictions
- Windows Disk Protection
- Accessibility
- The Handbook
- The Help file
- Command line
- Log Off Now
Setting up the Toolkit
The Getting Started screen walks you through the following steps:
- Preparing the disk for Windows Disk Protection: you can use Norton PartitionMagic 8.0 or another disk partitioning utility to create unallocated disk equivalent to at least 10% of the disk space (or 1024 MB, whichever, is larger) after the Windows partition. This space will be used by Windows Disk Protection.
- Select computer security settings that will be applied to all users of the computer. These include: prevent account names from being saved in the CTRL+ALT+DEL logon dialog, prevent Windows from caching Passport or domain credentials within user profiles, prevent logon to locked or roaming user profiles that cannot be found to improve security, remove cached copies of locked or roaming user profiles to improve privacy and save disk space, remove the shut down and turn off computer logon options, use the Welcome screen, remove Administrator from the Welcome screen.
Note:
If you remove Administrator from the Welcome screen, you can log onto the Administrator account by pressing CTRL+ALT+DEL twice to bring up the normal Windows logon dialog box.
- Create a public account for shared access in the User Accounts applet.
- Configure the public user profile by logging on with the public account and setting the desktop wallpaper, adding printers and configuring first time settings and accepting license agreements for programs that will be used by the shared public account.
- Restrict and lock the public user profile in the Windows Restrictions tool.
- Test the public user profile by logging on to the public user account and verifying that the programs needed by the account work and that the account is restricted as desired.
- Turn on Windows Disk Protection.
Using the Toolkit
After you install the Toolkit, you’ll see a number of options in its program menu in the Start menu, as shown in Figure 2.
Figure 2: Toolkit options
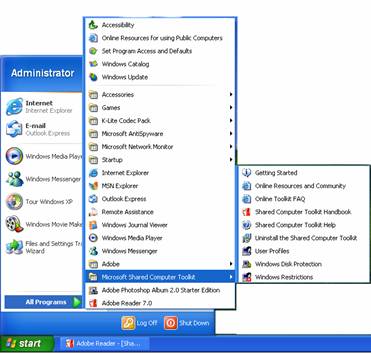
Note that you can go to the Getting Started screen from this menu even if you’ve unchecked the option to display it at startup.
Other options include:
- Online Resources and Community: this takes you to Microsoft’s Web site featuring resources for managing shared computers at http://www.microsoft.com/windowsxp/sharedaccess/resources.mspx, which includes tips and tools, security information and links to Microsoft’s shared computer newsgroups and other shared computer communities.
- Online Toolkit FAQ: takes you to Microsoft’s Web site of frequently asked questions about shared access at http://www.microsoft.com/windowsxp/sharedaccess/faq.mspx.
- Shared Computer Toolkit Handbook: this comprehensive 87-page handbook contains detailed instructions for using the toolkit, both on Workgroup/standalone computers and those joined to domains in the enterprise environment. It is in PDF format so you’ll need Adobe Reader or Acrobat to open it.
- Shared Computer Toolkit Help: These Help files are in Windows Help (.chm) format and include instructions on installation, the graphical tools and command line tools.
- Uninstall: uninstalls the Shared Computer Toolkit.
- User Profiles: this tool is used to create and delete user profiles on any partition. You can even delete locked profiles. It has a very simple interface, shown in Figure 3.
Figure 3: The User Profiles Tool is used to create or delete profiles

- Windows Disk Protection: this tool prevents changes from being made to the operating system and program files. The tool returns the Windows partition to its original state every time the computer is rebooted if you select the “Clear Changes with each Restart” option.
- Windows Restrictions: With this tool, you can limit what actions a non-administrative user can perform. By default, limited account users can’t install software or hardware or change account names or types, but can access programs that are already installed. You can also restrict shared administrative accounts. You can create custom desktops for different categories of users, lock user profiles so Windows won’t remember Internet history, passwords, desktop settings and other info from one session to another. You can even restrict users’ logon times so they must log off after a certain amount of time. The tool’s interface is shown in Figure 4.
Figure 4: The Windows Restrictions tool lets you limit what users can do

The Command Line Tools
The Toolkit includes some scripts you can run from the command line to automate some of the toolkit’s functions. These include:
- Accessibility.wsf: lets you run the Accessibility tool from the command prompt and enable or disable accessibility options such as high contrast, extra large pointer, magnifier, sticky keys, filter keys, mouse keys, the onscreen keyboard, narrator, sound sentry and show sound.
- Autodemo.wsf: demonstrates the toolkit functions by configuring a computer with accounts and profiles and performing toolkit functions (shouldn’t be used on a production computer).
- AutoLogon.wsf: lets you set up a user’s account to log onto Windows automatically.
- AutoRestart.wsf: lets you set up a user’s account to start in a specified program.
- AutoRunOnce.wsf: lets you set up a user’s account to start a specified program the next time that user logs on (but not every time).
- CriticalUpdates.wsf: this script downloads and installs critical Windows updates.
- Diskprotect.wsf: lets you turn disk protection on and off and save, clear or retain changes to the protected drive from the command line.
- Restrict.wsf: lets you use the command line to apply restrictions to user profiles, by using a XML file where the restrictions are saved.
- SCTReport.wsf: creates a report to be used by Microsoft to troubleshoot problems with the Toolkit.
- UserProfiles.wsf: lets you perform the functions of the User Profiles tool (create and delete profiles) from the command line.
- SleepWakePC.wsf: lets you put the computer to sleep or wake it to perform scheduled tasks.
- Welcome.wsf: lets you use the command line to prevent user accounts (such as the Administrator account) from appearing on the Welcome screen.
These scripts are all stored in the Scripts folder within the Microsoft Shared Computer Toolkit folder.
Summary
The Shared Computer Toolkit gives you many tools, both graphical and command-line, for better securing computers that are shared among two or more users. The beta version of the Toolkit is available as a free download; the price of the final release version hasn’t yet been determined.