
The chapter covers Virtual Server 2005 R2 SP1 Administration Website configuration, host and virtual machine performance tuning, and operational considerations. Performance tuning modifications are included for processor, memory, display graphics, hard disk, and networking components.
Configuring the Administration Website
The Virtual Server 2005 R2 SP1 default Administration Website configuration is designed for generic deployments. Additional tuning is required to provide an optimized experience for managing hosts and virtual machines. This section reviews configuration options for Virtual Server 2005 R2 SP1 search paths, default configuration folder location, and remote control.
Configuring Search Paths
The Virtual Server Administration Website is the primary interface to manage the configuration of virtual machines, virtual hard disks, and virtual networks on any Virtual Server host in your network. As a browser-based tool, it offers flexibility and a few limitations. When creating a new virtual machine, for example, you can enter a fully qualified path to an existing virtual hard disk or create a new virtual hard disk and provide the fully qualified path to the location to store the .vhd file. Unfortunately, the Virtual Server Administration Website does not provide the ability to browse the file system to select the fully qualified path. Therefore, before you enter a path to a file, you will probably identify and copy the fully qualified path in Explorer, paste it into the input box, and add the name of the file that you want to read or write to.
To simplify this process, the Virtual Server 2005 R2 Administration Website provides a way to specify search paths that will be parsed and cached for display. The Administration Website applies filters based on the action that you are performing, and it displays only the relevant files in the appropriate drop-down boxes. Figure 7-1 shows the Search Paths configuration screen.

Figure 7-1: Search paths configuration screen
For example, if you are attempting to select a CD-ROM ISO image file to attach to a running virtual machine, the only ISO files that are presented are the ones copied during Virtual Server installation. By default, these are displayed because the directory is automatically added to the search paths list at installation time.
Best Practices Create a directory on the Virtual Server host to store all the files that are commonly used by virtual machines (ISO, VFD, and so on). You should use subdirectories to organize the different types of files and simplify selection.
Best Practices Add all directories in which you store virtual machine files to the Virtual Server Search Paths. Once this is configured, files in the specified directories will automatically be parsed and displayed in any drop-down list on the Web site. This allows you to select a file rather than typing the fully qualified path.
Modifying the Search Paths Configuration
To configure the search paths options on your server, follow these steps:
- Determine the paths that you would like to add to the Administration Website.
- Open the Virtual Server 2005 R2 Administration Website.
- In Virtual Server, click Server Properties.
- Click Search Paths to open the Search Paths configuration page, as shown in Figure 7-1.
- Type the search paths (one per line) as full path statements, as shown in the following example:
C:\ISOs
D:\Virtual Machines
Click OK to save the search paths entered.
Configuring the Default Virtual Machine Configuration Folder
The virtual machine configuration folder defines the default storage location for any new virtual machine. Table 7-1 lists the default location for the virtual machine configuration folder for various operating systems.
Table 7-1 Virtual Machine Configuration Folder Defaults | |
Operating system | Default location |
Microsoft Windows XP and Windows Server 2003 | C:\Document and Settings\All Users\Application Data\Microsoft\Virtual Server\Virtual Machines |
Windows Vista | C:\Users\Public\Documents\Shared Virtual Machines |
If you create new virtual machines and specify only the name of the virtual machine instead of a full path to the configuration file (.vmc), Virtual Server 2005 R2 creates a subdirectory using the name of the virtual machine and stores the .vmc file at that location. Virtual Server 2005 R2 stores the save state file (.vsv) and any undo disk files (.vud) in the same directory as the .vmc file. Because the default folder location is on the system volume, it has the potential to cause disk space issues that can significantly affect Virtual Server 2005 R2 performance.
Best Practices Modify the default virtual machine configuration folder location to store virtual machines on a volume other than the system volume. When you change this path, the folder access control is reset to the security configuration specified in the Virtual Server 2005 R2 Administration Website.
Modifying the Default Virtual Machine Configuration Folder
To modify the default folder for virtual machines, follow these steps:
- Determine the path that you would like to use as the new virtual machine default folder.
- Open the Virtual Server 2005 R2 Administration Website.
- On the left navigation menu, click Server Properties.
- Click Search Paths. You will see the Search Paths configuration screen shown in Figure 7-1.
- nbsp;In the Default Virtual Machine Configuration Folder text box, type the new default folder location as full path statements, as shown in the following example:
D:\Shared Virtual Machines\
6. Click OK to save the settings.
Direct from the Source: Beware of Automatic ACL Changes
When you change the default virtual machine configuration folder to a new location, or when you add or remove an entry in the Virtual Server 2005 R2 Security Settings, the default virtual machine configuration folder specified and all subdirectories will have the access control lists (ACLs) reset to the current security configuration of the Virtual Server site. You will not receive a warning that this is going to occur.
The ACLs of the default virtual machine configuration folder root are completely replaced, and the subdirectories are reset in an overlay mode. If there is a group with ACLs defined on a subdirectory of the default virtual machine configuration folder and that group is being used in a security setting in Virtual Server, that ACL entry will be overwritten with the ACL settings defined in the Virtual Server 2005 R2 security setting.
Joseph Conway
Support Escalation Engineer, Virtualization
Enabling Virtual Machine Remote Control
Microsoft Virtual Machine Remote Control (VMRC) is disabled by default when you install Virtual Server 2005 R2. This ensures that the default installation of Virtual Server has a reduced remote attack surface. To remotely manage a virtual machine from a power-on state, you need to enable VMRC. VMRC allows access to all virtual machines on the Virtual Server 2005 R2 host based on access permissions. Unless you provide the name of a specific virtual machine, an administrative screen will be displayed containing thumbnail snapshots of all the virtual machines’ current video buffers.
When you enable VMRC, there are a series of options that you can configure, as shown in Table 7-2.
Table 7-2 VMRC Configuration Options | |
Option | Description |
TCP/IP address | TCP/IP address that VMRC uses for communications. |
TCP/IP Port | TCP port number that VMRC uses for communications. The default port number is 5900. |
Default Screen Resolution | Screen resolution that the VMRC client uses when establishing a remote session with a virtual machine. |
Authentication | Authentication Protocol that is used for authenticating access to the VMRC client: Automatic, NTLM, or Kerberos. |
Disconnect idle connections | Amount of time in minutes that the VMRC server waits with no activity before disconnecting the VMRC client session. |
Multiple VMRC Connections | Enables the ability for a VMRC client session to allow more than one user to connect to a virtual machine. |
SSL 3.0/TLS 1.0 encryption | Enables or disables the use of Secure Sockets Layer (SSL) or Transport Layer Security (TLS) encryption for the VMRC sessions. |
SSL 3.0/TLS 1.0 certificate | Required information to configure the certificate used for establishing the encrypted VMRC session. |
There are two interfaces to the VMRC protocol: an ActiveX control and a Windows client. The ActiveX control is the interface presented by the Virtual Server 2005 R2 Administration Website. The Windows VMRC Client is accessible from the Virtual Server program menu option. The configuration options in Table 7-2 affect both VMRC interfaces. You should consider each of the best practices in the following sections to modify the configuration of your Virtual Server 2005 R2 installations.
Enabling VMRC
To enable VMRC after installing Virtual Server 2005 R2 to allow remote management of virtual machines, follow these steps:
- Open Virtual Server 2005 R2 SP1 Administration Website in an Internet Explorer browser window.
- On the Virtual Server menu, click Server Properties.
- In the Properties window, click Virtual Machine Remote Control (VMRC) Server.
- To enable VMRC on this server, select the Enable check box as shown in Figure 7-2.

Figure 7-2: VMRC options screen
- Optionally, disable idle connections by selecting the Enable check box in the Disconnect Idle Connections section.
- Optionally, enable multiple VMRC connections by selecting the Enable check box in the Multiple VMRC Connections section.
- Click OK.
Best Practices Configure VMRC to listen only on a specific TCP/IP address if the host has multiple network adapters. This ensures that all VMRC traffic goes only across a single network card and a single TCP/IP address. This configuration makes it easier to troubleshoot any issues with VMRC.
Best Practices Change the default port for VMRC. Changing the default port provides additional protection to the VMRC service against denial of service attacks or other security threats. Changing the default port forces you to specify the port number as part of the query string in the VMRC client.
Best Practices Configure the authentication setting of VMRC to Kerberos to ensure that only Active Directory domain member servers can remotely manage the Virtual Server 2005 R2 host. This configuration provides an additional layer of security from remote systems that are not members of the Active Directory domain. Enabling this feature requires contacting a domain using Kerberos to authenticate the remote user session.
Best Practices Only enable multiple VMRC connections when you need the ability for multiple people to connect to a virtual machine concurrently. Scenarios might include debugging, training, or installation support purposes.
Best Practices Enable and configure SSL/TLS to protect the Internet Information Services (IIS) and VMRC network traffic when you enable basic authentication. By default, the Administration Website pages are not encrypted during transfer. When Windows authentication is used, user IDs and passwords are encrypted. Refer to Chapter 6, “Security in Depth,” for more information on securing Virtual Server and configuring SSL/TLS.
How to Obtain the Best Host Performance
Configuring your Virtual Server host to obtain the best performance requires focusing on five key configuration areas: processor, memory, display graphics, disk subsystem, and network adapters. Using the fastest hardware components available is a good beginning, but how you combine them to obtain the optimum configuration is not always obvious. In this section, you will learn more about the five key configuration areas and best practices to obtain the optimum performance for your Virtual Server 2005 R2 host.
Maximizing Processor Performance
Virtual Server 2005 R2 is a multithreaded application that performs best on servers containing multiple processors. Processors today are single core or multiple core and come with or without virtualization hardware assistance—such as Intel Virtualization Technology (Intel VT) and AMD Virtualization (AMD-V). They can also have hyperthreaded logical processors.
Because the number of simultaneous threads is directly related to the number of processor cores that are available to execute them, the best host configuration is one that has multiple cores. To maximize the number of processors available and minimize the footprint of the server that you are using, purchasing servers with the latest quad-core processors will provide you with the best price-to-performance solution.
Virtual Server 2005 R2 SP1 now supports the processors from Intel and AMD with hardware virtualization support: Intel VT and AMD-V. Hardware virtualization-assisted processors relieve Virtual Server 2005 R2 SP1 from performing some virtualization operations in software, thereby providing performance gains. Virtual Server 2005 R2 SP1 uses virtual machine additions to tune the performance of supported Windows and Linux operating systems. Most performance gains from the current series of hardware virtualization-assisted processors are obtained when the virtual machine additions have not yet been loaded, mainly during virtual machine boot and operating system installation.
Buying servers that have hyperthreaded processor cores will provide you nominal performance improvement. Hyperthreaded processors are logical and operate well in low workload conditions, using available physical cycles to process more instructions. As the load on the physical processor cores increase, the hyperthreaded processors become starved for processor cycles, and performance of threads and processes depending on a hyperthreaded processor can be significantly affected. To ensure that a thread of execution for a virtual machine does not experience this degradation, Virtual Server does not schedule any Virtual Server threads of execution on hyperthreaded processors.
Best Practices Purchase servers with multicore Intel VT or AMD-V processors as Virtual Server 2005 R2 SP1 hosts. Quad-core systems should be the minimal multicore processor configuration. Although it’s not required, you should consider disabling hyperthreading on the cores in a Virtual Server host to remove them from operating system management and monitoring cycles. If you do not do this, any workload analysis tool that determines the maximum available and utilized processing power will incorrectly include hyperthreaded processors and invalidate the calculations.
Maximizing Memory Performance
Available memory is a critical requirement in a Virtual Server 2005 R2 environment because Virtual Server uses only physical RAM to load and run virtual machines. Properly planning the memory requirements and configuration of a Virtual Server can have positive performance results for a virtual machine.
Understanding Memory Types
Most motherboards can use different types of memory, depending on the processor and chipset in use. Memory choices typically involve a tradeoff between speed and capacity. By choosing the faster memory chips, you typically reduce the maximum capacity of memory available in the system. This difference can be significant and as large as a 75-percent reduction in memory capacity. For example, the same motherboard might be able to install 128 GB of 266-MHz PC2700 memory, 64 GB of 333-MHz PC2700 memory, or only 32 GB of 400-MHz PC3200 RAM. Using the fastest RAM will dramatically reduce the amount of total RAM available and the number of virtual machines that your host can support. You should always verify the configuration with your hardware vendor to be assured that you are using the correct configuration settings.
Best Practices Determining the best practice configuration for memory in a Virtual Server 2005 R2 host is really driven by the goals of the system. If the goal is to obtain the fastest memory performance possible on the Virtual Server host, use the fastest memory available. If the goal is to obtain the best performance possible but run the maximum number of virtual machines on the host as possible, use the memory that gives you the highest capacity and attempts to compensate with other components, such as faster processors or a faster speed disk subsystem.
Understanding Memory Configuration
Memory chip performance is not the only consideration when evaluating the performance of virtual machines. Virtual machines that have too little memory allocated to them suffer from excessive amounts of memory paging to disk. Disk access is typically measured in milliseconds (10-3 seconds), while memory access is measured in nanoseconds (10-9 seconds). That makes memory access 1 million times faster than disk systems in retrieving data. Because disk access in a virtual environment has additional overhead, the actual impact on performance is even higher. Reducing the amount of memory paging to disk will increase the performance of the virtual machines.
Operating systems inside virtual machines require no less memory than on their physical counterparts. Virtual machines incur memory overhead for interfaces to the Virtual Machine Monitor (VMM), video buffer, keyboard buffer, and mouse buffer, whereas purely physical environments do not. Memory overhead varies but typical values are 32 MB of additional space over the standard memory assigned.
Physical servers are typically purchased based on a standard configuration. In the case of memory, many physical servers were purchased with more memory than the workloads required. When virtualizing the servers, it is a good time to reevaluate the actual physical server memory requirements.
Best Practices Once you have determined the actual memory required for the physical server, you should use a scaling factor when planning the amount of memory that you allocate to a virtual machine. A good value is 1.25 times the memory that you would have allocated to a purely physical machine with the additional 32 MB for overhead. This increased allocation will provide more memory for the virtual machine, increase the number of applications that can be loaded in the virtual machine’s RAM, and reduce the amount of paging to disk. The formula is as follows: Virtual Machine required memory = 32 MB + (1.25 × original physical server RAM in MB).
Understanding Non-Uniform Memory Access
Another memory consideration involves the architecture of the processor and motherboard. Non-Uniform Memory Access (NUMA) is an architectural feature of modern multiprocessor platforms. NUMA architecture combines the processor, I/O bus, and memory into a “node” that is tuned for performance. These nodes are interconnected by a high-speed bus system. The processor has faster access, with lower latency and greater bandwidth to the memory contained within the node. When the server needs to access memory on another node using the system interconnect, the performance will be affected by increased latency and reduced bandwidth. Proper configuration of a NUMA-based machine allows for maximizing local memory access while minimizing memory access using the system interconnect. An improperly configured NUMA-based server can suffer from significant performance issues.
Configuration of a NUMA architecture server requires understanding the memory requests of the virtual machines that will be running in the system. To properly configure the memory on a NUMA system, you need to evenly distribute the memory assigned to each processor. This gives each processor the same size of local cache and minimizes the memory requests between nodes. Figuring out how much memory to put in the system depends on a combination of factors, including the largest memory block a virtual machine requires, the number of processors in the system, and the size of the memory sticks that the system will accept.
If you have a virtual machine that is assigned 3.6 GB of memory, you need to ensure that you have at least 4 GB of memory installed on each processor node in the NUMA system so that the virtual machine thread running on a processor will be able to have all of its memory loaded in the local node. If you have 4 processor nodes, the minimum amount of memory you should be placing in the server is 16 GB, or 4 GB per node.
Direct from the Source: NUMA Ratio
NUMA vendors have established a NUMA ratio value that describes the amount of time it takes for a node to access “remote” memory, or memory that is assigned to another node, versus its own “local” memory. Generally, performance is not affected if the NUMA ratio is between 1.0 and 1.5. Once the ratio is 3.0 or greater, performance will degrade.
On NUMA systems that have one or more nodes without memory assigned, you will find Event IDs 1100 and 1101 in the application event log when the Virtual Server service starts. These events will be logged when a NUMA configuration is not set up properly. You will also see these errors on multicore systems where memory allocation to additional cores is not defined in the Static Resource Affinity Table (SRAT) but is handled instead at the BIOS level. Please check with your hardware vendors regarding their specific NUMA configurations to understand how to properly configure the memory.
Rob Hefner
Microsoft Services Support Engineer, Virtualization
Best Practices Determine the largest block of memory that will be requested on the NUMA system, and then purchase at least that much memory per processor. Because a virtual machine can be configured with a maximum of 3.6 GB of RAM, the minimum amount of memory per processor should be 4 GB of RAM. You should evenly distribute the memory to each processor to maximize local node use of memory and reduce the number of memory calls to another node.
Increasing Display Graphics Performance
Display graphics performance has two primary areas: the performance on the host, and the performance of the virtual machines. Increasing graphics performance on the host provides a better user experience when interacting at the console of the Virtual Server 2005 R2 host. Increasing graphics performance of virtual machines provides a better user experience when interacting with the Virtual Machine Remote Control (VMRC) console application.
Increasing the display graphics performance involves adjusting the display configuration and the visual effects configuration of the hosts and virtual machines. Windows display adapter drivers have an advanced setting that controls the level of hardware acceleration that is being used. The value ranges from No hardware acceleration to Full hardware acceleration. Most Windows Server installations do not automatically set the acceleration level to Full, preventing the maximum performance for the display subsystem.
Best Practices Enable Full hardware acceleration on the Virtual Server host and every virtual machine to obtain the best display adapter performance. In rare instances, increasing the hardware acceleration level will decrease performance. In these instances, an older display graphics driver that requires an update to the latest version is usually the source of the problem.
Adjusting the Display Hardware Acceleration
To adjust the display hardware acceleration, follow these steps:
- On Windows XP and Windows Server 2003, right-click the desktop and select Properties.
a. On Windows Vista, right-click the desktop, select Personalize, and then select Display Settings.
- Click the Settings tab, and then click the Advanced button.
- Click the Troubleshoot tab and you will see a Hardware Acceleration slider bar dialog box as shown in Figure 7-
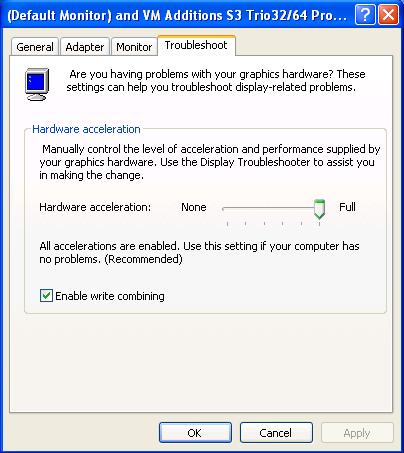
Figure 7-3: Hardware acceleration slider bar
- Move the slider to the right side where it says Full, and click OK.
Increasing VMRC Performance
VMRC allows you to remotely connect to the Virtual Server host and view the screens of virtual machines to which you have access. The Virtual Server service (Vssrvc.exe) contains the VMRC server-side interface that communicates with the VMRC client-side component. The default port that the VMRC service listens on is TCP port 5900.
The VMRC interface does not use the on-board display graphics adapter to generate virtual machine screens. All VMRC operations are performed purely in software. Therefore, one way to increase the graphics performance of VMRC sessions is to use faster processors and network adapters in the host.
You can also improve the performance across the network by enabling the option to use reduced colors. Enabling reduced colors can be accomplished two ways: enabling the option from the Virtual Server Administration Website, or enabling the option from the VMRC Windows client. When enabled from the Administration Website, all VMRC sessions to the Virtual Server configured to use reduced colors are affected. When enabled from the VMRC client, only the active server connection is affected.
Enabling Reduced Colors from the Administration Website
To enable reduced colors for all VMRC sessions to a Virtual Server host, follow these steps:
- Open the Administration Website on the desired Virtual Server host.
- Select Website Properties from the left menu.
- In the Virtual Machine Remote Control Properties section, select the Use Reduce Colors check box and then click OK.
Enabling Reduced Colors from the VMRC Windows Client
To enable reduced colors for a specific VMRC session to a Virtual Server host, follow these steps:
- Click the Start button, select Programs, select Microsoft Virtual Server, and click Virtual Machine Remote Control Client.
- Select the Reduce Colors check box as shown in Figure 7-4.
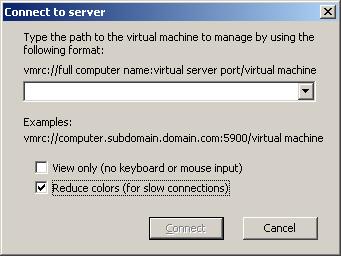
Figure 7-4: VMRC dialog box
- Type the name of the Virtual Server to manage in the Path box, and click Connect.
Best Practices Enable reduced colors in the VMRC client interface when connecting to a Virtual Server host across a slow wide area network (WAN) connection. Enable reduced colors on the Web properties of a Virtual Server host if all administration will be performed over a slow WAN connection.
Optimizing Hard Disk Performance
Virtual Server host scalability is heavily dependent on the disk subsystem. As you add more virtual machines to a host, the disk I/O workload increases. A single virtual machine performing heavy disk I/O can adversely affect the performance of other running virtual machines. In addition, applications that are running on the Virtual Server 2005 R2 host can affect disk performance.
Evaluating Virtual Server Host Applications that Are Affecting Disk Performance
Applications that can affect a Virtual Server host disk performance should be eliminated or reconfigured to minimize the effects on disk performance. Antivirus software is an example of a common application that is installed on Virtual Server hosts. Antivirus software is typically implemented as a disk filter driver that intercepts all calls for read access and writes to the hard disk and that scans the information for viruses before allowing the operation to complete. Antivirus software typically targets executables and other file types that can present a threat to the host operating system.
Virtual Server services and associated file extensions are not excluded by default from most antivirus applications. Most antivirus applications allow you to exclude file extensions or processes from virus scans. If you exclude the file extension, it excludes any application that might be reading and writing to those files, which might include a virus or Trojan horse. However, if you exclude processes, any other application that attempts to open the files would be scanned and the potential for catching a virus or Trojan horse is much higher.
Best Practices You should configure the antivirus application to exclude file extensions or processes. Using the process exclusion method rather than the file exclusion method is recommended because it provides better protection. When configuring the antivirus software to exclude the Virtual Server processes, you should exclude the Virtual Server service (Vssrvc.exe) and the Virtual Machine Helper service (Vmh.exe).
If your antivirus application does not support excluding processes, you should add .vhd, .vmc, .vud, .vfd, .vsv, and .vnc file extensions to your antivirus file exclusion list so that they are not scanned.
Understanding Disk Hardware Performance
Obtaining the best disk performance for your virtual machines requires the use of high-speed disks and spreading the disk I/O load over as many spindles as possible. The speed of the disk is directly related to how fast data can be read from and written to the disk. Hard drives typically come in speeds of 4200, 5400, 7200, 10,000, and 15,000 revolutions per minute (RPM). The most common drive speed today is the 7200-RPM drive.
Hard disk platters are arranged in concentric circles called tracks. Each track is divided into sectors that look like smaller arcs. As the platter spins, the read/write head is positioned over the track where sectors are located. The faster the platter spins, the faster the read/write head can access the sector, increasing throughput.
Best Practices You should use 10,000-RPM or faster drives in the Virtual Server host to minimize the data read/write times for virtual machines. Using a 10,000-RPM drive rather than a 7200-RPM drive significantly increases the number of read and write operations performed per minute.
Understanding How Disk Types Affect Performance
Disk speed is only one part of the equation. The type of drive is also very important. Drive types available today include Parallel-ATA, Serial-ATA, Serial Attached SCSI (SAS), and SCSI. All drive types have different performance specifications, and most even have different grades of drives, with higher throughput capabilities as the grades and prices increase. Table 7-3 shows a comparison of the performance ratings of standard SATA, SAS, and SCSI drives currently available.
Table 7-3 Drive Performance Comparison | ||
Drive type | Throughput | Queuing |
SATA | 2.4 gigabits/second per drive | NCQ |
SAS | 6 gigabits/second per drive | TCQ |
SCSI | 2.5 gigabits/second per shared bus | none |
Drives also operate using different protocols. Parallel Advanced Technology Attachment (PATA) drives must complete a read or write request before they will perform the next read or write in the queue. Serial Advanced Technology Attachment (SATA), Small Computer System Interface (SCSI), and Serial Attached SCSI (SAS) drives can queue multiple requests and make intelligent decisions about which sequence the operations should be performed in. The latest SATA drives use a method called Native Command Queuing (NCQ), while SCSI and SAS drives use a similar method called Tagged Command Queuing (TCQ). Both methods are designed to increase performance by allowing an individual hard disk to queue more than one I/O request at a time and dynamically modify the order in which the operations are performed.
Figure 7-5 shows the comparison of two disk operations accessing different tracks with and without command queuing. Without command queuing, the read/write head has to perform the operations in the order they were submitted into the queue. It might have to bypass the track that the second operation needs in order to access the track for the first operation. Then it would have to complete additional revolutions and head movement to perform the second operation, decreasing efficiency. With command queuing, operations can be optimized to perform the second operation and then the first operation. This flexibility reduces disk latency.
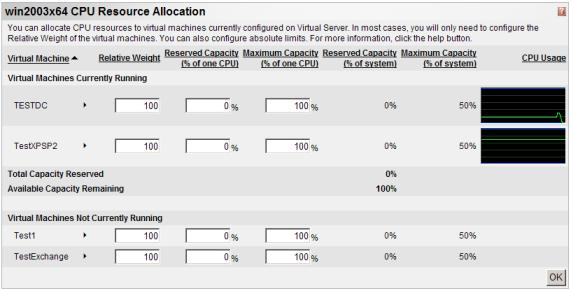
Figure 7-5: Command queuing comparison
Best Practices You should use the SATA or SAS drive type in the Virtual Server 2005 R2 host to obtain the benefits of command queuing. Although 10,000-RPM or faster drives are recommended, the exact drive type and speed will be driven by your available budget and, potentially, the original equipment manufacturer (OEM) contracts or standards that are in place.
Understanding Disk Drive Configuration
Designing a disk drive configuration that provides the best performance is dependent on the workload and the number of virtual machines that will be running on the Virtual Server 2005 R2 host. Running one virtual machine on a single dedicated spindle will provide good performance. As the number of virtual machines increases, so will the disk activity, and a single drive will no longer be able to provide acceptable read/write performance. Creating a disk array is the best way to spread the disk I/O load across multiple spindles. Redundant Array of Inexpensive Disks (RAID) level 10 is the fastest redundant disk subsystem in regular use today. RAID 10 is achieved by creating a mirrored set (RAID 1) of striped disks (RAID 0).
Storage area networks (SANs) are disk systems that have high-speed connections to drive arrays. SANs have software interfaces that allow the disk space to be combined into logical unit numbers (LUNs) and quickly reconfigured. Host bus adapters (HBAs) provide the high-speed connection between the host and the disk array. Most HBAs use fiber-optic cable connections called fiber channel.
Internet SCSI (iSCSI) is a network protocol that allows data transfer using the SCSI protocol over TCP/IP networks. iSCSI requires only an Ethernet network adapter to operate. iSCSI does not require expensive HBAs or storage protocols such as Fibre Channel, and it does not require SCSI disks to be used on the target system. This allows iSCSI to provide inexpensive access to centralize storage.
iSCSI uses a client/server metaphor for communication The iSCSI client is called an initiator, and the iSCSI server is called a target. An iSCSI initiator is a client device that connects to an iSCSI target, providing block-level access to its disk storage. One limitation of an iSCSI initiator/target system is that only one iSCSI initiator can talk to a specific iSCSI target at a time.
Best Practices You should consider a SAN that provides the redundancy of RAID 10 configurations, iSCSI target capability, and the ability to use high RPM queued I/O hard drives. Selecting one that supports SATA and SAS hard drives in the same enclosure will provide you with the most flexibility. When creating the RAID 10 disk array, you should use as many spindles as feasible to distribute the I/O load.
Optimizing Network Performance
Virtual Server shares the host’s physical network adapters with virtual machines. Networking performance of the host and the virtual machines is affected by the number of virtual machines sharing an adapter, the speed of the adapter, and the adapter configuration settings. This section describes common issues involved with configuring networking on the physical and virtual machines and best practice–based solutions.
Understanding Virtual Networks and Adapters
The Virtual Machine Network Services (VMNS) driver provides the interface between the virtual networks and the physical network adapters in the host. VMNS redirects packets to the correct virtual network and attached virtual machine network adapter. Virtual networks can be bound only to a single physical network adapter at a time. One or more virtual machines are assigned to a virtual network, and the combined network traffic of the assigned virtual machines is transmitted over the single physical network adapter. Sharing a physical network adapter with multiple virtual machines can affect network performance. Installing multiple network adapters in the Virtual Server host allows you to distribute the virtual networks load and performance effects across physical interfaces.
The virtual machine emulated network adapter was selected for universal driver availability in multiple operating system releases from multiple vendors. However, this choice of network adapter reduced the available advanced features found in more recent adapters such as the following features:
- TCP/IP offloading features (checksum, segmentation, and so on)
- Jumbo frame support
- Flow Control
- Teaming
- Quality of Service (QoS) offloading
Leaving these features enabled on the physical network adapter that will be used for virtual machine traffic can potentially cause data corruption, traffic loss, and reduced throughput.
Best Practices You should dedicate a network adapter for host traffic on every Virtual Server host. This arrangement prevents the virtual machine traffic from affecting Virtual Server management tasks. This is accomplished by unbinding the VMNS driver from the physical network adapters that will be the dedicated host network adapter.
Best Practices You should dedicate network adapters for virtual machine traffic on every Virtual Server host. This arrangement prevents the Virtual Server management traffic from affecting the virtual machine traffic. This is accomplished by unbinding all services, protocols (including TCP/IP), and drivers listed in the network properties dialog box except for the VMNS driver.
Best Practices You should disable hardware acceleration features of the host physical network adapter for all virtual machine dedicated network adapters. The virtual machine emulated network adapter does not provide support for these advanced features, and leaving them on will decrease performance and potentially cause data corruption.
Optimizing Virtual Machine Performance
Virtual machine performance can be affected by different variables, including the performance of the host, the configuration options for the operating system, the type and configuration of the selected virtual hardware in the virtual machine, and how resources are allocated to the virtual machine. This section reviews these component issues and the best-practice solutions for minimizing their effects.
Virtual Machine Additions
Virtual machine additions are features that improve the performance and integration of virtual machines by installing a series of drivers in the virtual machine. Driver updates are included for the mouse, keyboard, video, and SCSI systems. However, virtual machine additions are available only for a certain subset of Windows and Linux operating systems. They are installed in the virtual machine after the Windows or Linux operating system is installed. After additions have been installed, new integration features are enabled.
Best Practices You should install the virtual machine additions as soon as possible after the operating system has been installed. This approach allows you to take advantage of the performance improvements and integration features while you are finishing the configuration of the virtual machine.
Best Practices You should update the virtual machine additions on any pre-existing virtual machines or when you migrate virtual machines from Virtual PC to Virtual Server. By updating the additions to the latest version, you ensure the best performance and the latest additions features. You should use the latest additions version available for Virtual PC or Virtual Server.
Understanding Processor Resource Allocation
Virtual Server manages processor allocation to virtual machines through the CPU resource allocation settings accessible from the Virtual Server 2005 R2 Administration Website. CPU resource allocation configuration provides three settings options: relative weight, reserved capacity, and maximum capacity. Table 7-4 defines the three resource allocation settings and the allowed ranges of the values.
Table 7-4 Resource Allocation Settings | ||
Allocation setting | Description | Range |
Relative weight | Relative values assigned to virtual machines that define the amount of processing power a virtual machines receives. A virtual machine with a high relative weight obtains more processing power than a virtual machine with a low relative weight. | 1-10,000 |
Reserved Capacity | Reserved capacity is the percentage of a logical processor that Virtual Server will guarantee is available for a virtual machine. The maximum percentage is 100. | 0-100 |
Maximum Capacity | Maximum capacity is the percentage of a logical processor that Virtual Server will not allow a virtual machine to exceed. | 0-100 |
By default, all virtual machines have a relative weight of 100 and a maximum logical processor capacity set to 100 percent so that the resource requirements of each virtual machine are equal and none is given preference over another.
Understanding the Resource Allocation Management Page
The resource allocation page of a Virtual Server 2005 R2 host with two processor cores is shown in Figure 7-6. For each virtual machine, the page displays the processor resource allocation settings, the system-level processor resource allocation, and a processor utilization history graph.

Figure 6: Processor Resource Allocation management page
Resource allocation has two aspects: the values that you can set on the virtual machines for relative weight, maximum capacity, and reserved capacity; and the available capacity of the host when you attempt to turn on a virtual machine. It is possible to set the reserved capacity for every virtual machine to 100 percent. Although it seems that you can oversubscribe the capacity of the processing power of the host, processor resource allocation manages the available capacity automatically for you. As you start a virtual machine that has reserved capacity set, the amount of available capacity on the system is reduced. When you attempt to start a virtual machine that has a reserved capacity allocation that is larger than the available capacity left on the system, Virtual Server will return an error and not power on the virtual machine.
The reserved and maximum capacity is calculated based on the number of processors in the host. In Figure 7-6, the host has two processors, so the maximum capacity of the system that can be allocated to a single virtual machine is 50 percent. This value is calculated by taking 100 percent and dividing it by the number of processors. But when you actually set the value for reserved capacity of the virtual machine, you are setting a percentage of the logical processor that you want to reserve. So if you want to reserve an entire logical processor for a virtual machine, you enter 100 percent for the setting, and the system will calculate the amount of system capacity that will be allocated from the available pool of capacity when you turn on the virtual machine—in this case, that would be 50 percent of the system capacity. If you set the reserved capacity of a virtual machine to 50 percent, the reserved capacity of the system would display as 25 percent, or 50 percent of the maximum value for a processor.
Resource allocation should always be part of the planning process for the placement of virtual machine workloads on a Virtual Server host. You should also revisit the current allocation on a host on a regular basis to ensure that the addition or removal of virtual machines on the host has not upset the balance of the system. Once you modify the default resource allocation approach for a host, you risk starving virtual machines for processing power. You should consider the best practices listed in this section to configure the processor resource allocation of your Virtual Server 2005 R2 host.
Best Practices You should use a tiered approach to configure processor resource allocation settings. Unless you are going to manage the resource allocation settings and modify them regularly, you should maintain the default configuration. If you have a host with virtual machines for which you want to guarantee a certain amount of processing power, you should use the reserved capacity allocation approach for those machines. Typically, you do this for a machine that has dependencies to provide services to other physical or virtual machines, such as a domain controller, or for machines that you know will have high performance requirements, such as an SQL server. If you have a host for which you want to maintain equal processing power but you know the virtual machines do not provide critical services, you should use the maximum capacity allocation to limit the effect they will have on the other virtual machines in the system.
Understanding Virtual Machine Graphics Performance
Graphics performance inside a virtual machine is dependent on the emulated graphics card. Some advanced features that are easily handled by a hardware graphics adapter can cause screen repainting issues in a virtual machine and cause the virtual machine screen refreshes to be slow. This effect is most noticeable on a Windows client operating system such as Windows XP or Windows Vista, where the visual experience uses advanced graphics features such as shadowing.
To obtain the best repaint and refresh user experience in virtual machines, you have to tune the virtual machine user interface to provide best performance instead of best user experience. By default, the user interface experience is managed by the Windows operating system. You can modify the default and adjust for best performance.
Best Practices You should adjust the Windows visual interface settings to use a “best performance” setting instead of letting Windows adjust the settings to achieve the best user experience. This is required on the Virtual Server 2005 R2 host as well as every virtual machine.
Configuring the Windows User Interface for Best Performance
To adjust the default Windows user interface to obtain the best performance, follow these steps:
- Click the Start button, select Control Panel, and choose System.
- Click the Advanced tab and then the Performance button. The Performance Options dialog box will be displayed as shown in Figure 7-7.
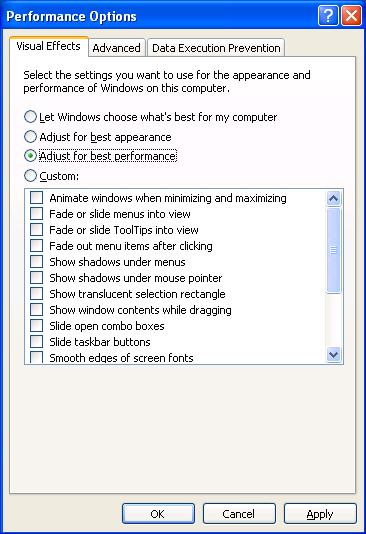
Figure 7-7: Visual effects Performance Options dialog box
- Select the Adjust For Best Performance option.
- Click OK.
Virtual Hard Disk Performance
Virtual hard disks are stored on the physical disk as single files with a .vhd extension. The initial size of the VHD file is dependent on the type of virtual hard disk selected. You can use a fixed-size virtual hard disk or a dynamically expanding virtual hard disk. When you create a fixed-size virtual hard disk, the entire size of the drive is allocated on the physical disk as a single file. For example, if you elect to create a 10-GB hard disk, Virtual Server 2005 R2 will create a 10-GB file on the host’s drive and internally structure it like a physical hard disk. It creates a master boot record and a file table, and it stores data in virtual tracks and sectors. Initial creation of a fixed-size virtual hard disk takes longer, but once the disk space allocation is complete, the file size is not modified again. A dynamically expanding virtual hard disk has the same internal structure as a fixed-size virtual hard disk, but when it is created it does not pre-allocate all the disk space in the file. As you write to a dynamically expanding disk and more space is needed, it allocates 2-MB chunks of space to extend the VHD file size to the maximum size of the VHD.
Fixed-size VHD files are less prone to be fragmented when created and do not have the overhead of allocation of space on the fly. Dynamically expanding disks allow you to use physical disk space as you go instead of pre-allocating space that is not being used. Proper disk space management is required if you elect to use dynamically expanding disks. Virtual Server does not prevent you from oversubscribing the disk space on the physical server when creating a dynamically expanding VHD. Proper planning is also required when provisioning fixed-sized virtual hard disks across the network because of the amount of data that needs to be transferred.
Virtual hard disks can also be connected to two different types of adapters in a virtual machine. The type of adapter you connect defines the size limits and virtual hard disk performance. Virtual machines provide both Integrated Drive Electronics (IDE) and SCSI adapters. Virtual hard disks attached to an IDE adapter can be a maximum of 127 GB, and virtual hard disks attached to a SCSI adapter can be up to 2 TB in size.
Virtual Server 2005 R2 IDE and SCSI virtual adapters have the same characteristics as physical adapters. A virtual SCSI adapter performs faster than a virtual IDE adapter because of architecture limitations on data transfer and SCSI adapter ability to perform multiple transactions simultaneously. Overall, virtual SCSI adapters provide approximately 20 percent performance gains over an IDE adapter on a virtual machine with virtual machine additions installed. The virtual machine additions install an optimized virtual SCSI adapter driver that provide performance enhancements over the out-of-the-box Adaptec SCSI adapter driver.
Best Practices To obtain best performance, you should create virtual hard disks as fixed disks and connect them to a SCSI bus adapter. A fixed disk eliminates the dynamic allocation overhead and oversubscription concerns on the host. Attaching the fixed disk to a SCSI adapter allows you to create larger virtual hard disks and obtain approximately a 20 percent improvement in performance.
Best Practices You should use compression software to reduce the size of the fixed virtual hard disks before you attempt to transfer them over the network. Compression technologies such as ZIP and RAR (Roshal ARchive) can achieve significant size reductions on VHD files that are mostly empty space.
Operational Considerations
Using Virtual Server 2005 R2 in test, development, or production environments requires that operational standards be established to maintain efficiency. This section addresses establishing naming standards and creating and operating a library of virtual machines.
Establishing Standards
Establishing a set of configuration standards before you roll out virtualization on an enterprise basis will save you many hours of configuration changes. Standards are critical to minimizing virtual machine migration efforts between hosts, provisioning virtual machines, and making virtual machines and virtual networks easily identifiable.
Virtual machines are listed in the Administration Website according to the virtual machine configuration (.vmc) filename, and they are sorted in ascending alphabetical order. The .vmc filename is not required to match the actual computer name of the virtual machine. This approach provides both flexibility and confusion. You are allowed to specify a different name for the .vmc file than the virtual machine, giving you flexibility for sorting and grouping in the user interface. However, you must maintain a mapping of the .vmc name to the machine name. The virtual machine configuration filename is required to be unique on a single host, but duplicate names can exist on other Virtual Server 2005 R2 hosts.
Virtual hard disks are stored in the virtual machine configuration file by absolute and relative paths to the vmc file. This arrangement provides Virtual Server 2005 R2 file portability, allowing it to find VHD files moved to other hosts with a different drive or path location. The relative path is used to prevent collisions if you made a copy on the same server.
Virtual network configuration files (.vnc) consist of a virtual network name, a bound physical adapter, and the configuration of the virtual Dynamic Host Protocol (DHCP) server. Virtual network names must be unique on a single host. Each virtual machine can have up to four virtual network adapters and be attached to four different virtual networks. The partnerships between virtual network adapters and virtual networks are stored in the virtual machine configuration file.
How It Works: Mapping a Virtual Network Adapter to a Physical Adapter
Mapping a virtual network adapter to a virtual network and then to a physical network adapter involves three files: the virtual machines .vmc, the virtual networks .vnc, and the options.xml host configuration file.
The .vmc file has an entry for each network adapter that specifies the ID of the virtual_network entry that is the virtual network it is attached to.
<ethernet_controller id=”0″>
<ethernet_card_address type=”bytes”>0003FF1B6AD5</ethernet_card_address>
<id type=”integer”>5</id>
<virtual_network>
<id type=”bytes”>00D67AACDFC2499DBD9222F7A0A29D54</id>
<name type=”string”>Wireless</name>
</virtual_network>
This maps to the .vnc file for the virtual network and the value for id. When these two values match, this is the virtual network that the virtual machine is attached to.
<settings>
<gateway type=”integer”>22</gateway>
<id type=”bytes”>00D67AACDFC2499DBD9222F7A0A29D54</id>
The options.xml file contains the binding to the physical network adapter using the gateway value of the .vnc file which maps to the id property value of the virtual_gateway entry.
<virtual_gateway id=”7″>
<adapter type=”string”>\DosDevices\VPCNetS2_{CA746289-F2E6-405A-B7C2-E2595ACA750A}</adapter>
<id type=”integer”>22</id>
<name type=”string”>Intel(R) PRO/Wireless 3945ABG Network Connection #2</name>
<type type=”integer”>2</type>
</virtual_gateway>
When you move the VNC from one machine to the other, only when the Virtual_gateway id matches between servers will it map properly to the physical adapter. It might be possible to have identical IDs between servers, but connected to different physical networks, so it is always better to reattach the VNC to the desired physical network adapter to be sure it is connected to the adapter you intended.
Best Practices You should establish naming standards for virtual machine configuration files as well as the computer name of the virtual machine. Virtual machine computer names should use the company naming standard for servers. Virtual machine configuration filenames should either match the virtual machine computer name or provide a way to group the machines in the user interface while including the virtual machine computer name.
For example, the company naming standard might be a three-letter location name followed by a server role designator, followed by a unique numeric value such as the following name:
HOUFS01
Using the standard three letter airport code designators will provide a preexisting recognized standard. The corresponding virtual machine name could be one of the following:
HOUFS01
F&P – HOUFS01
Using F&P in the beginning groups all file and print servers together in the Virtual Server 2005 R2 Administration Website user interface.
Best Practices You should establish virtual network naming standard to indicate the type of network attached: INTRANET, INTERNET, or TEST1. You should use a generic name that applies across multiple Virtual Server 2005 R2 hosts in a server farm. Refrain from using the network’s address, such as 10.10.10.0, for virtual network names. Using common virtual network names throughout the server farm allows you to migrate a virtual machine between hosts without having to reset the virtual network connection.
Best Practices You should establish a virtual hard drive naming standard that allows you to quickly determine the computer name, drive type, and the drive number. The standard you choose should be well documented and followed to allow proper asset tracking.
Sample VHD Naming Standard
A sample VHD naming standard includes computer name, drive type, and drive number combined together to form a name like the following one:
ComputerName-Drivetype-drivenumber.vhd
The following table summarizes VHD naming standard components.
Naming standard component | Description |
Computer Name | Virtual machine computer name |
Driver type | I = IDE disk S = SCSI disk ID = IDE Differencing disk SD = SCSI Differencing disk |
Drive number | VHD drive number for multiple VHD drives attached to a single machine |
Using this standard, a virtual machine called HOUFS01 with two SCSI disks would produce the following:
HOUFS01-S-01.vhd – Disk 1
HOUFS01-S-02.vhd – Disk 2
Library of Virtual Machines
Provisioning a virtual machine in Virtual Server 2005 R2 is as simple as copying a set of files that combine to give virtual machines an identity. A library of virtual machines could include base machines with only the operating system installed, specific types of pre-installed application servers, and special-purpose virtual machines that have unattended installations of applications scripted to launch on boot and complete the installation.
Challenges to creating and maintaining a library of virtual machines include issues such as sysprepping images, minimizing provisioning time, managing updatess, and maintaining an authoritative source and replication system for distributing virtual machines.
Best Practices You should install and run sysprep on any virtual machine that will be added to the virtual machine library. While you are not limited to the number of times you can run sysprep on a machine, you are limited to the number of times that you can execute sysprep and reset product activation. That limit is three times. If you are going to sysprep a machine on a regular basis, you should not reset activation. Refer to the “Additional Resources” section of this chapter for more information about sysprep limitations.
Best Practices You should use dynamically expanding disks rather than fixed virtual hard disks to minimize the size of the virtual machines in the library. Doing so will dramatically reduce the amount of traffic transferred and reduce the load on your network.
You should automate the process of updating machines in the virtual machine library. Currently, there is no way to offline update a Windows operating system. Managing updates requires a script that automates the process or a procedure that describes the manual processes. An automated script requires the following steps:
- Provision the virtual machines to a host machine.
- Register the new virtual machine.
- Power on the virtual machine.
- Silently install all updates.
- Power down the virtual machine.
- Unregister the virtual machine.
- Copy back the patched image to the library.
System Backup
Virtual Server 2005 R2 SP1 provides a new Volume Shadow Copy Service (VSS) writer. VSS writers are software interfaces included in applications and services that help provide consistent backups through the Volume Shadow Copy Service. The Virtual Server 2005 R2 SP1 writer responds to signals provided by the Volume Shadow Copy Service interface to allow the host and virtual machines to prepare their data stores for shadow copy creation by flushing all pending writes and to ensure that no writes occur on the volume while the shadow copy is being created. The VSS writer allows host and virtual machine backups to be performed from the host while the virtual machine is running. Without a VSS writer available, you would have to load a backup agent in every virtual machine, save the state, or shut down every virtual machine to ensure that memory and disk buffers are flushed to disk so that no data is lost.
The Virtual Server 2005 R2 SP1 VSS writer fulfills only half of the requirement. The backup application must implement support for the writer and have the ability to query the writer interfaces before it starts to back up the system. Refer to Chapter 17, “Managing a Virtual Server Infrastructure,” for a detailed discussion of Virtual Server backup and the VSS writer.
Important Because Windows Server 2003 SP1 and R2 versions were released before Virtual Server 2005 R2 SP1, Windows Server 2003 SP1 and R2 versions of NTBackup are not aware of the Virtual Server 2005 R2 SP1 VSS writer interface. Therefore, NTBackup will not properly signal Virtual Server or virtual machines to quiesce all disk and memory buffers before trying to back up the files.
Best Practices You should purchase a backup application that is aware of the Virtual Server 2005 R2 SP1 VSS writer to perform backups on Virtual Server 2005 R2 SP1 hosts. This will allow you to minimize the effort and load associated with performing backups of virtual machines.
Summary
This chapter covered best practices to address common configuration, performance, and operational issues associated with deployments of Virtual Server 2005 R2. You can avoid configuration issues by modifying the default virtual machine configuration folder, adding custom search paths for easy selection of files in the Administration Website user interface, enabling VMRC, and selecting configuration options to provide a secure remote virtual machine management solution.
Host performance issues can be avoided by selecting appropriate memory configurations, enabling full acceleration for your graphics display adapter, selecting and correctly configuring the right network adapters, and purchasing a SAN with high-RPM SATA or SAS hard disks and iSCSI support. You can avoid virtual machine performance issues by following best practices for your host hardware configuration, using proper resource allocation settings, improving your display graphics performance by configuring for performance and not visual effects, installing virtual machine additions, and using fixed-size SCSI virtual hard drives.
Finally, you can keep operational headaches to a minimum by establishing naming standards, establishing a library of sysprep virtual machines, and using the new Virtual Server 2005 R2 SP1 VSS writer to obtain the most flexible and best-performing backups of host and virtual machines.
Additional Resources
The following resources contain additional information related to this chapter:
About the Authors
Robert Larson works for Microsoft Consulting Services as an architect and expert on virtualization. He has developed hands-on labs, delivered Webcasts, and authored several white papers on Virtual Server 2005 and is a popular speaker on virtualization topics at events such as TechEd and ITForum.
Janique Carbone has spent the better part of 15+ years in the IT industry, including 7 years at Microsoft as a Senior Consultant and Technical Account Manager. In 2006, Janique founded the Infrastructor Group with a focus on virtualization technology. She is the co-author of the Microsoft Virtual Server 2005 R2 Resource Kit (Microsoft Press) and the Microsoft Windows Server 2008 Hyper-V Resource Kit (Microsoft Press) to be published in late 2008. Janique has a M.S. in Computer Science and Aerospace Engineering, as well as being an MCSE. You can reach her via email at [email protected].
The Windows Virtualization Team at Microsoft design, develops, and supports Virtual Server 2005.


