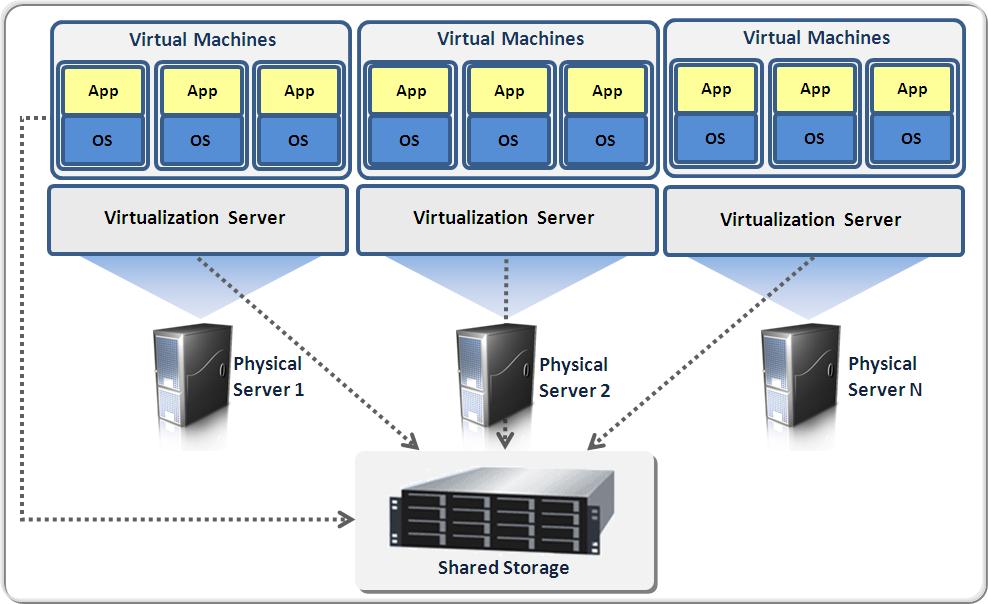
Virtualization is an excellent way to increase the utilization of the hardware at your organization. A Hyper-V server is one of the best virtualization solutions available in the market, and has the great advantage of being included with Windows Server at no extra cost. The latest version of Hyper-V takes this tool to an even higher level because it includes a number of new features that were missing earlier. Although an in-place upgrade option is not available because of architectural changes that are involved in implementation of a Hyper-V server, the in-network migration process detailed in this article works perfectly well.
In any contemporary IT environment, it is extremely important that an administrator be able to migrate across as many hypervisors as needed, for several reasons. One very common migration is between VMware and Hyper-V. However, the process does not get any easier just because it is common. It is still a complex process. There are a few specific steps that you need to take to ensure the success of your migration effort.
A couple of questions are in order first:
- How many VMs need to be migrated? The migration of large VMs can be efficiently accomplished by utilizing one of the several bulk migration tools that are available. Do remember the fact that each migration results in a specific amount of downtime, each instance of which costs a significant number of organizational dollars.
- How much downtime would be necessitated by my migration? In general, it is safe to say that the time needed to execute a migration is proportionate to the total volume of data that is present in the VM that is being migrated.
If it’s the case that you are going to migrate only a small number of VMs, the ideal way to migrate across hypervisors would be to use the actual tools provided by the vendors. Any support for OVF (open virtualization format) is directly built into vSphere, which means that there is a much larger range of platforms in addition to Hyper-V, to which your VMs can be migrated.
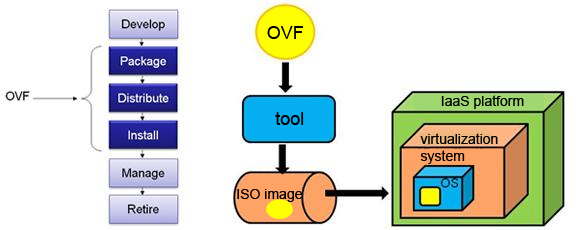
Bear in mind that Hyper-V does not support OVF in the same manner, which means that any migration to Hyper-V would require a few additional steps. However, the Virtual Machine Converter from Microsoft allows you to import VMware machines, which makes your job easy even in this scenario.
A program called the Azure Replica Wizard, which has OVF support built in, has superseded the migration tool this year. While this wizard can be used for free for one month during an evaluation period, you would need to pay after that. For now, it is recommended that you use the Virtual Machine Converter from Microsoft.

Performing a cleanup
Just before doing the actual migration of the virtual machine to Hyper-V from VMware, it is considered best practice to execute a cleanup on the actual source VM:
- First remove all CDs that are attached. This is because leaving any such media attached can cause disruptions to migrations. If you are using VMware’s most current web client, OVF will do an export of all the attached media.
- Now, look for the presence of any unnecessary hardware in the virtual machine. VMs can end up containing a considerable amount of virtual hardware that is unnecessary, such as serial ports, parallel ports, and sound cards.
- Next, clean up disks. This includes basic activities, such as emptying the trash can and removing unused applications. It is also considered a best practice to defrag the source volumes prior to migration.
- Finally, commit all snapshots. Given the fact that snapshots cannot be exported or used in the OVF, you should handle this by committing the snapshots or alternatively by reverting them, as per the specific need.
Once the cleanup of the VM is complete, it is ready for migration. It is critical to note that very specific ESXi versions are supported from a migration point of view. For instance, ESXi 6.5 is not supported as a source yet.
Preparation of Hyper-V server target
These are the steps in this process:
- First, complete the download and installation of the Hyper-V server.
- Now, you need to set up “Virtual networks” identical to those for the source host in Hyper-V using the host action “Virtual Switch Manager.”
- Next, download the Virtual Machine Converter from Microsoft (MVMC), which is a solution accelerator available for free. This tool has the ability to convert VMware virtual machines that are created with vCenter Server 5.0, vCenter Server 4.1, ESXi Server 5.0 and ESXi Server 4.1.
- Next, the MSI is to be run
- Now, you should enter the name of the actual location where MVMC is to be installed. Alternatively, you can use the location set by default and continue with the installation process happening on the local machine. Please note that the account that is executing the setup processes must be set up as the local administrator on the machine.
Converting VMs using the MVMC GUI
For achieving the best possible performance, it is highly recommended that the conversion process be executed on the destination host. What this means is that the MVMC should be installed and executed from the Hyper-V hypervisor. These are the steps involved:
- Open the MVMC, next open the “Source” page, and subsequently enter the details needed to connect to an ESX server, ESXi server, or a VMware vCenter server.
- Within the “Address” box, you should type the name of the VMware source server or the server IP address.
- Within the “User name” box, type the user name.
- Within the “Password” box, type the password and then click on Next.
- From the virtual machines page, select a virtual machine present on the source VMware server to convert.
- Please note the below:
- The MVMC always assumes that a virtual machine is in a running state. Any virtual machines that are not running (which are basically offline) cannot be converted by the MVMC.
- Each virtual machine should have the VMware tools installed and always be connected to an AD (Active Directory) domain.
- The boot disk that is attached to the actual source virtual machine will end up being converted into an VHD based on IDE. All the data disks that are attached to the actual source virtual machine would end up being converted into VHDs based on SCSI.
- The MVMC would create one more instance of the virtual machine on Hyper-V based on the actual configuration of the source virtual machine. While the source virtual machine remains intact, it will be shut down during the process of conversion.
- Now click on “Next.”
- On the “Virtual Machine Connection” page, enter the credentials for an admin account that can be used to connect to the virtual machine. This connection is required to uninstall VMware tools present on the source VM. The VM must be actually connected to an AD domain.
- From within the “virtual machine” box, type the name of the virtual machine.
- From within the “user name” box, type the domain and the user name.
- From within the “Password” box, type the password.
- In the option for “Final state of source VM,” you should make the choice to determine if the source VM is to be turned OFF or ON once the restoration completes.
- In the option for “Final state of target VM,” make the choice to determine if the target VM is to be turned OFF or ON when the conversion completes. Please note that the MVMC always saves a snapshot of the original source VM prior to the point when the tools are uninstalled. MVMC will always restore the VM to its original state after the disks connected to the VM have been copied to the machine where the actual conversion is taking place. Also, note that WMI (Windows Management Instrumentation) driven remote access should be enabled on the source VM.
- Now click on “Next.”
- From the “Workspace” page, click “Browse” to select the workspace folder path from which the UI may be run. You should ensure that you select a location that has sufficient disk space to store the converted VHD files.
- Now click on “Next.”
- Now, from the “Hyper-V Host” page, enter all the details required to connect to the destination Hyper-V server. The VM will be actually created on the Hyper-V server after conversion. The UNC path should be specified so that proper placement of VHD files happens.
- From inside the “Address” box, type the server’s IP address or the Hyper-V server’s name.
- In the “User name” box, type the user name and domain.
- In the “Password” box, type the password.
- In the “Path” box, click “Browse” to select the UNC path where the destination Hyper-V server will have the VHD file copied.
- Now, you should select if the VHD file should be dynamically expanding or be of fixed size.
- Click on “Next.”
- Review all details and click on “Finish” to complete the conversion process while on the summary page.
- Once the VM conversion completes successfully, the completion page will show up, where you click “Close.”
Export the VM
To execute an export to Hyper-V from VMWare, open the Virtual Machine Converter program from Microsoft. After you click through the opening page, under “Machine type,” select the option for “virtual machine conversion”. Click on “Next.” The following selection is for “Migration destination,” which allows you to migrate to either a Hyper-V or an Azure environment. Here, choose the option to “Migrate to Hyper-V,” and then click on “Next.”
On the following screen, you can select the actual Hyper-V host that is going to be the destination and the user account desired. In many cases, you could well be logged on as the admin or under another ID with admin privileges. The current account may be overridden by unchecking the box for “Use my Windows user account.”
The subsequent screen provides you the functionality related to defining where to upload all converted VMs. It is very important to set up the destination share properly to ensure that the user who is actually executing the conversion has sufficient rights and privileges necessary to complete it successfully. Domain administrators will anyways have complete rights on the associated shares. In general, it is best to leave the other options with the default values that are associated with them.
The next step is to select the ESXi host or source vCenter. Please note that this process works perfectly fine for free ESXi hosts. Note the fact that we generally use the domain admin credentials to log in to vCenter, which ensures that we can visualize all the machines present in the cluster. In any case, vCenter should always utilize Active Directory-based authentication in any medium to large-sized environment, with the proviso that settings may need to be adjusted as needed.
Standalone ESXi hosts are indeed well-supported from a migration point of view, with the appropriate host name and the suitable host credentials of the local ESXi host to be used. On the screen after that, the actual VM is to be chosen. Note that for any successful migration to happen into Hyper-V from VMware, all the VMs are to be maintained in a power-off state. Next, a location is to be chosen for all temporary migrations that need to happen, which should have a lot of spare storage. This selection is made in the workspace screen.
Now, you should double confirm the details mentioned on the summary page before clicking “Next.” The migration starts happening at this very moment. Once the entire migration from VMware to Hyper-V is completed, the server will automatically start up the guest, if the relevant option had been selected. At this point, the service for VMware tools would pause. After the boot-up is completed, this service should be removed.
Photo credit: Pixabay


This does not work on Windows Server 2016. A hypervisor host cannot have any SMB shares on it, and as such you cannot specify a location to save converted disk files.
Confirmed: does not work with Hyper-V Server 2016.
Error at Summary stage: “UNC Path ‘server\e$\vms’ is not valid or does not have write permissions.”
Other message boards suggest clicking Browse will prompt for credentials, or that accessing the folder first from the client computer will help, but these do not work for me.
That was a good idea for A STORY, but the steps are wrong and importing exporting hyper-v to VMware would be a mess. The data would be corrupted hence you need to have another go at it. Structured or unstructured data needs resolving, exporting and importing vm’s is unclear the same os or not, Networking and storage mapping kios, parallel options not even considered. if anyone try’s this
any chance u post the opposite direction (migrating exchange 2010 from hyper-v to vmware?) it will be most appreciated.
thank you