If you would like to read the next part in this article series please go to:
- Migrating from Domino to Exchange 2007 (Part 1)
- Migrating from Domino to Exchange 2007 (Part 2)
- Migrating from Domino to Exchange 2007 (Part 4)
- Migrating from Domino to Exchange 2007 (Part 5)
- Migrating from Domino to Exchange 2007 (Part 6)
So far in parts one and two of this article we’ve covered an introduction to the Transporter Suite for Lotus Domino, the installation of the suite, and the initial directory synchronization process between neilhobson.com, running Exchange 2007 and nghcloud.co.uk, running Lotus Domino 7. Now that the address books are synchronized, the next logical step is to ensure that users from each organization can see each other’s calendar free/busy information. Having a shared address book is good, but having the ability to query calendar free/busy information across both systems is even better; this ensures a better meeting booking experience across the two systems.
Free/Busy Connector
The Directory Connector doesn’t allow for the querying of free/busy information across systems – that’s the job of the Free/Busy Connector. Now that neilhobson.com and nghcloud.co.uk users can see each other in their respective address books, they may start to attempt to book meetings with each other. Imagine that a user within neilhobson.com, called Exchange User 1, attempts to book a meeting via Outlook Web Access with the nghcloud.co.uk user called Domino Administrator. Without the Free/Busy Connector, the neilhobson.com user will get the familiar ‘no information’ hatched line when querying for free/busy information as seen in Figure 16.
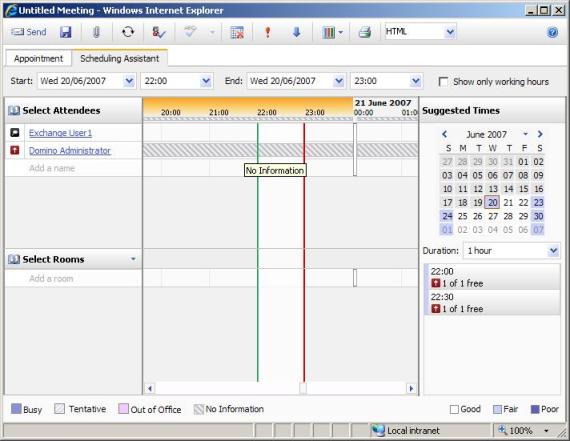
Figure 16: Life Without the Free/Busy Connector
Before we go ahead and install the Free/Busy Connector, there are a few things to note about it:
- A separate process of the transporter suite, excalcon.exe, must run on a Domino server to allow free/busy requests to work.
- It’s required to create a foreign domain document in Domino for free/busy information, something that isn’t a requirement for the Directory Connector.
- Microsoft states that the Domino server must be started as a service and not as an application for free/busy lookups to work. This can be configured from the window shown in Figure 17 when starting the Domino server. Note the option to always start as a service.

Figure 17: Starting Domino as a Service
Prepare the Domino Environment
Let’s look at creating the foreign domain document. Here’s the process that needs to be performed on the nghcloud.co.uk Domino server. The assumption here is that this task is performed using the Domino Administrator program.
- Run the Domino Administrator program.
- Click the Configuration tab and then expand Messaging in the left-hand pane.
- From the list of options presented under Messaging, select Domains. This option is shown in Figure 18.

Figure 18: Notes Domain Configuration
- Click the Add Domain button which then presents you with the New Domain window.
- The Basics tab should now be selected by default. Make sure that the Domain type: field is set to Foreign Domain and then type “Exchange” (without the quotes) into the Foreign domain name: field. It’s probably best that you use “Exchange” as the foreign domain name in Domino, otherwise you have to run the Set-DominoDirectoryConnector cmdlet with the –ForeignDomain parameter to alter the Directory Connector configuration. The relevant portion of the completed Basics tab is shown in Figure 19.

Figure 19: Foreign Domain Basics Tab
- Next click the Mail Information tab. Enter the name of the Domino server running excalcon.exe into the Gateway server name: field. Now, we haven’t installed excalcon.exe onto a Domino server yet, but in this case we know that the nghcloud.co.uk administrator will install it onto the server called domino/nghcloud.co.uk so that’s what is entered here. In the Gateway mail file name: enter mail.box. The relevant portion of the completed Mail Information tab is shown in Figure 20.

Figure 20: Foreign Domain Mail Information Tab
- Finally, click the Calendar Information tab. The Calendar server name: field should again contain the Domino server running excalcon.exe, namely domino/nghcloud.co.uk in this article. The Calendar system: field should be configured with a name for the Exchange calendar system. Microsoft recommends using a name of ExchFreeBusy, so let’s stick with that in this article as the name explains the usage fairly well. The relevant portion of the completed Calendar Information tab is shown in Figure 21.

Figure 21: Foreign Domain Calendar Information Tab
- Once these tabs have been completed, just click the Save & Close button to complete the foreign domain creation process. If all has gone well, you should see a screen similar to that shown in Figure 22.

Figure 22: Foreign Domain Creation
Installing Excalcon.exe
Whilst we’re in Domino configuration territory, we might as well perform another of the required Domino configuration steps, namely the installation of the excalcon.exe process. This needs to be installed onto nghcloud.co.uk’s Domino server and is achieved by running the transporter.msi file (or transporter32.msi if you’re using the 32-bit version) on the Domino server. Here are the steps required:
- Skip through the welcome screen, then onto the Licensing screen where you’ll obviously need to accept the license.
- At the Select Components and Install Location screen, make sure that the Microsoft Transporter Tools component will not be installed and that the Free/Busy Connector Add-In Task for Lotus Domino will be. Doing this makes sure that only excalcon.exe is installed onto the Domino server and not the rest of the transporter suite. This is shown in Figure 23 below.

Figure 23: Installing Free/Busy Components
- Complete the installation by clicking the Next button and then the Install button on the Ready to Install screen.
- When the installation has finished, it’s now time to modify the notes.ini file found on the Domino server so that the excalcon.exe process is always loaded. By default, the notes.ini file will be found in the \Program Files\Lotus\Domino folder on whatever drive you installed Domino onto. One of the lines in notes.ini begins with the string ServerTasks= such as the example shown below in Figure 24.
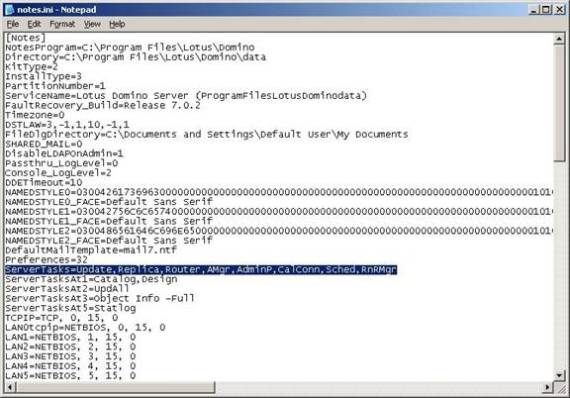
Figure 24: Default notes.ini File
- The highlighted line in notes.ini shown in Figure 24 needs to be modified to include the excalcon.exe process. The additional text required to make to the notes.ini file is in the following format:
,excalcon <Exchange server FQDN> <Foreign Domain Name>
In our example, neilhobson.com’s Exchange server is called W2K3BASE and is within the neilhobson.com domain. You’ll remember that we’ve just created the foreign domain name with a name of Exchange, so this text becomes:
,excalcon w2k3base.neilhobson.com exchange
Therefore, the modified notes.ini file will look like the one shown in Figure 25.

Figure 25: Modified notes.ini File
- Once notes.ini has been modified and saved, you can either restart the Domino server application or invoke the excalcon.exe process without restarting Domino by entering the following command at the Domino server console:
load excalcon <Exchange server FQDN> <Foreign Domain Name>
So in our case this command becomes:
load excalcon w2k3base.neilhobson.com exchange
However, it’s not worth doing this yet as you’ll get an error when you attempt to load excalcon on the Domino server. If you think about it, we’ve not actually created the connector yet and the required service isn’t running on the Exchange server. The error is shown in Figure 26.

Figure 26: Loading excalcon.exe on the Domino Server
Summary
Here in part three we’ve looked at the first steps required in preparation for the creation and configuration of a Free/Busy Connector between Exchange 2007 and Lotus Domino. These steps have centered around the preparation of the Domino environment. In part four, we’ll look at preparing the Exchange environment, followed by creation and configuration of the Free/Busy Connector.
If you would like to read the next part in this article series please go to:


