If you would like to read the first part in this article series please go to Mobile Device Management (Part 1).
Introduction
In the first part of this article we explored the basics of the new Mobile Device Management capabilities of Exchange 2010. We saw all the possible access states and how Exchange determines the state each device should be assigned.
This second and final part will be hands-on as we will see how to configure and manage all aspects of Mobile Device Management.

Controlling Access States
As we saw in the first part of this article, there are 3 ways of controlling the access state for mobile devices. Administrators can configure:
-
Exchange ActiveSync [EAS] organization settings;
-
Organization access rules for mobile device families or specific models;
-
Personal exemptions for users.
Although I will explain each method in this order for simplicity, remember that they are applied in the reverse order as explained in the Determining Access States section.
Before we start, it is better to clarify the difference between a device family and model and how to get this information.
The device’s family and model is communicated by the device itself to Exchange as part of the EAS protocol. Basically, the difference is that family is broader like Pocket PC while the model is more specific like HTC HD2 T8585 or Palm Treo 850. This distinction exists because many device manufacturers release the same device with different names on different carriers.
There are several methods which administrators can use to obtain information regarding device families and models. As EAS uses HTTP, every request is recorded in the IIS web logs, by default saved in C:\inetpub\logs\logfiles\W3SVC1\. In there, we can search for ActiveSync entries where we will have entries similar to the one below where we can see the username, DeviceID and DeviceType among other information:

Figure 2-1: Exchange ActiveSync IIS logs
As normally these logs have thousands of entries, it might not be easy to search them. A more effective method is to use the Exchange Management Shell [EMS] and the Export-ActiveSyncLog, Get-ActiveSyncDeviceStatistics or Get-ActiveSyncDevice cmdlets. The first reads a single IIS log file and exports the relevant information regarding EAS into 6 different CSV files. The ones we are interested in are the UserAgents and Users files as they include device models and families.

Figure 2-2: Export-ActiveSyncLog results
The last two cmdlets provide slightly different information, but for the purpose of this article both provide the information we are looking for: DeviceId, DeviceMobileOperator, DeviceOS, DeviceType, DeviceUserAgent and DeviceModel. We can easily collect the information for every user that has used EAS at least once, export it to a CSV file and then analyze the results:
(Get-CASMailbox –ResultSize Unlimited -Filter {HasActiveSyncDevicePartnership -eq $True} | Get-Mailbox) | ForEach {Get-ActiveSyncDeviceStatistics -Mailbox $_} | Export-Csv E:\Logs\EAS.csv -NoType
We can automatically group the statistics by DeviceModel, for example:

Figure 2-3: Sort Exchange ActiveSync Stats by Device Model
Or simply check the details for a single user:

Figure 2-4: User’s ActiveSync Device Statistics
The final method is to use the Exchange Control Panel [ECP] as we will see later in this article.
EAS Organization Settings
This is the first step into configuring access levels. When Exchange 2010 is first installed, the default access level is set to Allow, which means that any device is able to automatically connect to Exchange as long as they comply with the EAS policy. This value can be set to Allow, Block or Quarantine by using the EMS or the ECP.
With the EMS, we use the Set-ActiveSyncOrganizationSettings cmdlet with the DefaultAccessLevel parameter.
This cmdlet also allows us to configure two other useful settings using the following parameters:
-
AdminMailRecipients – specifies the e-mail address(es) of the administrator(s) (can also be a distribution list) that will receive an e-mail when a device is quarantined;
-
UserMailInsert – specifies the text to be added to the e-mail message sent to users when their mobile device is blocked or quarantined.
Set-ActiveSyncOrganizationSettings –DefaultAccessLevel Quarantine -AdminMailRecipients [email protected], [email protected] –UserMailInsert “Your mobile device is temporarily blocked from synchronizing with the server while permissions are verified.”
To use the ECP, follow these steps:
-
Log in to the ECP;
-
Make sure you are managing My Organization (you will only see this option if you have Exchange Administrator access);
-
Select Phone & Voice -> ActiveSync Access tab;
-
Click on the Edit button and you will be presented with the following screen where we will see all the options we set up using the EMS:
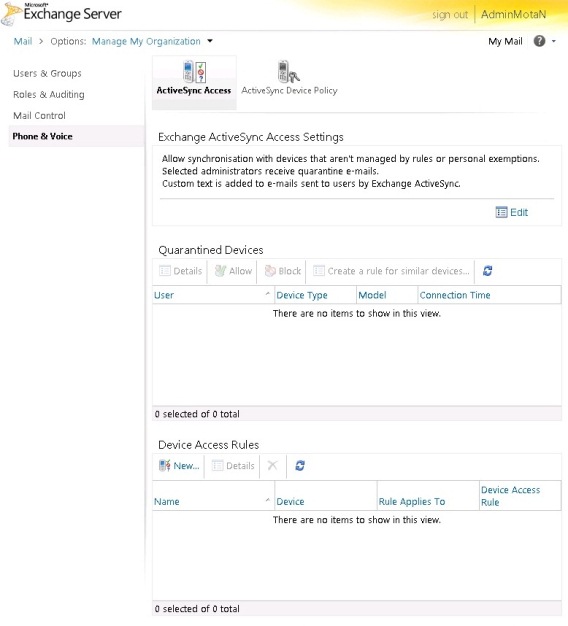
Figure 2-5: The ActiveSync Access page

Figure 2-6: Configuring EAS Organization Settings through the ECP
In this picture we can confirm the settings we configure using the EMS and the text that the user received when the mobile device was quarantined (Figure 1-2).
Note:
The default organization settings will be applied only if a rule specific for a device or user does not match!
Setting the access level to Quarantine at the organizational level, allows administrators to monitor which devices and users are making new connections to Exchange. This means that if there is no rule for a device or if there is no exemption for the particular user, then any unknown device will be quarantined. This process might be useful in cases where administrators want to gradually allow only particular devices that are supported and block all other devices.
Organization Access Rules
These rules allow administrators to control the access level of a group of devices based on their family or model. The easiest way to create a new rule is to use to the ECP by clicking in New… under Device Access Rules on the ActiveSync Access tab where we configured the EAS organization settings previously.

Figure 2-7: New Device Access Rule
In here you can click on Browse to see a list of all the device families and models that have already connected to Exchange. If this is a brand new installation of Exchange and no device has ever connected, these lists will be empty.
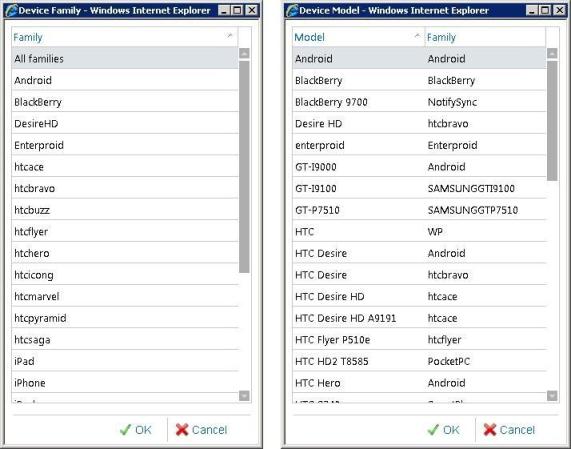
Figure 2-8: Device families and models

Figure 2-9: New Device Access Rule for Device Samsung GT-I9100
Once you have selected the family or model (have in mind that when creating rules you can only select the device’s family or model, not both!), you can choose to allow, block or quarantine it. After you select the desired action and click Save, the rule is created:

Figure 2-10: Device Access Rule created
In this case, the rule we just created is redundant as we already set the access level to Quarantine at the EAS organizational level settings.
We can also create these rules from the list of quarantined devices. When a device is quarantined, we can select it from the list of Quarantined Devices and then click in Create a rule for similar devices…. This will open a window similar to Figure 2-9 where we can choose to Allow or Block similar devices.

Figure 2-11: Quarantined Devices
After we choose to Allow the device, the rule will automatically allow all devices that are in quarantine, as well as identical devices that connect from this moment on, that match the device family or model (in our case model) covered by the new rule:

Figure 2-12: New Device Access Rule created
It is also possible to create a rule based on a user’s device that has already connected or tried to connect to Exchange:
-
Select Manage My Organization and then click on Users & Groups;
-
Search the user for whom you want to base your rule on, and then select Details;
-
Under Phone & Voice Features, select Exchange ActiveSync and then select Edit;
-
Under Mobile Devices, select the device that you want to create a rule for, and then select Create a rule for similar devices…;
-
Select whether you want this rule to apply to the selected device family or model;
-
Select whether to allow, block or quarantine the chosen devices;
-
Click Save to create the rule.
The rule will now appear in the main screen as the examples above. However, note that these rules don’t apply just for that user, but for everyone with identical devices!
To create these rules using the EMS, you use the New-ActiveSyncDeviceAccessRule cmdlet with the AccessLevel (the state for the device), Characteristic (either DeviceType or DeviceModel) and QueryString (which device type) parameters:

Figure 2-13: Creating New Device Access Rule through EMS
To check for any created rules, we use the ECP or the Get-ActiveSyncDeviceAccessRule cmdlet which will provide the exact same information as seen in Figure 2-13.
Note:
Remember that if a device tries to connect to Exchange and there is no access rule in place that matches the user or the device, the default organization settings will be applied.
Personal Exemptions for Users
The final method of controlling mobile devices is by creating rules that only apply to specific users. These rules allow administrators to either allow or block (you cannot quarantine) particular devices (based on the DeviceID) for a user regardless of EAS organizational settings or access rules. If a user tries to connect a different device that does not match an exemption, that device’s access state will be determined by the EAS organizational settings or access rules.
As with all previous methods, this one can be achieved through the ECP and through the EMS with the Set-CASMailbox cmdlet and the ActiveSyncAllowedDeviceIDs and ActiveSyncBlockedDeviceIDs parameters.
To use the ECP, the method is similar to the last one demonstrated in the Organization Access Rules section. To perform it, you must ask the user to attempt to synchronize the device with Exchange so that it appears in the user’s ECP. As an administrator (not as the user), login to the ECP:
-
Select Manage My Organization and then click on Users & Groups;
-
Search the user for whom you want to create the exemption for, and then select Details;
-
Under Phone & Voice Features, select Exchange ActiveSync and then select Edit;
-
Under Mobile Devices, select the device that you want to exempt and then click either Allow or Block;
-
Click Save to create the exemption.
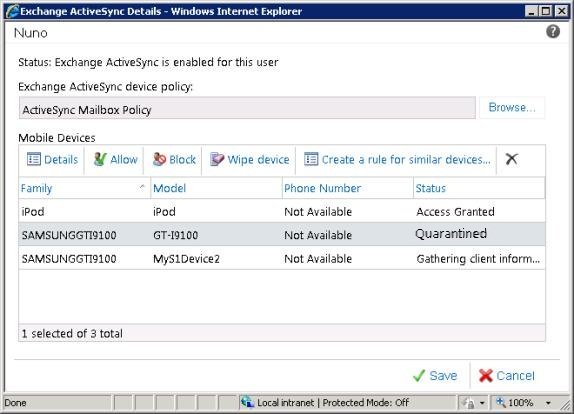
Figure 2-14: Creating Personal Exemption Rule through ECP
To achieve the same result from the EMS, we must know the DeviceID which we get from the e-mail we as an administrator receive when a device is quarantined or by using any of the methods explained in the beginning of this article. After we know the DeviceID, creating the rule is straightforward:
Set-CASMailbox nuno –ActiveSyncAllowedDeviceIDs “SAMSUNG1355310041884853”
To verify any of these methods, we can again use the ECP by following the previous steps until step 4 and by clicking on Details instead of Allow or Block. A new window with details about the selected mobile device will open. The Access state and Access set by tell us what the access level is and how it was assigned. As we can see, the device was granted access by an Individual Assignment (exemption):

Figure 2-15: Mobile Device Details window
To check using the ECP there are 3 cmdlets we can use: Get-ActiveSyncDevice, Get-ActiveSyncDeviceStatistics (identical output for the information we want) or Get-CASMailbox:
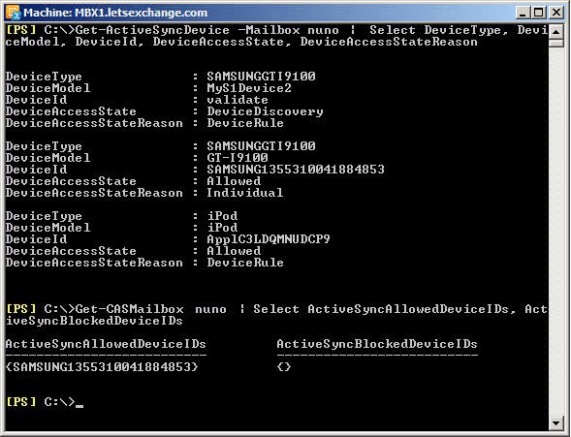
Figure 2-16: Check Personal Exemption through EMS
In the picture above, we can see that the Samsung device has been allowed to connect to Exchange because of the exemption we just created while the iPod is also allowed but because of a device rule instead.
Unfortunately, there is no GUI to check for exemptions. We can use EMS to search for users that have either ActiveSyncAllowedDeviceIDs or ActiveSyncBlockedDeviceIDs set up with the following cmdlet:
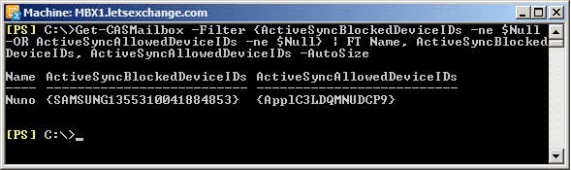
Figure 2-17: Searching for Personal Exemptions
Conclusion
The new Mobile Device Management functionality of Exchange 2010 is a big step forward. However, with so many new MDM solutions out there, Microsoft should improve this even more.
Maybe the next steps will be an easier way to control what applications can be installed on devices or being able to geographically locate a device if a user reports it as stolen.
If you would like to be notified of when Nuno Mota releases the next part in this article series please sign up to our MSExchange.org Real Time Article Update newsletter.
If you would like to read the first part in this article series please go to Mobile Device Management (Part 1).


