When planning remote access to any application in your organization, the security around authentication must be designed and implemented. With remote work becoming a permanent part, this has become more important than ever. This article shows you how to force multifactor authentication for all remote users using Microsoft Teams. The same principle can be applied to any other application that relies on Azure Active Directory.
Enabling Azure AD Premium
The first step to implementing multifactor authentication for remote workers using Microsoft Teams is to enable Active Azure AD Premium. An easy way to activate the offer is to go to Azure Active Directory. In the new blade, click on Security and then click on conditional access. A banner on the right side will be displayed, informing the user to activate the Azure Premium offer to access all resources. That is what we are looking for. Click on it (Item 1), and then on Activate located under Azure AD Premium P2 (Item 2), as depicted in the image below.

The first step is to create at least a couple of groups to nest users together and use those groups to roll out services and features to the users. We will create two groups: one to control the MFA users and a second one to have all Microsoft Teams users and control the adoption of the product.
These new groups can be created on your Active Directory on-premises (if you are synchronizing) or in Azure Active Directory. We may need new groups to support your upcoming solutions being enabled to the users. Your design and business requirements may vary. Thus, it is hard to say when to use a single group or several.
In the image below, we are creating a group called AP6-MSTeams-Users and adding two users: Adrian Veidt and Daniel Dreiberg. To create the Azure AD Group, click on Azure Active Directory, Groups, and then New Group. Fill out the required information and select the desired users, and click on Create to complete the process.
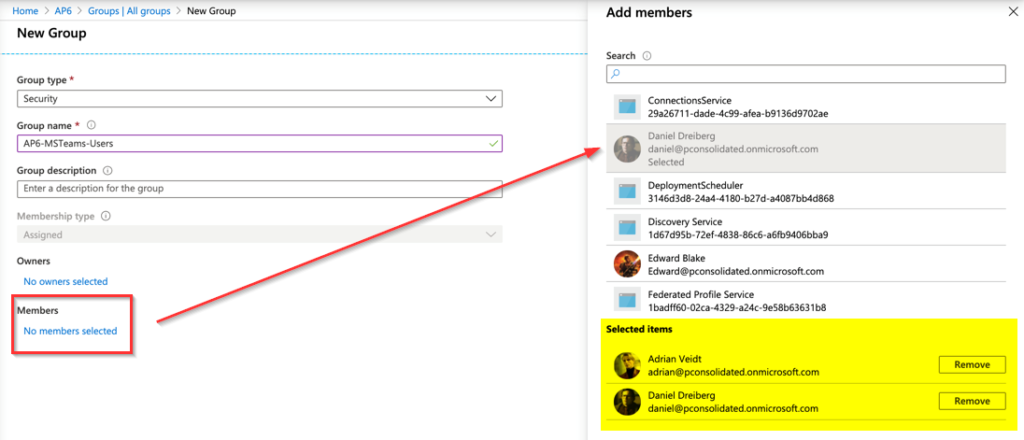
We will create the AP6-MFA-Users, and we will add Adrian Veidt, Daniel Dreiberg, and Laurie Juspeczyk. The names, as you may have noticed, are from The Watchmen universe!
Managing Azure AD Premium
The use of Azure Premium enables a lot of features to protect your environment. We will focus on some of those features to address the goal of this article, which is to enable multifactor authentication for all users using Microsoft Teams.
The first step is to manage the MFA registration policy. We will define how we will roll out the MFA to our end-users by asking them to perform registration, and this procedure can be done way before releasing a service, such as Microsoft Teams.
Open Azure Active Directory in the Azure Portal. In the new blade, click on Security, Identity Protection, and click on MFA registration policy. A blade with all settings will be displayed in Users. Select a group (or even all users depending on the company’s size). In this article, we are going to choose the group that we created to support Microsoft Teams.

What is the impact of this setting? All users covered in the configuration will receive the dialogue box depicted in the image below, which will help them configure their MFA. Although it is not required, we can have some tech-savvy users getting the work done before we enforce the use of MFA in any application/service.

Enforcing multifactor authentication only on Microsoft Teams
Time to configure conditional access, which allows flexibility when creating rules to access your applications. By default, new subscriptions (after October 2019) have security defaults enabled.
If you plan to take advantage of the conditional access, we must disable such features and start controlling access through the conditional access blade. Unfortunately, both features cannot coexist.
Logged in the Azure Portal, click on Azure Active Directory, click on Properties (Item 1). In the new blade, click on the last link label as Manage Security Defaults (Item 2), and select No (Item 3). Click on Save.

Time to get our feet wet and create the first policy that will require multifactor authentication for remote users using Microsoft Teams.
Our first stop is to define the IP range being used by your offices. We will require MFA for remote users who are not in a corporate office.
Click on Azure Active Directory, in the blade properties, click on Security. Click on conditional access, and that brings all existing policies on the right side. Before getting to the policies, click on Name locations, and click on New location. Fill out the information with your office location, and we can even define a country instead of an IP address, in case you need more permissive access.

Back to the main attraction: Policies! Click on Policies. There shouldn’t be any policies being listed. Click on New.
At first, the process may sound complicated, but it is just a matter of time to get used to. First, label the policy (Teams in our article), and we are going over every two main areas of the policy, which are: assignments and access controls.
Think of an assignment as an “if” clause. When any given user is trying to authenticate, they must satisfy all assignments of the policy, and if they are, then an action will occur, which we define in the access controls area. Note: If we have more than one assignment, they are considered a logical “and” clause when they are being evaluated.
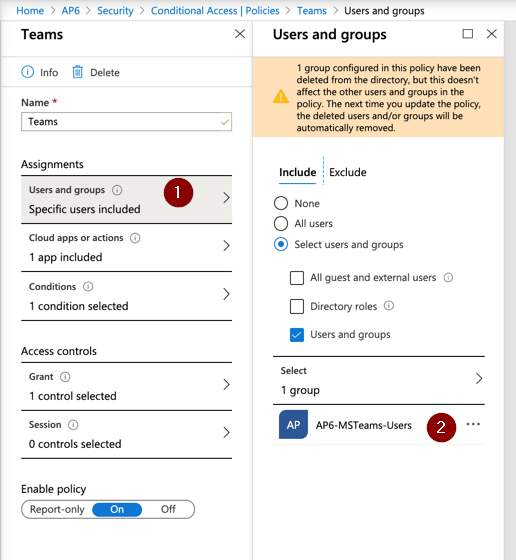
In the Assignments section, we will configure the following settings:
- Users and Groups (Item 1): We will include only AP6-MSTeam-Users (Item 2).
- Cloud apps or actions: We will select Microsoft Teams from the list.
- Conditions: We will define Locations, we will configure Include: Any and Exclude: All Trusted locations.
In the Access Control section, we will click on Grant, select Grant Access, and check the option Require multifactor authentication.
The last step is to enable the policy by selecting On in the last setting. Click on Create.
What’s next?
At this point in our article, all users being listed in the AP6-MFA-Users should be receiving notification to configure their MFA (in our example, it’s a total of three users). After creating the conditional access above, all members of the AP6-MSTeam-Users are being requested to authenticate using MFA when using Microsoft Teams and from an IP that does not match the corporate office (any remote office user).
Perform some testing in the current scenario to validate the effectiveness of the new conditional access policy. Try to use a new profile or even a new machine and clear the cache after each test to make sure that you are performing the correct analysis.
- Try to authenticate at the Microsoft Teams website in a new session of your browsers from a user that belongs only to the MFA group. The result should provide information to configure MFA.
- Try to authenticate to the same place above using a member of the MSTeams-Users group, and the result should be MFA enforced.
- Assign an Outlook license to a member of the group MSTeams-Users (if they don’t have one yet), and try authenticating the user. It should be able to authenticate without MFA (we are enforcing just for Teams).
- Repeat those tests from corporate and from a public IP (remote office).
If you have deployed the features we went over in this article, you increased your security posture by adding one extra layer of security to your end-users. We covered the technical aspects of enabling multifactor authentication for Microsoft Teams. Now make sure that you document and inform the end-user as part of your rollout plan.
Featured image: Shutterstock