In the previous article in this series, I showed you how to build a template that could be used to create virtualized Nano servers. That’s all well and good, but one of the primary use cases for Nano Server is that of building Nano Server-based Hyper-V servers. By running Hyper-V on Nano Server, you can reduce the server’s footprint, which improves security and also frees up some of the resources that would have otherwise been used by the host operating system, so that those resources can instead be used to host more virtual machines.
As was the case with creating a Nano Server template for System Center Virtual Machine Manager, the first step in creating a Nano Server-based Hyper-V deployment is to create a Nano Server image.
Download the tool
The easiest way to create the required image is to download the Nano Server Image Builder tool, which is a graphical tool for creating Nano Server images.
Upon launching the tool, you will be prompted as to whether you would like to create a new Nano Server image or create a bootable USB media device. Select the option to create a new Nano Server image, and you will be taken to the tool’s Before You Begin screen. There isn’t really anything to do on this screen, so click Next to move on to the next screen.
This screen asks you to provide the location for the Windows Server media source. The interesting thing about this screen is that you don’t actually have to supply the Windows Server installation media. The Windows Server 2016 installation DVD contains a folder called NanoServer. This folder is the only thing that the Nano Server Image Builder needs. That being the case, I simply copied the NanoServer folder to my hard disk, so that I have a copy that I can use any time that I need to create a new image. Because I opted to copy the Nano folder, and not the entire installation media, I am not using up very much hard disk space with the media files.
One thing that you need to know about my technique of copying the NanoServer folder to the hard disk is that when the Nano Server Image Builder tool asks for the location of the Windows Server Media Source, you will need to provide the path to the NanoServer folder’s parent directory. For example, the NanoServer folder exists on my hard disk at C:\NanoServer. As such, the path that I enter into the Nano Server Image Builder is C:\, as shown below.

You will have to tell the Nano Server Image Builder tool where it can find the NanoServer folder.
Click Next, and you will see a screen displaying the Windows Server license agreement. Accept the license terms, and then click Next.
The next screen that you will be taken to is one of the more important screens that is presented by the wizard. This screen asks you whether you want to create a virtual machine image, or a physical machine image. You can see what this looks like below.
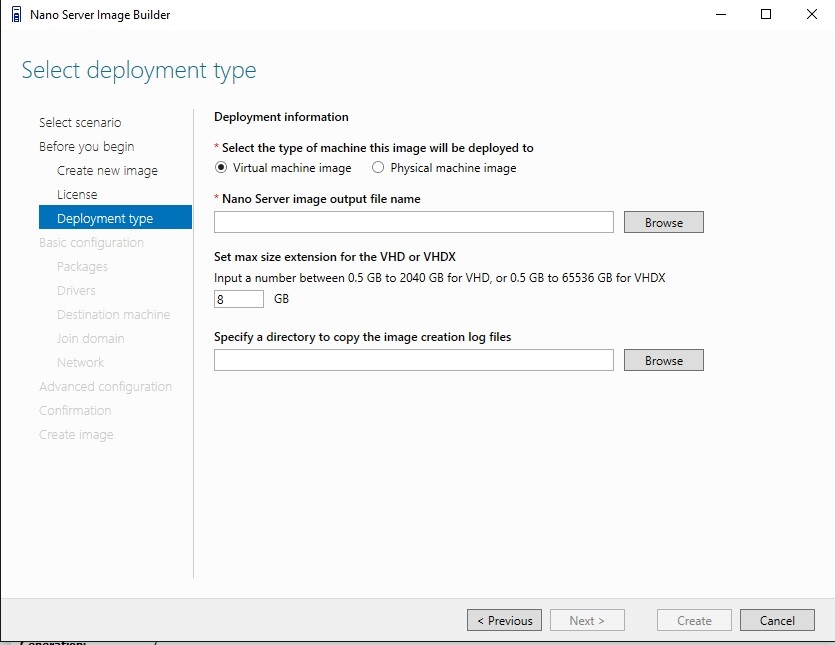
If you plan to use the image for bare-metal Hyper-V deployments, then you will obviously use the Physical Machine Image option. In my case however, I am going to be using the Virtual Machine Image option instead. As crazy as that sounds, there is a method to the madness. The reason why I am making a virtual machine image is, because for the purposes of this article series, I have no choice but to run the Nano Server inside of a VM. Otherwise, I would not have a way of making screen captures. Even so, Windows Server 2016 supports nested virtualization, so it should not be a problem for me to run a Hyper-V server inside a VM.
Before moving on, you will need to specify an output file name and a directory within which to place the image creation log files.
Installation
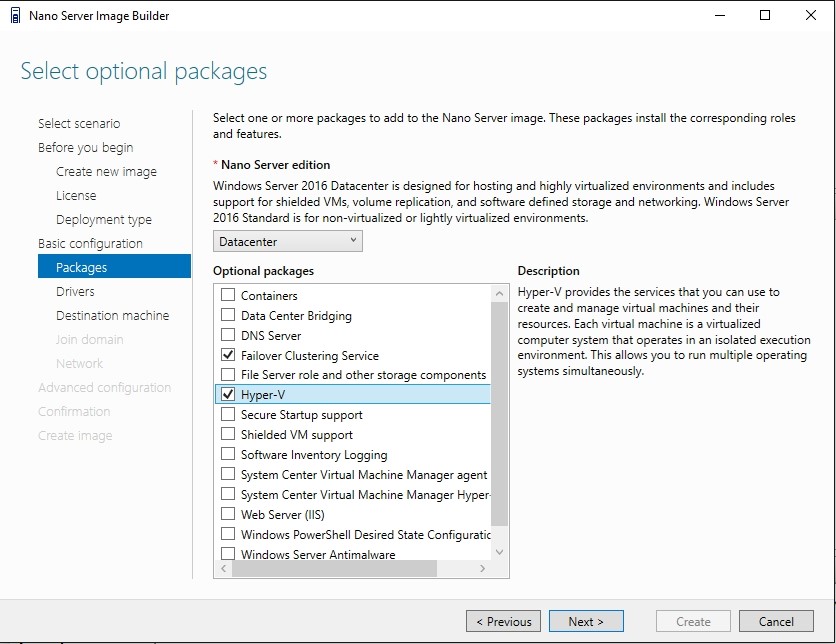
Click Next, and you will be taken to the Basic Installation screen. There isn’t really anything for you to do on this screen, so click Next again. You should now see the Packages screen. You are going to have to use this screen to select the packages that you want to include within your Nano Server image. Since we are creating a Hyper-V Nano Server, you will have to select the Hyper-V Server package. In most cases, you will also need to select the Failover Clustering Service package, as shown below. Failover clustering isn’t technically required, but most real world Hyper-V deployments are clustered.
Click Next, and you will be taken to the Drivers screen. If you are going to be deploying Hyper-V onto physical servers, then you will need to add any required drivers. For example, you may need drivers for network adapters or storage controllers.
The next screen that you will see asks for a computer name and an administrative password. Remember, this image is going to act as a template for bare-metal deployment, not as the actual OS for a Hyper-V server. Therefore, you should leave the Computer Name field empty. It is, however, important to go ahead and provide an administrative password.
The next screen provides you with the option of joining a domain. This screen gives you the option of either leveraging an existing computer name within the Active Directory or of using a domain blob file. In our case, we are building a template, so neither of these options is appropriate. We will deal with joining a domain later. For right now, just click Next without joining a domain.
The next screen that you will see asks you to provide the network configuration for the image. You have the option of enabling virtual LAN, and enabling the use of WinRM from remote subnets. This is also where you decide whether to assign IP addresses through DHCP or to use static IP addresses. Because this is going to be a template image, you should not set an IP address manually.
Click Next, and you will be taken to the Advanced Configuration screen. We don’t have to set any advanced configuration options for what we are doing, so just click the option to create a basic Nano Server image, and then click the Create button. Your Nano Server image will now be generated.
Coming up
In this article, we have created an image that we will use for bare metal deployments of Hyper-V server. In the next article in this series, I will show you how to put this image to work.


