Microsoft Hyper-V is a hardware virtualization product allowing you to create and run virtual machines (VMs). Each VM will run its own operating system and programs. Microsoft Hyper-V does a great job of hosting VMs despite their operating system
That said, every once in a while, you might discover that you can’t install an operating system onto a Hyper-V VM. This could be due to several reasons. In this article, I’ll mention some of these common reasons and show you how you can fix the problems you encounter.
Let’s discover the reasons preventing you from installing an operating system on a Hyper-V VM.
Issues with Virtual Machine Generations
If you’re having trouble installing an operating system onto a Hyper-V VM, the most common reason would be that your VM’s generation is incorrect.
When you create a Hyper-V VM, you’ll have to choose between a Generation 1 and a Generation 2 VM. In general, if you’re installing a 64-bit Windows operating system onto a VM, you should create a Generation 2 VM. If you install anything else, though, including a 32-bit Windows operating system, you should create a Generation 1 VM first.
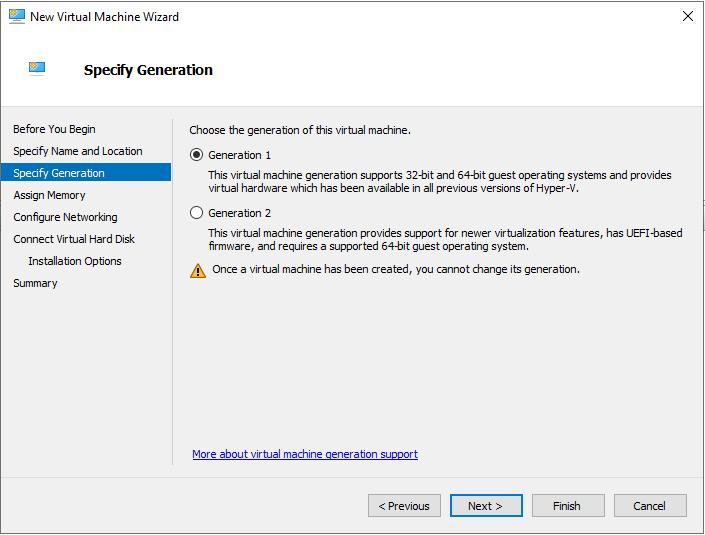
Remember that what I laid out in the previous paragraph is a general guideline and not an absolute rule. In some exceptions, these guidelines won’t work. For example, you’ll need to install Windows Server 2008 into a Generation 1 VM. That’s because the operating system is so old it predates Generation 2 VMs.
Conversely, you can install Red Hat Enterprise Linux version 6 and above into a Generation 2 VM. But keep in mind, you can only install it if the Hyper-V host is running Windows Server 2016 or above. Microsoft also provides a detailed list of the supported operating systems in each VM generation.
Now, you may wonder what happens if you try to install a guest operating system into a VM running an incorrect generation. Let’s discover below!
What Happens If You Use the Wrong VM Generation?
If you’re attempting to install a guest operating system onto a VM running an incorrect generation, you’ll experience different problems that will vary depending on the operating system itself. You might see blue screen errors or find that the VM doesn’t support your hardware. In addition, the operating system might simply not load.
For the sake of demonstration, I’ve created a Generation 2 VM and then booted it from an Ubuntu ISO file. Initially, the boot process completely failed. As you can see in the figure below, Hyper-V didn’t even try to install the operating system. It simply resorted to attempting a PXE boot since it didn’t know what to do with the ISO file.

After a few minutes, Hyper-V will give up and display an error message like the one shown below.

Unfortunately, you can’t “fix” this problem since Hyper-V won’t allow you to change a VM’s generation once it has been created. Thus, the solution here is to delete the VM and then recreate it using the correct version.
That said, if you’re seeing an error message despite having the correct VM generation, this is another issue. Let’s discuss what to do in this case below.
What If the VM Generation Is Correct?
In rare situations, you might see an error message like the one shown above even though the VM generation is correct. If that happens, the problem almost always ties back to the installation media. For example, if you’re installing an operating system from a physical DVD drive, the drive may not be mapped to the VM.
On the other hand, if you’re attempting to install from an ISO file, the file might be damaged or corrupt. Similarly, the ISO file may be in a location where Hyper-V can’t access it or a connectivity disruption may occur interrupting the OS deployment process. The best thing you can do at this point is to download a fresh copy of the ISO file. That way you can ensure it’s good and verify that Hyper-V can access the ISO file without issue.
The Bottom Line
When trying to install an operating system to a Hyper-V VM, this could fail for several reasons. The first thing you should do then is to ensure your VM is of the correct version. If the version checks out, your problem is most likely related to a damaged or inaccessible ISO file.
In this article, I’ve explained how you can go through solving each of the problems preventing you from installing the operating system. Thus, this article should be your guide to fixing the problems of installing an operating system to a Hyper-V VM.
Have more questions about a Hyper-V VM? Check out the FAQ and Resources sections below.
FAQ
How can I find out what generation my existing VMs are?
To find out the generation of your existing VM, you should go to PowerShell first. You’ll then have to enter this command: Get-VM | Select-Object name, Generation.
How are the Generation 1 and Generation 2 VMs different?
Generation 1 and Generation 2 VMs have some differences between them. Generation 2 VMs support secure boot while Generation 1 VMs don’t. In addition, Generation 2 VMs support larger boot volumes (up to 64 TB compared to 2 TB).
What should I do if the ISO file isn’t working?
If you’re having trouble getting an ISO file to work, you’ll first need to check that you have the correct VM generation. If that’s out of the way, you can try to re-download the file. You should also ensure you’ve downloaded the ISO file directly from the vendor instead of a mirror site or an internet archive site. That’s because non-vendor sites are notorious for modifying ISO files, even integrating malware sometimes.
How can I configure a VM to use a physical DVD drive?
Only Generation 1 VMs support the use of physical DVD drives. To use a physical DVD drive, open the VM console and then select the DVD Drive | Capture options from the Hyper-V Media menu.
Why is my Generation 1 VM unable to capture a physical DVD drive?
At least some, possibly all, versions of Hyper-V have a limitation that prevents multiple VMs from accessing a DVD drive at the same time. If you’re having trouble accessing a DVD drive from a VM, you’ll need to figure out which VM is currently using the drive. You should then release the DVD drive from that VM. At that point, you should be able to capture the drive without any issues.
Resources
TechGenix: Article on Hyper-V Virtual Switch
Discover how to resolve problems when creating a Hyper-V virtual switch.
Microsoft: Article on Hyper-V features
Read more on the Hyper-V features that are compatible with each VM generation.
TechGenix: Article on Expanding Hyper-V Virtual Disks
Discover the 5 things you should know when expanding a Hyper-V virtual disk.
TechGenix: Article on Hyper-V Integration
Learn how to manually deploy the integration services of a Hyper-V.
TechGenix: Article on Hyper-V Best Practices
Read more on the best practices for running Hyper-V on Windows 10.


