Introduction
When Outlook Web Access (OWA) was first introduced it was more like a kind of ‘backup’ client, to be used perhaps in situations where the user’s main Outlook installation wasn’t available, or maybe when travelling on business. The latest incarnation, OWA 2003, makes full use of client-side scripting to provide a client that can rival desktop Outlook, and some organizations are beginning to use it exclusively for their Exchange mail access. When it comes to administering the features of the interface, however, things haven’t been so straightforward. Themes support (from the OWA Options page) allowed quick and easy changes to the overall visual appearance, but anything beyond that generally required manipulation of the registry. Direct manipulation of the registry is not, it has to be said, something that should be done as part of the normal day-to-day duties of the Exchange administrator, since a simple mistake can cause a lot of damage, so a more user-friendly approach would surely be a most useful product enhancement.
Happily for us, in May 2004 Microsoft released the Exchange 2003 Outlook Web Administration tool, which provides a Web-based user interface allowing the administrator to change those features of OWA 2003 behaviour that had hitherto required the use of the less-friendly regedit utility.
Requirements
Since the administration tool is Web-based, it doesn’t actually have to be installed on the machine from which you are going to use it. The main requirements are a server or a workstation that is part of the domain to be administered, that has Internet Information Server (IIS), the .Net framework version 1.1 and ASP.Net installed. It also requires an SSL certificate, but if this is not present at install time, the setup package will create a certificate for you. If you rely on the automatically created certificate, however, you need to be aware that it will expire after three years.
The setup package for the utility is (at the time of writing; June 2004) located here:
http://www.microsoft.com/downloads/details.aspx?FamilyId=4BBE7065-A04E-43CA-8220-859212411E10
Once installed, the setup package creates a Virtual Directory called OWAAdmin on the IIS server, so you access it by navigating to https://servername/OWAAdmin. The client browser must (according to the readme document) be Internet Explorer 6.0 SP1 , or higher.
Usage
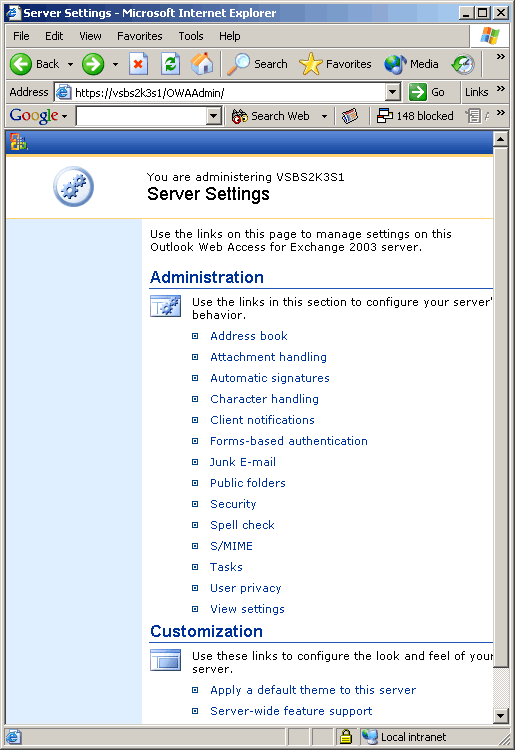
When you first access the utility you see the main screen shown below (in figure 1). It is clear from the appearance of the interface that a lot of thought has been given to its aesthetic qualities (unlike the usual ‘purely functional’ approach to such things).
Fig. 1: The OWA 2003 Web-based administration interface
Clicking on any of the main menu hyperlinks will reveal a further page containing more configurable items. Here is a list of the parameters that are available to the administrator:
Administration
Address book
Maximum Find Names Result List
Attachment handling
Disable Attachments
Accepted Attachment Front-end Servers
Level 1 File Types
Level 1 MIME Types
Level 2 File Types
Level 2 MIME Types
Enable Freedocs
Automatic signatures
Maximum Signature Length
Character handling
Use Regional Character Set
Disable NCR Conversion
Use GB18030
Use ISO-8859-15
Client notifications
New Mail Notification Interval
Reminder Polling Interval
Forms-based authentication
(Settings effective after server restart)
Public Client Timeout
Private Client Timeout
Allow SSL Offloading
Junk E-mail
Maximum Jun E-mail Contact Addresses
Maximum Blocked Junk E-mail Senders
Maximum Junk E-mail Safe Recipients
Maximum Junk E-mail Safe Senders
Advanced Junk E-mail Support
Public folders
Resolve Foreign Users
Maximum Public Folder Attachment Size
Maximum Public Folder Reply or Forward Size
Security
User Context Timeout
Enable Change Password
Enable Basic Authentication to Back-End Server
Enable Logoff Warning
Spell check
(Settings effective after server restart)
Maximum Spell Check Document Size
Maximum Spell Check Errors Per Item
Maximum Simultaneous Spell Check Requests
Maximum Unique Errors
Disable Spell Check on Send
Update Spell Check Language List
S/MIME
Check CRL on Send
Distribution List Expansion Timeout
Use Secondary Proxies when Finding Certificates
CRL Connection Timeout
CRL Retrieval Timeout
Disable CRL Check
Always Sign
Always Encrypt
Clear Sign
Include Certificate Chain Without Root Cert
Include Certificate Chain and Root
Encrypt Temporary Buffers
Signed E-mail Certificate Inclusion
BCC Encrypted E-mail Forking
Include S/MIME Capabilities In Message
Copy Recipient Headers
Only use Smart Card
Triple Wrap Encrypted Mail
S/MIME Encryption Algorithms
S/MIME Signing Algorithm
Use Key Identifier
Tasks
Minutes In A Day
Minutes In A Week
User Privacy
Content Filtering Options
Filtering Mode
View Settings
Maximum View Rows
Customization
Apply a default theme to this server
Force a Default Theme For Your Users
Server-wide feature support
Calendar
Contacts
Tasks
Journal
Notes
Public Folders
Reminders
New mail pop-up
Premium Client
Spell Check
S/MIME
Search Folders
Auto Signature
Rules
Themes
Junk E-mail filtering
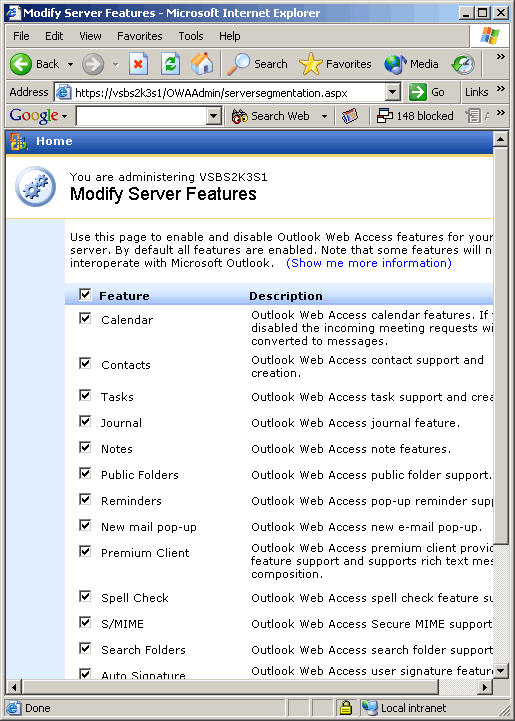
Here, in figure 2, is an example of one of the other screens that can be reached via these hyperlinks. In this case it is the ‘Server-wide feature support’ menu item.
Fig. 2: The ‘Server-wide feature support’ options
Most of the settings under the main page heading ‘Administration’ are likely to be used only for troubleshooting email issues, and I would suggest that it is better to leave most of them alone until you really need to change something. The ones under the heading ‘Customization’, however, are more interesting, since they provide an easy way of setting the default OWA Theme, and selectively hiding certain folders and messaging features from the end user.
Here (figure 3) is a screen capture if the ‘Apply a default theme’ page. You can choose from the list of available themes, and your selection is even previewed so that you can see what it will look like in use.
Fig. 3: The ‘Apply a default theme’ option

Both the ‘Features’ page settings (an OWA feature known as Segmentation), and the Default Theme settings have previously required manual manipulation of the registry.
So, in conclusion, if you need to make changes to your OWA interface, then this new utility is the way to go. The list of configurable options covered by the utility may not yet seem comprehensive, but it covers all of the currently known OWA 2003 registry ‘tweaks’. I feel sure that many more will appear in future releases of the tool.


