If you would like to read the other parts of this article series please go to:
- Planning, Deploying, and Testing an Exchange 2010 Site-Resilient Solution sized for a Medium Organization (Part 1)
- Planning, Deploying, and Testing an Exchange 2010 Site-Resilient Solution sized for a Medium Organization (Part 2)
- Planning, Deploying, and Testing an Exchange 2010 Site-Resilient Solution sized for a Medium Organization (Part 3)
- Planning, Deploying, and Testing an Exchange 2010 Site-Resilient Solution sized for a Medium Organization (Part 4)
- Planning, Deploying, and Testing an Exchange 2010 Site-Resilient Solution sized for a Medium Organization (Part 6)
- Planning, Deploying, and Testing an Exchange 2010 Site-Resilient Solution sized for a Medium Organization (Part 7)
- Planning, Deploying, and Testing an Exchange 2010 Site-Resilient Solution sized for a Medium Organization (Part 8)
- Planning, Deploying, and Testing an Exchange 2010 Site-Resilient Solution sized for a Medium Organization (Part 9)
- Planning, Deploying, and Testing an Exchange 2010 Site-Resilient Solution sized for a Medium Organization (Part 10)
- Planning, Deploying, and Testing an Exchange 2010 Site-Resilient Solution sized for a Medium Organization (Part 11)
- Planning, Deploying, and Testing an Exchange 2010 Site-Resilient Solution sized for a Medium Organization (Part 12)
- Planning, Deploying, and Testing an Exchange 2010 Site-Resilient Solution sized for a Medium Organization (Part 13)
Introduction
In part 4 of this multi-part article, we installed a trusted SAN/UC certificate on the Exchange 2010 servers as well as configured static RPC ports for the RPC Client Access service and the Exchange Address Book service.
In this part 5, we will continue where we left of in part 4. We will start out by creating a Client Access array in each Active Directory site. Then we will enable Outlook Anywhere as well as configuring the Outlook Provider settings so Outlook Anywhere clients still can connect after an *over has occurred.
Creating the Client Access arrays
A Client Access array is, as the name implies, an array of CAS servers. More specifically, it is an array consisting of all the CAS servers in the Active Directory site where the array is created. So instead of connecting to a FQDN of a CAS server, an Outlook client can connect to the FQDN of the CAS array (such as outlook.domain.com). This makes sure Outlook clients connecting via MAPI and all HTTPS based Exchange clients (OWA, Outlook Anywhere etc.) are connected all the time even during mailbox database fail and switch-overs (aka *-overs).
Here is how things work in regards to CAS arrays. An Exchange 2010 mailbox database has an attribute called RpcClientAccessServer. When creating a new mailbox database in an Active Directory site where a CAS array hasn’t been created, this attribute will be set to one of the CAS servers located in the respective AD site. You can see what this attribute is set to for a particular mailbox database by running the following command:
Get-MailboxDatabase <DB name> | fl Name, RpcClientAccessserver

Figure 1: Default RpcClientAccessServer value for a Mailbox Database in an AD Site without a CAS array
If a CAS array exists in the AD site where a new mailbox database is created, the RpcClientAccessServer attribute will be set to the FQDN of the CAS array. This is so the CAS array on the Client Access server knows which Mailbox server and database a user should be directed to.
A CAS array can only be configured using the Exchange Management Shell. More specifically you need to use the New-ClientAccessArray cmdlet. So to create a CAS array in the AD site associated with the primary datacenter, we need to use the following command:
New-ClientAccessArray –Fqdn “outlook-1.exchangeonlinet.dk” -Site “Datacenter-1” –Name “outlook-1.exchangeonline.dk”

Figure 2: Creating a new CAS Array in the primary AD site
In regards to the CAS array object itself, we don’t need to do any additional configuration. As already mentioned all CAS servers in an AD site will become members of the CAS array in the respective AD site. We can verify this using the following command:
Get-ClientAccessArray “outlook-1.exchangeonline.dk” | fl Name,Members
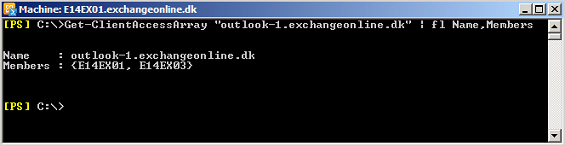
Figure 3: Verifying CAS Array Membership
When the CAS array has been created we need to create an “A record” in AD DNS. This record will be named outlook-1.exchangeonline.dk and point to the virtual IP address of the internal load balancing solution configured in the primary datacenter.
So let’s open the DNS Manager and right-click on the respective forward zone. In the context menu select “New Host” and then enter the name of the new host record (in our case “outlook-1”) and specify the VIP address configured on the load balancer solution in the primary datacenter as shown in Figure 4.

Figure 4: Creating the DNS record for the CAS array in the primary AD Site
We now need to repeat the above steps in order to create and configure a CAS array for the failover datacenter. That is we create the CAS array object using the following command:
New-ClientAccessArray –Fqdn “outlook-2.exchangeonlinet.dk” -Site “Datacenter-2” –Name “outlook-2.exchangeonline.dk”

Figure 5: Creating a new CAS Array in the failover AD site
Note the FQDN is different since we cannot have the same FQDN associated with two CAS array objects.
We now need to create the DNS record in AD DNS and have it point to the VIP address used on the load balancer solution in the failover datacenter.

Figure 6: Creating the DNS record for the CAS array in the failover AD Site
Changing the RpcClientAccessServer value for existing Mailbox databases
For any existing mailbox databases in each datacenter now would be a good time to change the value of the RpcClientAccessServer property value to the FQDN specified for the CAS array obejct in the respective AD site. For instance to change this value for a database named “MDB01” in the primary datacenter use the following command:
Set-MailboxDatabase MDB01 – RpcClientAccessServer outlook-1.exchangeonline.dk

Figure 7: Changing the RpcClientAccessServer value for a Mailbox Database
Now when configuring a new Outlook profile the MAPI endpoint will be resolved to “outlook-1.exchangeonline.dk” as can be seen in Figure 8.
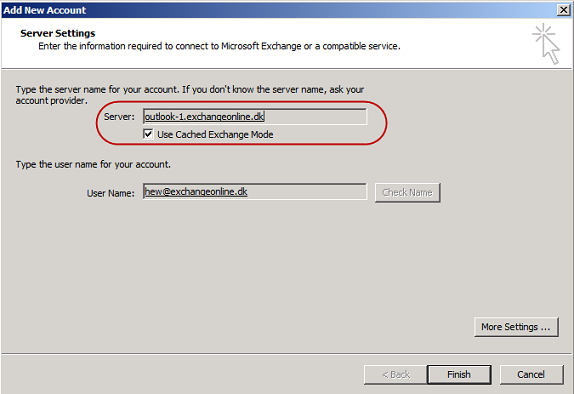
Figure 8: Connection Endpoint for an Outlook Profile after pointing a Mailbox database to CAS array
When opening the “Connection Status” window after Outlook has launched will reveal that both “Directory” and “Mail” uses “outlook-1.exchangeonline.dk” as the connection endpoint (Figure 9).
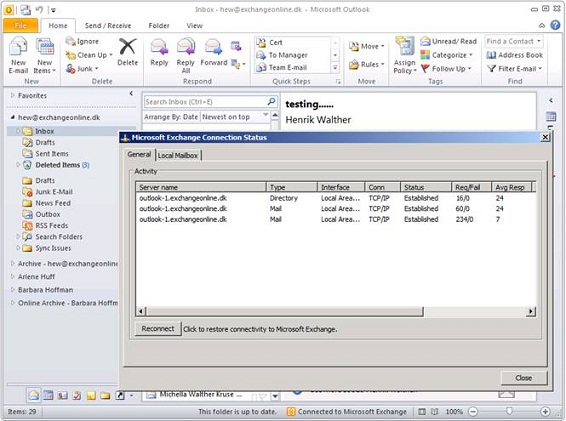
Figure 9: Connection endpoint for “Directory” and “Mail” in the Outlook Connection Status Window
Enabling Outlook Anywhere
Since our Exchange 2010 users needs to be able to connect to their mailbox from an external network (such as the Internet) using Outlook, we need to enable Outlook Anywhere.
Since all four Exchange 2010 multi-role servers are considered Internet-facing, we must enable Outlook Anywhere on all of them. This can be done via the Exchange Management Console or using the Enable-OutlookAnywhere cmdlet in the Exchange Management Shell. As we need to enable this feature on four servers let use the Enable-OutlookAnywhere cmdlet. In the primary datacenter, we need to run the following command for each server (where servername is replaced):
Enable-OutlookAnywhere –Server E14EX01 –ExternalHostname “mail.exchangeonline.dk” –DefaultAuthenticationMethod “Basic” –SSLOffloading $false
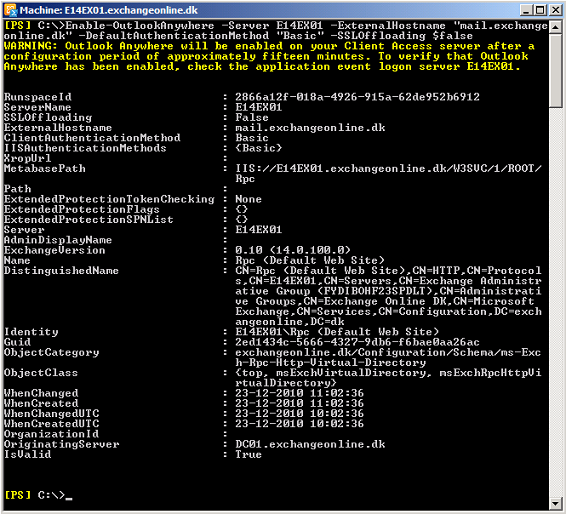
Figure 10: Enabling Outlook Anywhere
In the failover datacenter, we need to run the following command for each server (where servername is replaced):
Enable-OutlookAnywhere –Server E14EX02 –ExternalHostname “failover.exchangeonline.dk” –DefaultAuthenticationMethod “Basic” –SSLOffloading $false
Configuring the Global Outlook Provider Setting
Because we have installed the same UC/SAN certificate on the Exchange 2010 servers in both datacenter, the certificate principal name (mail.exchangeonline.dk) is the same for both datacenters. This means that if an *over to the failover datacenter has occured, the principal certificate name (mail.exchangeonline.dk) and the external hostname configured for Outlook Anywhere (failover.exchangeonline.dk) no longer will match. Because an Outlook client connecting via Outlook Anywhere expects the certificate principal name and the external hostname configured for Outlook Anywhere to match in order to connect, Outlook Anywhere client connectivity will break after an *over to the failover datacenter has occurred.
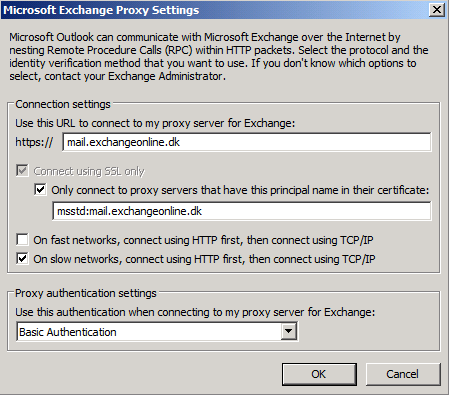
Figure 11: Default Exchange Proxy Settings in Primary datacenter
Some of you might say why not buy a UC/SAN certificate for the failover datacenter where the principal certificate name is failover.exchangeonline.dk? well you could fix the issue this way, but you know what? It isn’t a required method. You can also fix it by using other means.
What we need to do is to configure the “msstd” value to be the same in both datacenters. In order to do so, we use the “Set-OutlookProvider” cmdlet with the “CertPrincipalName” parameter.
To configure the “msstd” value to be identical for all Exchange 2010 servers in both datacenters, we use the following command:
Set-OutlookProvider EXPR –CertPrincipalName msstd:mail.exchangeonline.dk
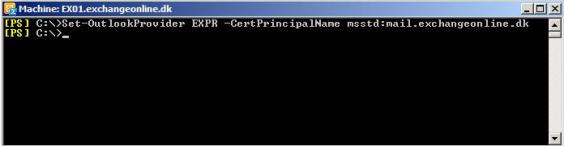
Figure 12: Setting the Certifical Principal Name globally isung the Set-OutlookProvider cmdlet
This means that the proxy settings for Outlook clients connecting to the failover datacenter af an *over will be updated (via Autodiscover) with settings like shown in Figure 13.

Figure 13: Exchange Proxy Settings in Failover Datacenter af configuring Outlook Provider Settings
We have reached the end of part 5 in this multi-part article, but you can look forward to part 6 which will be publised in a near future.
If you would like to read the other parts of this article series please go to:
- Planning, Deploying, and Testing an Exchange 2010 Site-Resilient Solution sized for a Medium Organization (Part 1)
- Planning, Deploying, and Testing an Exchange 2010 Site-Resilient Solution sized for a Medium Organization (Part 2)
- Planning, Deploying, and Testing an Exchange 2010 Site-Resilient Solution sized for a Medium Organization (Part 3)
- Planning, Deploying, and Testing an Exchange 2010 Site-Resilient Solution sized for a Medium Organization (Part 4)
- Planning, Deploying, and Testing an Exchange 2010 Site-Resilient Solution sized for a Medium Organization (Part 6)


