If you would like to read the first part in this article series please go to Planning an Upgrade to Hyper-V 2008 R2 (Part 1).
Introduction
In my previous article in this series, I began introducing you to some of the concepts involved in upgrading to Hyper-V R2. In this article, I want to conclude my discussion by walking you through an in place upgrade of Windows Server 2008 with Hyper-V.
The Prep Work
Rather than providing you with a generic set of instructions for performing an in place upgrade, I decided to upgrade a server that I use as a virtualization host for a number of lab machines. Before I began the upgrade process, there was a little bit of prep work that I had to do.
The first thing that I did was to make sure that I had the correct version of Windows Server 2008 R2. My server started out running the X64 version of Windows Server 2008 Enterprise Edition, so I made sure that I had the 64-bit Enterprise Edition of Windows Server 2008 R2.
As I mentioned in the previous article, the upgrade process will go more smoothly if you can get rid of your virtual machine snapshots. That being the case, I shut down all of my virtual machines, and then deleted all of my snapshots by right clicking on the snapshot and choosing the Delete command from the shortcut menu. It is worth noting that it can take a long time for the snapshots to be merged. In my case, the merge process took the better part of a day.
The last thing that I did prior to beginning the upgrade was to make a full system backup of my server. I wanted to make sure that I had something to fall back on if the upgrade process failed catastrophically.
The Upgrade Process
The actual upgrade process itself was a lot easier than what I expected. I started out by inserting my Windows Server 2008 R2 installation DVD, and running Setup. When I did, Windows displayed a familiar splash screen, on which I clicked Install Now. At that point, Setup began copying all of the system files from the installation DVD to my server’s hard drive.
When the copy process completed, Setup asked me if I wanted to check online for the latest installation updates, which of course I did. When the update check completed, Setup asked me which edition of Windows Server 2008 R2 I wanted to install. I chose the Enterprise Edition option since that is what was previously installed on my server, and clicked Next.
The following screen asked me to accept the license agreement. After doing so, I was taken to the screen shown in Figure A. This familiar screen asked if I wanted to perform an upgrade or a custom installation. Needless to say, I chose the Upgrade option.

Figure A: When prompted, choose the Upgrade option
At this point, Setup displays the warning message shown in Figure B. As you can see in the figure, this warning message is essentially just a disclaimer telling you that you need to make sure that all of your software is compatible with Windows Server 2008 R2 before continuing with the installation. Since my server was only acting as a virtualization host, I went ahead and clicked Next.
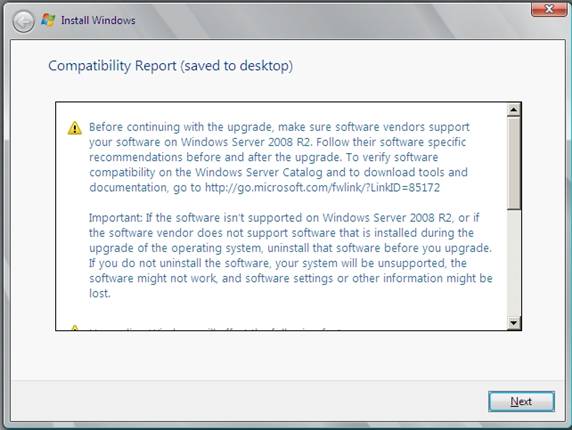
Figure B: Make sure that your software is compatible with Windows Server 2008 R2 before going any further
At this point, Windows will begin copying files and transferring files, settings, and applications. As you can see in Figure C, this process is nearly identical to a regular Windows Server 2008 installation. When the Setup process finishes, your upgrade is complete.

Figure C: The rest of the upgrade process is just like installing Windows Server 2008
Confirming the Installation
When Setup completes, the server will reboot and load Windows Server 2008 R2. On the surface, you would be really hard pressed to tell the difference between Windows Server 2008 and Windows Server 2008 R2. Likewise, the Hyper-V Manager looks virtually identical to the way that it did in the original RTM release of Hyper-V. That being the case, I wanted to take the opportunity to show you how to confirm that the upgrade has succeeded, and that you are running the new version.
Since we performed a full blown operating system upgrade, it is not a bad idea to verify that the operating system is reporting the correct version. There really is not any reason why it should not be. Even so, I seem to recall a time when I was going to upgrade from Windows Server 2003 to Windows Server 2003 R2 and accidentally inserted the wrong installation disk. To make a long story short, I ended up accidentally reinstalling the same operating system that was already running. Since that time, I like verifying versions after an upgrade, just to make myself feel better.
If your server is using the default wallpaper, then you would not have to look far for evidence that the server was successfully upgraded. As you can see in Figure D, Windows Server 2008 R2 displays the Windows Server 2008 R2 logo on the desktop wallpaper. If you prefer a more conclusive version check though, then just right click on My Computer, and choose the Properties command from the resulting shortcut menu. The resulting System Properties sheet displays the operating system version, as shown in the figure below.
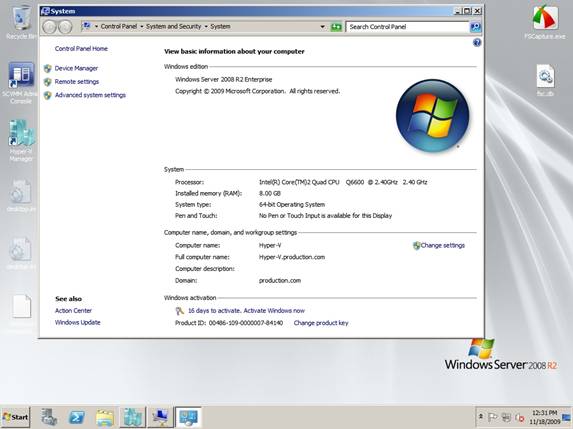
Figure D: The System Properties sheet displays the Windows Server version ID
Confirming that Hyper-V was successfully upgraded is a little bit less intuitive. As I mentioned earlier, you would be hard pressed to look at the Hyper-V Manager and tell that anything has changed. The easiest way to check the Hyper-V version is to open the Hyper-V Manager and choose the About Hyper-V command from the Help menu. When you do, the Hyper-V version will be displayed, as shown in Figure E.

Figure E: Choosing the About Hyper-V command from the Hyper-V Manager’s Help menu displays the Hyper-V version information
As you can see in the figure, the Hyper-V Manager displays a version number, but it does not explicitly say that Hyper-V 2008 R2 is being used. Fortunately, it is relatively easy to figure out which version of Hyper-V is being run by looking at the version number. Here is what the various version numbers mean:
6.0.6001.17101 – The beta version of Hyper-V
6.0.6001.18004 – The Hyper-V Release Candidate
6.0.6001.18016 – The original RTM release of Hyper-V
6.1.7600.16385 – Hyper-V 2008 R2
Post Installation Work
Since the majority of the installation process is automated, you really do not have to do much after Setup completes. One thing that you do have to do though is to update the Integration Services on each of your virtual machines. To do so, I simply used the Control Panel option to remove software to uninstall the integration services from each virtual machine. After that, I just rebooted each virtual machine and then installed the integration services in the usual way.
Conclusion
As you can see, the process of performing an in place upgrade is really simple and straight forward. Even though the upgrade itself is easy, you should always do your due diligence and thoroughly test for hardware and software compatibility prior to the upgrade.
My original plan had been to continue this series by talking about the various types of upgrades to Hyper-V R2 that can be performed, and the various caveats associated with each upgrade type. A few days ago though, I found out that another author on this site is already working on such a series. Out of respect to that author, I am going to conclude my series on upgrading to Hyper-V 2008 R2 with this article.
If you would like to read the first part in this article series please go to Planning an Upgrade to Hyper-V 2008 R2 (Part 1).


