If you would like to read the other parts in this article series please go to:
Introduction
This is the second part of an article series looking at the priority queuing feature of Exchange 2010. In part one we discussed the reasons for implementing priority queuing, described the lab environment used for demonstrating the feature and then began the process of testing normal message flow when priority queuing is disabled. We left part one having confirmed that the normal priority message, sent first, arrived in the destination inbox first; this is what we would have expected to happen. Remember, priority queuing is disabled by default.
We will start part two by looking at how we can use protocol logging on the neilhobson.com Exchange server to confirm that the normal priority message was processed first. We will then proceed to enable the priority queuing feature and perform the same tests again.
Protocol Logging
Here’s how to use protocol logging to determine the order that messages were processed by the nghcloud.co.uk Exchange server:
- Run the Exchange Management Console on the neilhobson.com Exchange server
- Navigate to Server Configuration / Hub Transport and select the Hub Transport server
- In the bottom pane, right-click the default Receive connector and choose Properties from the context menu. In my lab, the default receive connector is called Default C-EXCH
- On the General tab in the properties of the default Receive connector, set the protocol logging level to Verbose as shown in Figure 8

Figure 8: Setting the Default Receive Connector Protocol Logging Level
By default, protocol logs are stored in the \Program Files\Microsoft\Exchange Server\V14\TransportRoles\ProtocolLog folder but of course this specific location may be different in your environment if you chose to install Exchange into a custom path. Under the ProtocolLog folder are separate folders for the protocol logs linked to Send and Receive connectors; these folders are named SmtpSend and SmtpReceive respectively. Since we’ve just configured the default Receive connector, we are obviously interested in the contents of the SmtpReceive folder.
Once protocol logging has been enabled, we can again disable the Microsoft Exchange Transport service on the neilhobson.com Exchange server. We will again send 2 messages from the [email protected] account, although this time we will send a normal priority message to [email protected] and a high priority message to [email protected]. The important thing is that the normal priority message is sent and queued before the high priority message is sent. Once both messages have been sent and queued, we can restart the Microsoft Exchange Transport service and then examine the contents of the protocol log; these contents are shown in Figure 9.

Figure 9: Examining Receive Connector Protocol Logs
In Figure 9, you can see that the highlighted block of text starts with the message destined for [email protected] at a time of 18:00:27, while 5 seconds later the message destined for [email protected] is sent. Clearly the message for John is processed first, despite the fact that the message for Fred is marked as a high priority message. So, nothing too dramatic has happened here, but it appears that by default Exchange 2010 does not consider the priority of the message when processing a queue.
Enabling Priority Queuing
We have seen that by default Exchange 2010 does not appear to process messages based on their priority settings, which is what we expected. Let’s now enable priority queuing on the nghcloud.co.uk Exchange 2010 server and then perform the testing again. To enable priority queuing, we need to edit the EdgeTransport.exe.config file that is found in the \Program Files\Microsoft\Exchange Server\V14\bin folder by default. The specific parameter that we need to edit is the PriorityQueuingEnabled parameter as shown in Figure 10. To enable priority queuing, we need to change this parameter from the default value of false to true and save the file. Once you have done this, restart the Microsoft Exchange Transport service on this server for the changes to take effect.
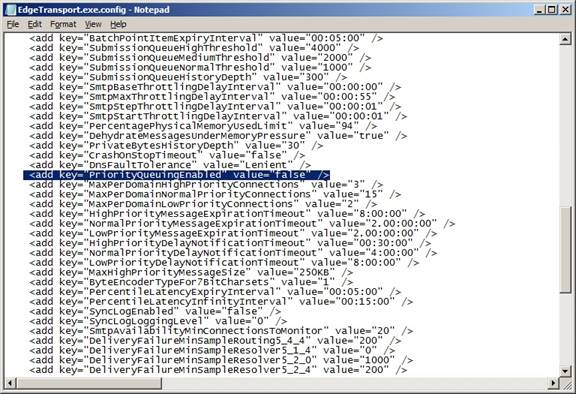
Figure 10: Enabling Priority Queuing
With the priority queue changes now made on the nghcloud.co.uk Exchange server, we can now stop the Microsoft Exchange Transport service on the neilhobson.com Exchange server ready for the next stage of testing. Once stopped, we can then send the same type of test messages that we first sent when priority queuing was not enabled. Specifically, we can send a normal priority message and a high priority message from the user [email protected] to the user [email protected]. Remember, it is important to send the normal priority message first and ensure that it is queued before sending the high priority message. We can then run the Queue Viewer on the nghcloud.co.uk Exchange server to confirm that the messages are queued; you can see this in Figure 11. It is clear from Figure 11 that the normal priority message was received at 18:12:17, earlier than the high priority message which itself was received at 18:13:06.

Figure 11: Normal Priority Message Queued First
Now that the messages are queued, the big test is what happens when we re-enable the Microsoft Exchange Transport service on the neilhobson.com Exchange server, so let’s do that now and examine the contents of John’s inbox. The results are shown in Figure 12.

Figure 12: High Priority Message Delivered First
As you can see in Figure 12, the high priority message has been delivered first into John’s inbox, so priority queuing appears to be working correctly. However, since we also examined the protocol logs in the last test, let’s perform another test and this time examine the protocol logs now that priority queuing has been enabled.
To do this, we first need to send a normal priority message to [email protected] followed by a high priority message to [email protected]; again, it is important to ensure that the normal priority message is sent first and queued before sending the high priority message. In Figure 13, it is clear to see that the queue viewer shows the normal priority message was received nearly 2 minutes before the high priority message.

Figure 13: Normal Priority Message Queued First
Let’s now re-start the Microsoft Exchange Transport service on the neilhobson.com Exchange server and then examine the protocol log on that server. The protocol log contents are shown in Figure 14. Note that, for clarity, I did remove some of the transmission information from the log file but nevertheless it is clear from this log file that the message to [email protected] is processed first; this is the high priority message.

Figure 14: Protocol Log Confirming High Priority Message Processed First
Message Tracking Logs
We could also have used the message tracking feature of Exchange 2010 to see which message was processed first. Here’s how to do this using the Exchange Management Console, although we could of course also use the Exchange Management Shell.
- Run the Exchange Management Console on the neilhobson.com Exchange server and select the Toolbox option from the left-hand pane
- Double-click the Tracking Log Explorer icon to open this tool
- In the main window, enter the relevant message tracking parameters as required. For example, here we can enter a start and end time period that covers 18:33, since that’s approximately when the first message was received
Running the tracking log explorer tool should produce a window similar to the one shown in Figure 15, where we can essentially see the same information that we just saw in Figure 14. So we can see from our tests that enabling priority queuing on the Hub Transport role does indeed alter the way in which the Hub Transport server processes messages.

Figure 15: Message Tracking Log Confirming High Priority Message Processed First
Summary
In part two of this article, we have seen how enabling priority queuing appears to show that high priority messages are processed before normal priority messages. We confirmed this by examining both protocol logs and message tracking logs. In part three, we’ll examine the effect of large messages and priority queuing.
If you would like to read the other parts in this article series please go to:


