Here is their description of the software: “This suite provides a fully featured web security scanner, crawler, report analysis tool, as well as web security explanations, and an extensive database of security checks for all leading web server platforms. The all-in-one web security software lets the user scan for SANS Top 20 and OWASP Top 10 2004 vulnerabilities. Additionally, the new baseline security scanning feature automatically detects, reports & addresses outdated server software, closing up your web server even more to vulnerabilities and possible attacks.”
Product: Acunetix Web Vulnerability Scanner
Product Homepage: click here
30-day Trial Version: click here

Installing Acunetix WVS
You can download a 30-day test evaluation version of WVS at http://www.acunetix.com/download/ which allows you to scan the Acunetix test website (http://test.acunetix.com). It can be installed on Windows 2000, XP or Server 2003 (you also need Internet Explorer 5.1 or above). The setup wizard is pretty straightforward. After you accept the EULA, you’ll be asked to choose a location on which to install WVS. You need 16.1 MB of free disk space to install it.
Next, you’ll be asked whether to enable database support. If you choose to enable database support, you then choose to store scan results in either a Microsoft Access database (you don’t have to have Access installed on this computer to use this option) or in a Microsoft SQL Server (version 7 or above) or Microsoft Desktop Engine (MSDE) database. If you select to use a SQL database, you will of course need an SQL server installed on the network, and you’ll need to enter valid logon credentials for the SQL database.
You can select whether WVS will place an icon on the desktop (by default, it does). Then you’re ready to start installing. Review the installation info and click the Install button. It took only a few seconds to complete the installation.
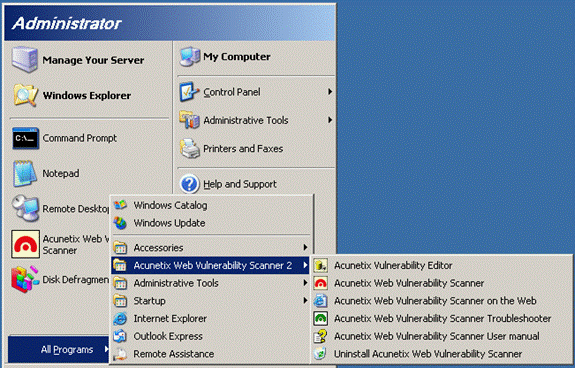
You can launch the tool from the desktop icon or the Programs menu. Note that the Acunetix submenu contains several selections, as shown in Figure A.
Figure A: Acunetix adds a submenu to the Programs menu
The Vulnerability Editor contains all the tests that the program uses during a scan. Although you can make changes to it, you shouldn’t because this could affect the scanner’s ability to operate properly.
Select Acunetix Web Vulnerability Scanner to start the program. When WVS opens, you’ll see a multi-paned interface as shown in Figure B.
Figure B: Acunetix WVS Interface

If you’ve purchased the software and have downloaded and installed the full version of the product: expand the General node in the left Tools Explorer pane and right click Licensing. Click License Product and a dialog box will appear where you can type in your license key. If you’re evaluating the product, clicking this node will tell you how much time is left on your 30-day trial period.
Features Overview
So, now that you’ve got it installed, what does it do? The scanner detects hosts running Web server services and scans them for common vulnerabilities such as cross site scripting (XSS), directory traversal, SQL injection and many others. It will perform HTTP authentication testing to detect insecure configurations or weak passwords and examine the server’s security configuration. It lets you know if you have outdated server software that may need patching or upgrading.
You can scan virtual web hosts and all types of Web servers, not just Windows-based ones. WVS supports UNIX and Linux operating systems and Apache web services and PHP configuration files. You can also conduct operating system specific tests.
You can scan many types of Web pages and files, including ASP and CGI. It supports secure HTTP (HTTPS) and proxy servers.
Configuration Options
You can set configuration options by clicking the Configuration node in the left pane. Click Settings to adjust the following options:
- General – This is where you can modify the updates URL (www.acunetix.com/wvsupdate/) and select when WVS should check for updates (either when the application starts or when you click the “Check for updates” selection on the Help menu). This page is also used to set general HTTP settings such as a file size limit (in kilobytes) and HTTP request timeout (in seconds).
- LAN settings – This is where you can tell the program to use an HTTP proxy server and/or a SOCKS proxy and enter the identification and credential information for each.
- Database – This setting allows you to enable, disable or change the type of database to which you want the scan results saved.
- Tool Settings: Site crawler – Here you can set which file types should be included or excluded when the crawler fetches files and directories.
- Tool Settings: Scanner – On this page, you set scanning options such as whether to report internal server errors, disable alerts generated by the crawler (such as those for broken links) and/or synchronize crawlers when scanning Web sites with files on multiple hosts. You can also specify which hosts are allowed to be scanned.
- Tool Settings: HTTP Sniffer – Here you can tell the built-in HTTP sniffer on which interface and port to listen.
Performing a Scan
To perform a scan of your Web applications and discover your Web servers’ vulnerabilities, click File | New and select Scan.
Note:
If you have IDS software installed, it will see the WVS scan as multiple attempted intrusions and send you alerts.
The Scan Wizard will appear, as shown in Figure C.
Figure C: The Scan Wizard lets you set the parameters for the scan
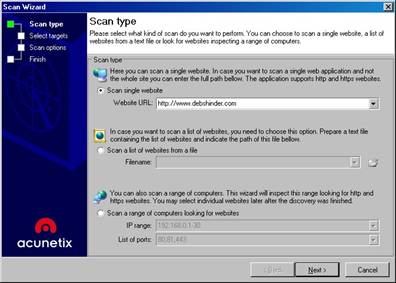
On the first page of the wizard are three option buttons. You can choose to:
- Scan a single Web site (HTTP or HTTPS). Enter the URL or IP address of the site you want to scan.
- Scan a list of computers. You’ll need to make a text file containing the list of computer names or IP addresses.
- Scan a range of computers. Type in the beginning and ending IP addresses and list the ports that you want to scan (for example, port 80).
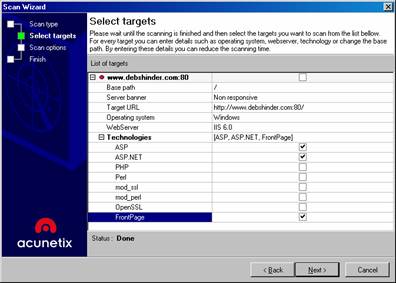
On the next page, a list of the target sites or computers will appear. You can expand the node for each target to see detected details (and you can change these if they are incorrect), as shown in Figure D.
Figure D: Select the targets for the vulnerability scan
On the next page, you can create a scanning profile (that enables or disables different tests) to speed up the scanning process. You can also set crawling options, as shown in Figure E. The crawler is the software component that “crawls” or traverses the Web site. Setting these options tells the crawler to skip or include certain links and files.
Note:
When you set crawler options in the Scan Wizard, they only apply to that particular scan. If you want to change the default crawler behavior, you can do so by expanding the Configuration node in the Tools Explorer left pane of the WVS console and clicking Settings | Tools Settings | Crawler.
Figure E: Set a scanning profile to use and set crawling options
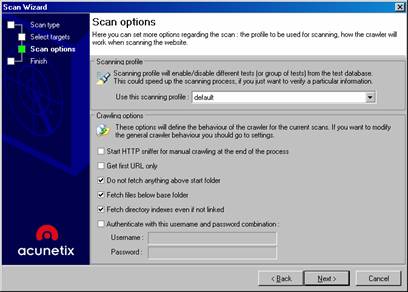
By default, the following options are selected:
- Do not fetch anything above start folder
- Fetch files below base folder
- Fetch directory indexes even if not linked
In addition, you can choose to:
- Start HTTP sniffer for manual crawling at the end of the process
- Get first URL only
- Authenticate with a specified user name and password
You would want to perform manual crawling if the crawler isn’t able to follow all the links automatically. After a manual crawl, the crawler includes the links that are discovered manually in the site structure. You would select to get the first URL only if you don’t want the crawler to follow any links that go outside the target Web site. You would enter a user name and password if you want to scan sites that require authentication.
After you’ve set all these options, click Next and check or uncheck the box to save the results to the database. Then click Finish to start the scan.
Getting the Results
The scan results contain the following nodes:
- Alerts – Expanding this node provides you with a list of security vulnerabilities that were detected during the scan, such as insecure configurations, permissions issues, or outdated software versions. Alerts are classified as Informational only, Low, Medium or High. You can click on a vulnerability under the Alerts node to view details about it in the right pane. This includes recommendations on how to fix the vulnerability and a list of references where you can get more information about the vulnerability.
- Site Structure – This node shows the directories and files that the crawler discovered (including those discovered by a manual crawl) and their structure within the file system. You can click on a file or directory name in the left pane to get information about it (such as its path, size in bytes, HTTP Get results, etc.) in the right pane.
The window at the bottom of the console is the Activity Window. It logs all of the activities performed by WVS. The Scan Results window will show you (in parentheses) the number of each vulnerability found. For example, our results showed 4 broken links and one instance of cross site scripting.
You can use the Compare Results selection in the Tools menu to compare the results of a current scan with those of a previous (saved) scan.
Generating Reports
If you’ve enabled database support, you can generate reports from the SQL or Access database files. If you didn’t enable database support during installation, you can do so at any time by expanding the Configuration node and clicking Settings | Database. Under Application options in the small middle pane, click Database and then check the box to enable database support, select the database type from the drop-down box, and enter the path for the Access database or the server information and credentials for the SQL database.
You use the Reporter tool to create a report from the information in the database. In the WVS console, click New | Report. The Generate Report Wizard will start. First you’ll be asked to select the scan(s) that are saved in the database from which you want to generate a report. Click Next and you’ll be able to customize the information to be included in the report. You can choose to include only alerts of a specified severity (Informational, Low, Medium and/or High) and select whether to show detailed alerts, show request/response headers and/or show the alerts chart. You can also specify the report title, header and footer text and choose a header image.
The report will be divided into the following sections:
- Scan groups
- Scan summary
- Alerts summary
- Alerts details
The scan summary will show you the start and finish times of the scan, scan duration, and general information about the web server such as operating system and server banner (web services version).
You can save a report to a file and/or print it. You can also create report templates that include chosen test modules, to make it quick and easy to customize your reports.
Additional Tools
The Acunetix WVS package also includes several additional tools:
- HTTP Editor – for building custom HTTP requests and response analysis and define output/response format (for example, plain text or HTML). It includes within its interface the encode-decode tool, for converting between plain text and URL-encoded or Base64 encoded, and the variable editor, which lets you edit query variables, cookies and request data.
- Target Finder – for probing a list or range of IP addresses to discover HTTP/HTTPS servers.
- Authentication Tester – which can be used to test or recover valid passwords for a target site that’s password protected. It’s used to crack passwords using brute force methods.
These can be accessed from the Tools menu on the WVS console. There is also a Troubleshooter Wizard that’s accessed from the Acunetix submenu in the Programs menu.
Summary
The Acunetix Web Vulnerability Scanner was easy to install, configure and use. It takes only minutes from the beginning of the installation procedure until you have your first scan results in hand. This simplicity, however, doesn’t mean it’s not sophisticated or thorough. There are many ways to configure and customize its behavior and a number of additional tools to add more functionality. It also comes with a pretty comprehensive user manual in HTML Help format (you can access PDF and Web versions of the manual from the Acunetix Web site). We also liked the fact that, unlike many programs, Acunetix provides an easy “Uninstall” option on its program menu in case you need to uninstall it – although we have no plans to do so, since it worked as claimed without causing any conflicts or problems.
WindowSecurity.com Rating: 4.5/5

For more information about Acunetix Web Vulnerability Scanner, click here.