Product: SolarWinds Virtualization Manager 5
Product Homepage: click here
Free Trial: click here

Introduction
Believe it or not, there was a day when IT was just an afterthought for many organizations. Today, due to the heavy reliance on IT, IT is the business for many companies. The complex business environments supported by IT departments must be stable, available and perform at or above expectations. Further, more and more environments are moving toward virtualization, adding potential variability to workload performance. As such, implementing tools that ensure that these complex systems remain consistently operational is of prime importance.
We’re also seeing the beginnings of another trend: Although VMware continues to enjoy a vast share of the hypervisor market, more organizations are beginning to consider the use of Hyper-V in their virtualization plans. For years, third party vendors have either ignored Hyper-V or included support for it as an afterthought.
That’s all beginning to change.
SolarWinds is one of the vendors at the forefront of the effort to embrace Hyper-V and support it in their products. With the release of SolarWinds Virtualization Manager 5.0, SolarWinds supports both VMware and Hyper-V hosts in the product.
In this review, I will explain what purpose Virtualization Manager 5.0 serves, will walk through a lab installation and then provide some details regarding the kinds of information you can glean from the product. I will wrap up with my thoughts on the product as a rating.
Let’s get started!
What is Virtualization Manager?
Don’t think that Virtualization Manager’s embracing of Hyper-V means it’s a second-class product, either. In fact, Virtualization Manager is an enterprise-class, tier 1 virtualization management product that provides a number of services for virtualized environments, including:
- Unified capacity management
- Sprawl monitoring
- Performance management
- Configuration management
Virtualization Manager enables time-strapped IT organizations assure their organizations that virtual environments are operating within specified parameters from both capacity and performance perspectives. By doing so, IT departments can focus their limited time on value-add business initiatives rather than on constant review of what should be routine operations.
There are a number of factors that make Virtualization Manager 5.0 a fantastic tool. First of all, the product is deployed as either a Hyper-V or VMware vSphere virtual appliance. You don’t have to mess around with an installer to get the base product up and running. This allows a full deployment inside of 30 minutes in most cases. There is one caveat that I will discuss later. Finally, Virtualization Manager 5.0 is an affordable tool with pricing starting at $2,995, which allows you to manage and monitor up to 50 running virtual machines. Note that powered off virtual machines don’t count toward licensing limits.
| Virtualization Manager Tier | Price (USD) |
| VM50 |
$2,995 |
| VM100 |
$5,995 |
| VM200 |
$10,995 |
| VM400 |
$16,995 |
| VM700 |
$23,995 |
| VM1200 |
$33,995 |
| VM2000 |
$52,995 |
Now, for the caveat: As mentioned, Virtualization Manager 5.0 adds full support for Hyper-V hosts. This is a most welcome capability since many organizations are beginning to see Hyper-V as a viable alternative to VMware’s vSphere product. This is particularly true for small and medium sized businesses (SMBs). Although the process for deploying Virtualization Manager 5.0 itself is extremely easy, the steps that administrators need to take to enable their Hyper-V hosts to be monitored is anything but. I need to point out that this is not the fault of SolarWinds, but is necessary due to restrictions that Microsoft puts into place for remote access to various Windows components upon which Virtualization Manager relies. On the good side, the documentation provided by SolarWinds is superb and walks you through what needs to be done.
My lab
For the purposes of this review, I have a bit of an Inception-like scenario, but it demonstrates well the product’s support for both VMware vSphere and Microsoft Hyper-V. My lab consists of the following:
- A Dell PowerEdge 2950 server running Hyper-V on Windows Server 2008 R2 with SP1. On this Hyper-V virtual machine, I have quite a number of virtual machines running for various projects I’m working on.
- A generic desktop running VMware Workstation 8 on Windows 7. The machine has 16 GB of RAM. One of the virtual machines running inside VMware Workstation 8 is running VMware vSphere 5. It is in this vSphere 5 virtual machine that I have chosen to deploy Virtualization Manager 5.0. I am not running vCenter at present. Once VMware reinstates their VMTN subscription service, I will re-install vCenter into my environment.
Requirements
Virtualization Manager 5.0 carries with it a number of hardware and software requirements. Bear in mind that the product deploys as a virtual machine in either vSphere or Hyper-V format, so the hardware requirements are for the virtual machine that will house Virtualization Manager.
Of course, if you use one of the automated deployment methods, such as importing using an OVF template into vCenter, the virtual machine will be created using the recommended minimum configuration. Just make sure that the host to which the product is deployed has enough resources to meet these minimums:
Hardware:
- CPU. 4 vCPUs
- Memory. 8 GB
- Hard Drive. 100 GB (Thin provisioned disk for VMware)
Software
- Operating System. Virtualization Manager Installs as a Linux Based Virtual Appliance, available in both VMware (VMDK) and Microsoft (VHD) formats.
- Database. Virtualization Manager uses an embedded database included in the deployment
Managed Environment
- vCenter for vSphere/ESX. VMware vSphere 5, VMware vSphere 4.x, VMware Infrastructure 3 (ESX 3.5+, ESXi 3.5+, vCenter 2.5+).
- Hyper-V. Microsoft Hyper-V R1 or R2 (SP2)
o The deployment does not require SCVMM
For any Hyper-V hosts you wish to manage, you also need to make configuration changes in order to allow Virtualization Manager the access it needs to manage these hosts. I will not repeat the necessary steps here. The Virtualization Manager documentation provides very clear instructions.
Product installation
To demonstrate the exact process I went through to deploy Virtualization Manager 5.0 in my lab, I will do a step-by-step installation of the product for this review.
As expected, the process starts by downloading the virtual machine you intend to use. A VHD-based virtual machine is available for Hyper-V deployment and an OVF version is available for importing into vSphere.
Once the product is downloaded, open the vSphere Client and go to File > Deploy OVF Template. See Figure 1.
When prompted, point the deployment wizard to the location at which the template resides as shown in Figure 2.

Figure 1: Deploy the OVF template
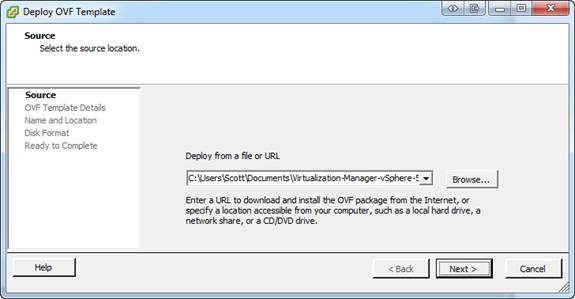
Figure 2: Indicate the location of the file you downloaded from SolarWinds
The wizard will read the contents of the deployment file so that you can review the settings. Note that the deployment information shown in Figure 3 indicates that this is version 4.1.99.640 rather than version 5.0. This is because this review is being written using a final beta version of the product.

Figure 3: Review the deployment details
Every product has a license agreement. The next step of the deployment process asks you to agree to the terms of the Virtualization Manager 5.0 license.

Figure 4: Agree to the license terms
All of your virtual machines need names, too. In Figure 5, note that I’ve named my new virtual machine SolarWinds Virtualization Manager.

Figure 5: Name your new virtual machine
When you use the VMware method, you need to choose a data store into which to deploy the new virtual machine. I’ve opted to use datastore1, which has 103.5 GB of available space. This is also where you can choose the disk format you’d like to use. Personally, I’m a big fan of thin provisioning, so I’ve opted for that format, as you can see in Figure 6.
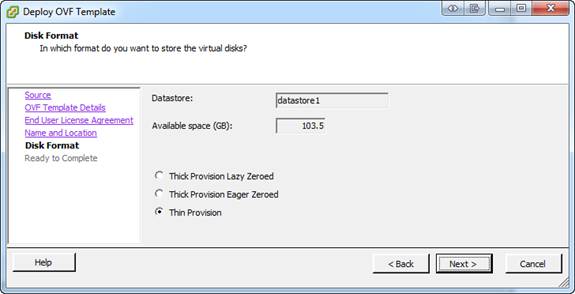
Figure 6: Choose a data store and format
With all questions answered, you’re presented with a summary page on which you can review your selections. You can see this page in Figure 7. Once you click the Finish button, the deployment process begins, shown in Figure 8.

Figure 7: Review your selections
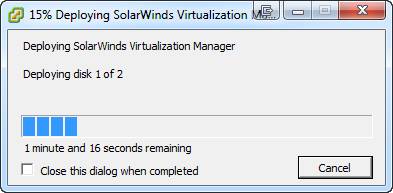
Figure 8: Track deployment progress
Easy, eh?
Initial configuration
It probably won’t take too long for the deployment process to complete. Afterwards, start the virtual machine to begin the initial configuration process. The first screen you will see if another copy of the license agreement (Figure 9) followed by a screen showing you the IP address for the management interface for the new deployment (Figure 10).

Figure 9: License agreement redux

Figure 10: Informational screen. Note the IP address.
Using a web browser, open to the IP address shown in the previous page. The default username and password are both admin.

Figure 11: Log in to the product
And, once again, you need to agree to the license.

Figure 12: Agree to the license again
The remainder of the deployment process is shown to you in Figure 13. You can see that there are a few steps to complete. I’ll be providing information for many of these steps. I won’t be doing much with the SMTP configuration or Storage Manager (a separate but related SolarWinds product) since I don’t have it in my environment.

Figure 13: A look at the remaining configuration items
I’m not going to go through every single remaining configuration step as they will vary based on the environment into which the product is deployed, but will show you a few screens.
In Figure 14, you’re asked to provide credentials that Virtualization Manager will use to contact your various hosts or your vCenter implementations. This is how the tool gathers information.

Figure 14: Provide credentials for the various systems you have deployed
Figure 15 shows you an example for what you might see if you are adding an ESX or vSphere host to Virtualization Manager.
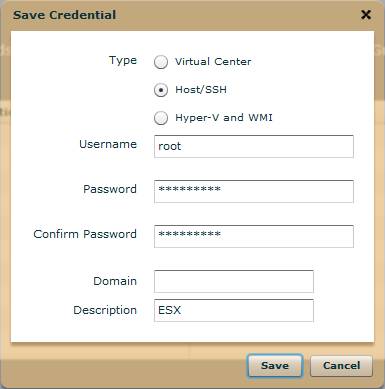
Figure 15: Provide credentials for each type of server you have
When you’re done adding systems, your screen will look something like the one shown in Figure 16. Note also that, by now, you should have followed the instructions for adding Hyper-V hosts to the environment. The details are outlined in the product documentation.

Figure 16: Credentials have been provided
The results
Once you’ve configured your credentials and, if necessary, made configuration changes to your Hyper-V hosts, the tool will begin monitoring various aspects of your environment. In Figure 17, you can see that the tool has found a number of issues:
- A lot of virtual machines with outdated tools. When I upgraded my Hyper-V host to Windows Server 2008 R2 SP1, I didn’t update the tools in many of my virtual machines. This can pose risks and performance issues, so Virtualization Manager is warning me.
- Virtual machines with connected media. Leaving virtual media connected to virtual machines can result in an inability to migrate those virtual machines to other hosts.
- VM storage rightsize. Too much storage can be as bad as too little. One way that Virtualization Manager helps you is by suggesting techniques to solve capacity management issues. In my environment, I have a virtual machine which Virtualization Manager feels is oversized.
The dashboard view shown in Figure 17 provides at-a-glance information about the items in the environment that need attention.

Figure 17: Dashboard view
You can view the host memory alert by clicking on it. This will show the page you see in Figure 18, which explains the metric that is used to gauge compliance. Here, you can see that having host memory go above 70% used results in a warning.
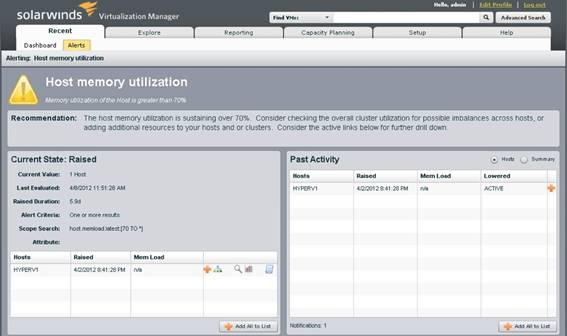
Figure 18: A host is using too much RAM
In Figure 19, take a look at the kind of information you can glean from an individual running virtual machine. Pretty much every operational metric is available right here, making it simple for you to see if a particular resource is being over-consumed.
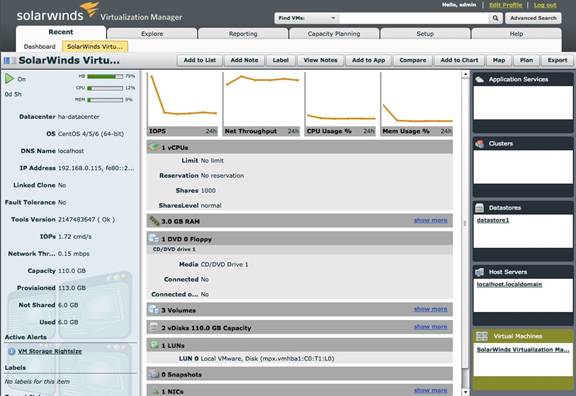
Figure 19: Statistics for an individual virtual machine
You can also drill down into a specific resource. In Figure 20, you can see the IOPS generated by this virtual machine over a specified period. This kind of information can be invaluable when you’re trying to nail down performance related issues.

Figure 20: Storage performance for an individual virtual machine (IOPS)
The base installation comes with a number of different dashboards, providing you with various views into the environment. In Figure 21, you can see what SolarWinds calls the Manager Hyper-V view. This view provides you with some statistics about the Hyper-V environment, including the number of powered on virtual machines, the operating systems that are deployed, your current virtual machine consolidation ratio and some aggregate performance information.

Figure 21: Many different dashboards are provided
Although my lab environment does not lend itself to real capacity planning, I wanted to show you the capacity planning dashboard present in Virtualization Manager. In an enterprise environment, the capacity planning dashboard will predict when resources are projected for depletion. This kind of planning is critical to enabling your virtual environment to continue serving business needs. Now, you can be proactive when it comes to resource management.

Figure 22: The capacity planning dashboard
My thoughts
Personally, I see Virtualization Manager 5.0 as a huge leap forward in easy to use management and monitoring software. I’ve used a lot of these kinds of tools and many are simply overwhelming. Virtualization Manager 5.0 brings ease to a process, which, frankly, should be easy. It’s robust feature set, which includes extremely deep monitoring on a per resource, per host, per VM, per datastore basis, and the addition of Hyper-V make Virtualization Manager 5.0 a winner of VirtualizationAdmin.com Gold Award with 4.5 rating.
Learn More about SolarWinds Virtualization Manager 5 or Download a Full Feature 30-Day Free Trial.
VirtualizationAdmin.com Rating 4.5/5

Learn More about SolarWinds Virtualization Manager 5 or Download a Full Feature 30-Day Free Trial.