I’ve always considered dealing with end users to be about as much fun as a trip to the dentist or a tax audit. Fortunately, there are some things that you can do to help keep the users happy (a happy user is a quiet user). The techniques that I am going to be showing you in this article center around the use of roaming profiles and folder redirection. Right now you might be wondering how something like roaming profiles can make your life easier. Well, there are several situations in which roaming profiles and folder redirections pay off big time.
For example, any decent administrator will instruct their users to save their data on a network drive so that the data gets backed up each night. Inevitably though, some users will save data to the local hard drive. If that hard drive happens to crash, then the user will lose all of their data and will be upset because you didn’t back it up. One of the techniques that I will show you will redirect the user’s My Documents folder to a network share.
Another example of how roaming profiles and folder redirections can make your life easier involves a situation in which the user gets a new PC. Normally, you would have to manually move all of the user’s documents and settings from the old PC to the new one. You would have to be careful not to leave anything behind to avoid upsetting the user and to accidentally exposing the user’s files to whoever inherits the user’s old PC. With roaming profiles though, each user’s files and settings follow them from PC to PC, so there is no need to move anything.
Another situation in which roaming profiles and folder redirections come in handy is when a user’s workstation crashes. Management can easily have the user whose computer crashed use someone else’s PC for the day and all of the user’s normal files and settings will be there. This frees up your time so that you can focus on resurrecting the dead computer.
I could go on and on with more examples of how roaming profiles and folder redirections can improve the quality of your life, but I think you probably get the idea. Instead, I want to move on and show you how it’s done.
The Anatomy of A Profile
Before I show you how to set up a roaming profile, you need to understand that any time a user logs into a Windows XP workstation, Windows automatically creates a profile for that user (unless the machine already contains a profile for the user). The profiles are stored in the Documents and Settings folder and are contained within a sub-folder bearing the user’s name. For example, if I logged onto a machine as Brien, then Windows would place my profile in a folder named C:\Documents and Settings\Brien.
The profile itself is fairly intricate because it contains the user’s documents and any settings that are user specific. For example, a profile contains things like the user’s application settings (EX: how Outlook is configured to allow that user access to their E-mail), Internet Explorer favorites and cookies, the user’s desktop, and the user’s Start Menu. Figure A shows the contents of a profile directory, and should give you a better idea of what all information is stored within a user’s profile.
Figure A: This is a user’s profile folder

Defining A Roaming Profile
Now that you know what a profile looks like, let’s talk about making the profile mobile. The basic technique behind creating a roaming profile involves creating a shared folder on the server, creating the user a folder within the share, and then defining the user’s profile location through the group policy.
For example, suppose that you wanted to implement roaming profiles in your own organization. The first thing that you would have to do is to create an empty folder on one of your file servers. You can call the folder anything that you want, but I have traditionally named this folder PROFILES. After you create the Profiles folder, you must share the folder. I recommend sharing the folder in a way that gives everyone full control at the share level. I would then recommend controlling permissions at the NTFS level.
When I define the NTFS permissions, I allow everyone to have read access to the PROFILES folder. I then create sub folders for each user. The sub folder’s name should match the user’s name. As you create each user’s individual folder, you will need to define some NTFS permissions. I recommend granting the Administrator and the user full control over the folder. You should also make the user the owner of the folder. After you have set these permissions, you should block parent permissions from propagating to the folder. Otherwise, everyone will be able to read anything in the user’s profile folder.
In most situations, this will take care of the necessary permissions. However, I have seen at least one network in which the backup software was unable to backup the user’s profile directories until the backup program’s service account was granted access to each user’s folder. That is the exception rather than the rule though.
Once you have created the necessary folders and defined the appropriate permissions, it’s time to redirect the user’s profile. To do so, open the Active Directory Users and Computers console, right click on a user account, and select the Properties command from the resulting shortcut menu. When you do, you will see the user’s properties sheet. Now, select the properties sheet’s Profile tab. The very first field on the tab is the profile path. Enter the user’s profile path as: \\server_name\share_name\user_name. For example, if you created a share named PROFILES on a server named TAZ, then the path to Brien’s profile should be \\TAZ\PROFILES\Brien. Click OK and then the user’s profile will be roaming starting with the next login.
Folder Redirection
After you enable roaming profiles for a couple of users, the first thing that you will probably notice is that logins and log offs become extremely slow for those users. The reason for this is that the user’s profile is actually being maintained in multiple locations.
The first time that a user logs in after roaming profiles have been enabled, a roaming profile does not exist for the user, so Windows uses the profile that’s stored in the local C:\Documents and Settings\ folder. When the user logs off, the entire contents of the local profile (minus the Internet Explorer cache) is copied to the server. If the user has lots of big files, this process can take a long time to complete.
The next time that the user logs on, a roaming profile does exist. The roaming profile takes precedence over any local profile that might exist. Therefore, the entire profile is copied from the server to the local C:\Documents and Settings folder as a part of the login process. As before, if the user has a lot of large files, this can take a long time to complete. I have personally seen situations in which a login has taken over an hour because the user’s profile was so massive.
Once the login process completes, the user works off of the local copy of the profile (which is now a mirror of the network copy). However, it’s very possible that the user could modify the profile by creating a document, placing an icon on the desktop, changing wallpapers, or whatever. Therefore, Windows considers the local profile to be the most current and copies it to the network when the user logs off.
The solution to obscenely long logons and log offs is to use folder redirection. Folder redirection allows you to save portions of the user’s profile in a different location on the network. The advantage to using folder redirection is that once a folder has been redirected to an alternate location, it no longer has to be copied every time that the user logs on or off. Windows just understands that those particular folders will always reside on the network. Windows will only touch those folders when it needs to open a file from one of them.
You can’t redirect every folder in a user’s profile, but you can redirect the ones that tend to be the largest and take the longest to copy each time a user logs in or out. The folders that you can redirect are Application Data, Desktop, My Documents, and Start Menu.
You can actually redirect these folders to a user’s local profile, but that defeats the purpose of implementing roaming profiles. Therefore, I recommend creating a share point on the server to which you can redirect these folders. Creating a share point for folder redirection is a lot easier than creating a share point for roaming profiles. Basically, you can just create a folder, share it, and give everyone full control at the share level.
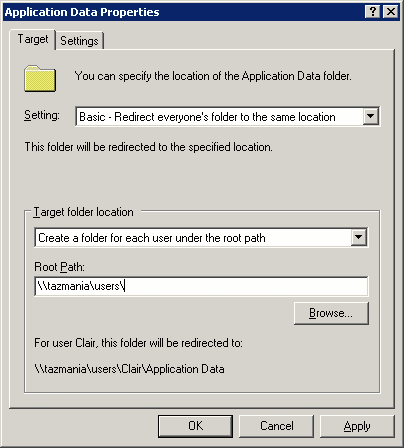
The actual folder redirection is done through the group policy. To redirect a folder, open the Group Policy Editor and navigate to User Settings | Windows Settings | Folder Redirection. The group policy requires you to redirect each of the four folders separately, but the procedure for doing so is the same for each folder. Set the folder’s Setting option to Basic – Redirect Everyone’s Folder To The Same Location. Next, select the Create A Folder For Each User Under The Root Path option from the Target Folder Location drop down list. Finally, enter your root path in the place provided. For example, on my test server, I just created a share called USERS on a server named TAZMANIA. Therefore, I entered \\TAZMANIA\USERS as the root path. If you look at Figure B, you will notice that in the example under the root path, Windows automatically fills in the user name and the folder name. This occurs because Windows will automatically create all of the necessary folders and will set the required permissions as well.
Figure B: Windows will automatically create the necessary folders beneath the root path and set the required permissions
Conclusion
In this article, I have explained how to implement roaming profiles and folder redirections in a way that gives you optimal performance while reducing your day to day workload. I do have one last bit of advice though. I recommend using a DFS (Distributed File System) server to store roaming profiles and redirected folders.
The reason why I recommend doing this is because DFS allows you to create replica servers. This means that you would have multiple servers containing copies of user profiles and redirected folders. These servers can work together to balance the workload. They also provide you with a measure of fault tolerance. If a server were to fail, the remaining DFS replicas would pick up the slack and the users would never be aware of the failure. Having multiple replicas also gives you the luxury of being able to take a server down for maintenance in the middle of the day without disturbing the users.


