If you would like to read the first part in this article series please go to Protecting and managing accounts in Exchange Server 2010/Windows Server 2008 R2 (Part 1).
Enabling Recycle bin on Windows Server 2008 R2
Windows Server 2008 R2 brought a lot of new features and some of them will help the mail administrators, such as: Rights Management Server and Recycle Bin Feature. In this article we will be enabling the Recycle Bin Feature and we will be also using a free utility called ADRecycleBin to restore deleted objects in a really easy way. Before starting the technical stuff a few key points about the Recycle Bin Feature, as follows:
- The Forest mode must be Windows Server 2008 R2 which means that when we have that in place we cannot add any other Windows Server 2003/2008 as Domain Controller. Keep that in mind before doing any Forest mode changes
- Even if you start a Windows Server 2008 R2 forest/domain from scratch the feature by default is disabled
- You must be logged with Enterprise Admins privilege (you can identify the current groups that you belong to using netdom <your-user-name> /domain, if you don’t have Enterprise Admins make sure to add yourself to that group and then log off and log on back again)
- The Forest mode change is a one way process which means make sure that you plan very well this modification
Let’s open Active Directory Domain and Trusts, and let’s right-click on the first item on the left and then let’s click on Raise forest functional level let’s select Windows Server 2008 R2 and let’s click on Raise. (Figure 1)
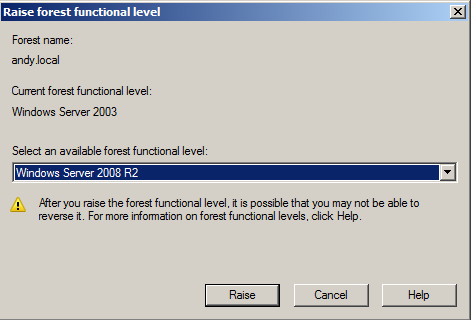
Figure 1
We need to confirm the operation clicking on OK on the dialog box that will pop up. Note: This process is irreversible so think twice before hitting OK button. After clicking on OK a dialog box containing information will be displayed, just click OK.
Next step is to right-click on the Active Directory Module for Windows PowerShell icon, and then click on Run as Administrator. Now it’s time to run the following cmdlet to enable the feature, as follows:
Enable-ADOptionalFeature ‘Recycle Bin Feature’ –Scope ForestOrConfigurationSet –Target <your-domain-FQDN>
All steps described previously are depicted in the Figure 2. You can also test if the feature was installed properly using Get-ADOptionalFeatures –Filter * afterwards.
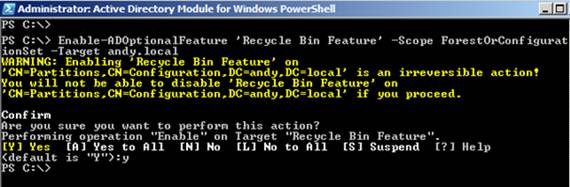
Figure 2
Using the Recycle Bin Feature allows us to restore Active Directory objects and we can do that either using some cmdlets or using free tools available on the Internet. In this article we are going to use a Canadian free tool named ADRecycleBin that was created by Overall Solutions Inc. You can download your copy from here.
The tool is really cool and simple to use, just double click on it and then click on Load Deleted Objects button and on the Deleted Objects frame we will see all deleted objects (Figure 3) and on the right side all the AD Properties and its respective values. To restore an object just click on Restore Checked Objects.
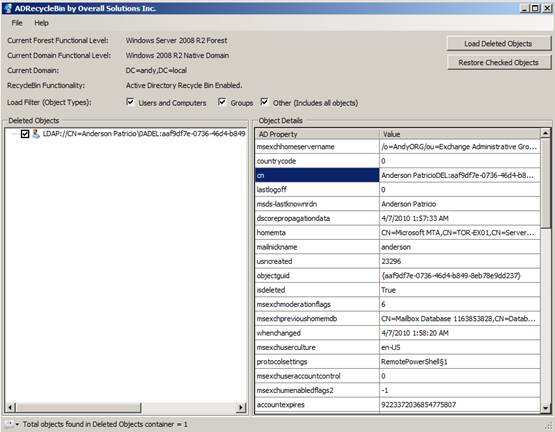
Figure 3
After clicking on Restore Checked Objects a new window called Restore Summary will be displayed with the results of the operation, as shown in Figure 4.
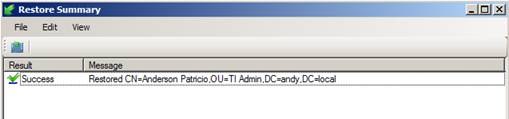
Figure 4
Okay, we know how to restore but what happens when I remove an Exchange Server 2010 mailbox straight from the Exchange Management Console/Shell and the mailbox show up on the disconnected mailboxes in the Exchange Management Console? Well, when you restore an object and that object used to be a mailbox as well, then that mailbox will show up automatically on your Exchange Management Console/Shell.
Reconnecting a Mailbox
We identified how we can be protecting Organization Units, objects and also how to restore using the Recycle Bin feature of Windows Server 2008 R2, now it’s time to validate the reconnect process using Exchange Server 2010.
Let’s say you have a Disabled and the user is called Lidiana Patricio, in order to reconnect a user these following steps can be performed:
- Open Exchange Management Console
- Expand Microsoft Exchange On-Premises
- Expand Recipient Configuration
- Click on Disconnected Mailbox item. All disconnected mailboxes will show up on the right side
- Right click on the desired Mailbox and click on Connect
- In the Introduction Page. Click on User Mailbox, as shown in Figure 05
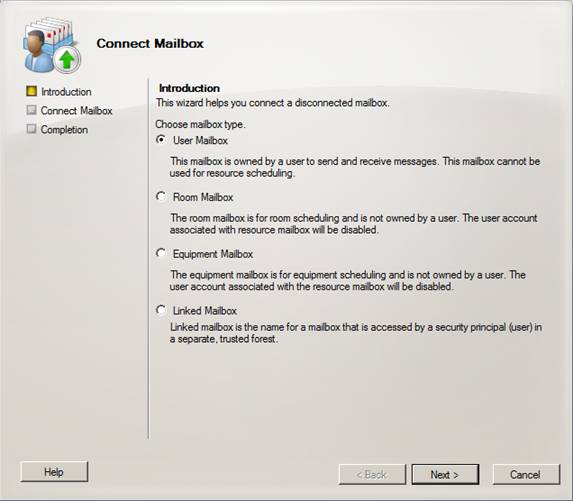
Figure 5
In the Mailbox Settings page, the first option is the Matching User where the wizard will try to match the disconnected mailbox with a current user basically checking the LegacyExchangeDN and DisplayName attributes. If there is no match the second option Existing User must be used and you will have to find manually a user account (only users that do not have a mailbox will be listed). Bear this important point in mind, usually it brings some confusion but it’s a simple rule: you cannot connect a mailbox to an existent mailbox user. You are able to reconnect with just regular users. (Figure 6)
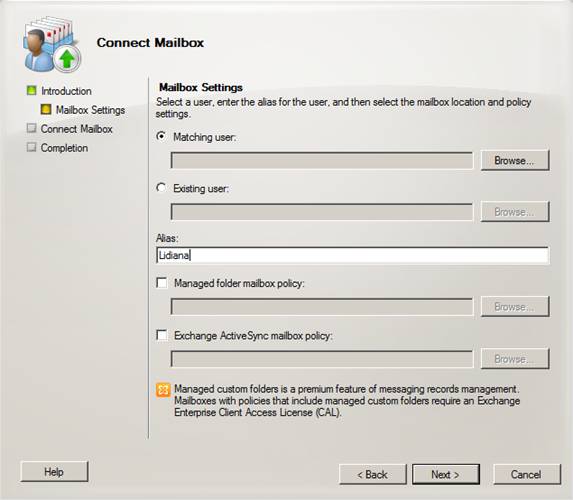
Figure 6
In the Connect Mailbox page. A summary of everything that we defined so far will be listed, just click on Connect to start the process. (Figure 7)
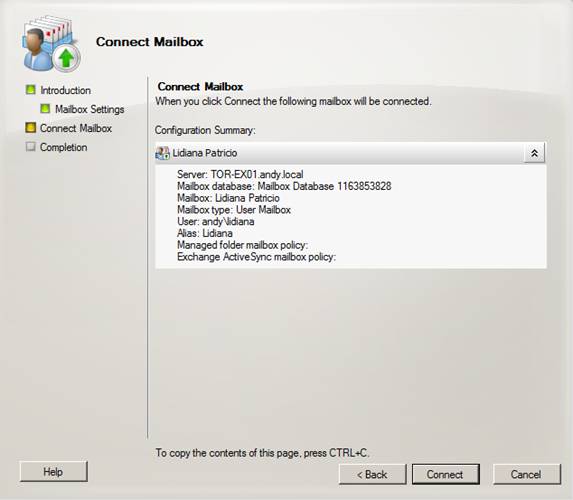
Figure 7
In the completion page. The result will be displayed, and at this point we can just click on Finish (Figure 08) to close the wizard. Now we can check that the disconnected mailbox will disappear from the list of Disconnect Mailbox and a new entry will show up on the Mailbox item.
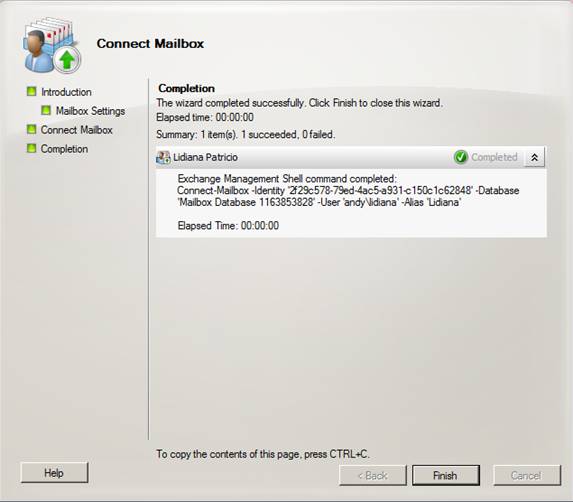
Figure 8
The connect feature can also be useful in cases where an employee is fired and his mailbox become disconnected and the new employee wants total access to the entire data from the ex-employee. If you need to do this, the easiest way is to create a single Active Directory user to the new employee and reconnect the disconnected mailbox to the new account.
Reconnecting Personal Archives
A personal archive can be disconnected from a mailbox and when it occurs the personal archive will show up in the disconnected mailbox item. To disable personal archive is just right click on the mailbox that has the personal archive and then click on Disable Archive, as shown in Figure 09. A dialog box will require your confirmation in order to disable the archive, just click on Yes to confirm.
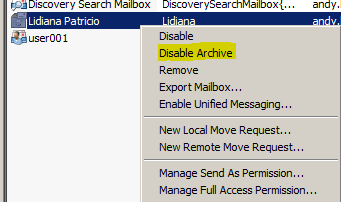
Figure 9
After disabling archive for a user the user icon will change back to the regular mailbox icon. In order to reconnect the Personal Archive, we just need to go to Disconnected Mailbox item and right click on the desired Personal Archive and then click on Connect to Primary Mailbox, as shown in Figure 10.
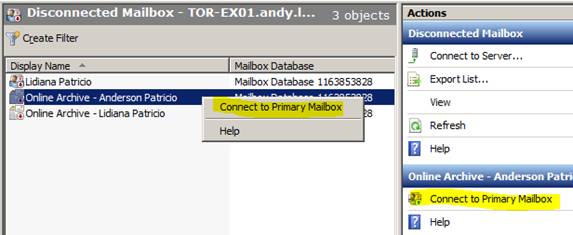
Figure 10
A dialog box will show up to confirm if we really want to connect and also the mailbox information will be displayed, as shown in Figure 11. Click on Yes.
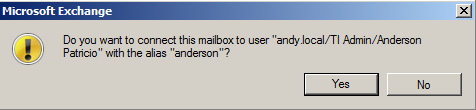
Figure 11
A third screen will show up saying that we should wait for the Active Directory Replication (Figure 12) and after that you can inform the end-user that his Personal Archive is available either using Microsoft Outlook 2010 or Outlook Web App.

Figure 12
We are going a little further in Archive features in one of my next article here at MSExhange.org and then we will see different scenarios to restore the data.
Troubleshooting deleted mailboxes/personal archives that do not show up on the disconnected mailbox item
This is a pretty common question in the TechNet Forums, and there are a couple of procedures that can help you out to find out the missing deleted mailboxes/Personal Archives. The first one is for those ones that have more than one server, if that is your case make sure that you are in the right server. When we click on Disconnected Mailbox item on the title bar on the right will show up the server name, you can always look at another server clicking on Connect to Server… in the Toolbox Actions, as shown in Figure 13.
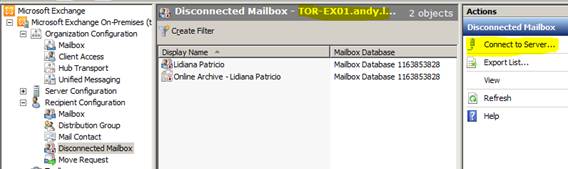
Figure 13
The second option is using Clean-MailboxDatabase cmdlet, where it will refresh the disconnected objects from the database. The following syntax can be used:
Clean-MailboxDatabase –Identity “Database Name”
Another possible option is to restart the Information Store (definitely is not a recommended option in a production environment).
Conclusion
In this final article we have seen how to use the Recycle Bin feature and how to reconnect Mailboxes and Personal Archives in Exchange Server 2010.
If you would like to read the first part in this article series please go to Protecting and managing accounts in Exchange Server 2010/Windows Server 2008 R2 (Part 1).


