If you would like to read the next parts in this article series please go to
Publishing Exchange Client Access with ISA 2006 – The Complete Solution (Part 2)
Publishing Exchange Client Access with ISA 2006 – The Complete Solution (Part 3)
Introduction
Publishing Exchange Server Client Access with ISA Server should be a straightforward and easy task. Well, it isn’t. Although there are lots of resources on the Internet about the subject and Microsoft provides extensive technical documentation with more or less detailed steps, the truth is that every time I go through the process of providing access to Exchange for external users using ISA Server, I can’t help feeling a little bit frustrated.
Some of the technical information needed is somehow dispersed through several sites and articles and I usually end up spending a lot of time searching for that particular solution that I know will solve my problem. That’s why I decided to write one more article about publishing Exchange with ISA. I call it the complete solution (I know it’s kind of pretentious) because it covers all aspects of the most common scenario I keep finding at my customers.
So, what can you expect in this one-stop article?
- ISA Server configuration
- Exchange configuration
- Certificates: getting them, installing and exporting
- How to create the appropriate web listener
- ISA Server publishing rules
- Redirection (folder and protocol)
This is meant to be an objective article, so I’ll try not to lose too much time diving into some more deep technical content. I’ll enumerate the necessary steps to reach the main goal and they will be illustrated with lots of pictures.
This article applies to both Exchange 2003 and Exchange 2007. Whenever there are specific configurations, I’ll use distinct topics to cover them.
Main Objectives
The main goals we’re trying to accomplish are:
- Publish full Exchange Client Access to the Internet:
- Outlook Web Access (OWA)
- Outlook Mobile Access and ActiveSync
- RPC over HTTP(s) / Outlook Anywhere
Solution Topology
As I said previously, I’ll cover the most common scenario I find at my customers. In order to provide you the “Complete Solution” I had to keep focused on one particular configuration or it would be impossible to write an online article about it.
The following image depicts the topology that will be used along this article:

Figure 1: Exchange Topology
The main characteristics of this topology are:
- ISA Server is in a workgroup
- ISA Server has only one network interface (unihomed)
- ISA Server is in a DMZ
ISA Server Configuration
Our first task is to configure ISA Server in a unihomed workgroup configuration. I’ll skip the ISA Server setup procedure, so we’ll start from the point where the ISA is already installed in a Windows Server 2003 environment that doesn’t belong to a domain.
What we’ll have to do is apply the Single Network Adapter Template.
- Open ISA Server Management Console. Browse to Configuration and then Networks. On the Templates pane, you’ll find the Single Network Adapter. Select it and that will trigger the configuration wizard. Click Next twice.

Figure 2
- On the Internal Network IP Addresses page, you’ll see the addresses that will be configured to define the default ISA firewall Internal Network. You can accept the default options. Click Next.

Figure 3
- Select Apply default web proxying and caching configuration and click Next.

Figure 4
- On the Completing the Network Template Wizard page, click Finish.

Figure 5
- A warning will appear. Click OK.

Figure 6
- Click Apply to save the changes and update the firewall policy. Click OK in the Apply New Configuration dialog box.
Certificates
To ensure the communications between the all the peers are properly secured, you need to install a server certificate on both the Exchange CAS/Front-End and ISA Server. If this certificate is from an internal CA you’ll need to install the CA certificate on both servers and your clients must all trust that same internal CA.
When you install Exchange 2007, you can install a default Secure Sockets Layer (SSL) certificate that is created by Exchange Setup. However, it is not recommended to use it, since this certificate is not a trusted SSL certificate.
- To obtain a new server certificate using the Web Server Certificate Wizard, in IIS Manager, expand the local computer, and then expand the Web Sites folder. Right-click the Web site for the Exchange services and click Properties. On the Directory Security tab, click Server Certificate. Use the wizard to request and install the Web server certificate. In the Web Server Certificate Wizard, select Create a new certificate.

Figure 7
- On the Delayed or Immediate Request page, select Send the request immediately to an online certification authority if you have a Windows Server 2003 enterprise CA installed in your domain. Otherwise select Prepare the request now, but send it later.
- Enter the required information on the Name and Security Settings and the Organization Information pages.

Figure 8

Figure 9
- Type the FQDN on the Your Site’s Common Name page. This name must match the name ISA Server will use to communicate with the Exchange server. It doesn’t have to be the final external name, as we will see ahead.

Figure 10
- Enter the required information on the Geographical Information page.

Figure 11
- If you’ve selected Send the request immediately to an online certification authority, accept the default port of 443 on the SSL Port page and from the list under Certification authorities, select the correct internal enterprise CA. Click Next to submit your request. This will also install the certificate for your Web site.
If you’ve selected Prepare the request now, but send it later, save the request to a text file and submit it using a browser. If it’s a Microsoft CA, the URL will be http://CAServerName/CertSrv. Select Request a certificate, click Next and select Advanced request. Click Next and select Submit a certificate request using a base64 encoded PKCS #10 file. Click Next, and open the request file that you saved from the Web Certificate Wizard in Notepad. Paste the entire text of the file, including the BEGIN and END lines, into the Base64 Encoded Certificate Request text box. When the certificate is issued, go back to IIS Manager, right click the web site and on the Directory Security tab, click Server Certificate. Select Process the pending request.

Figure 12
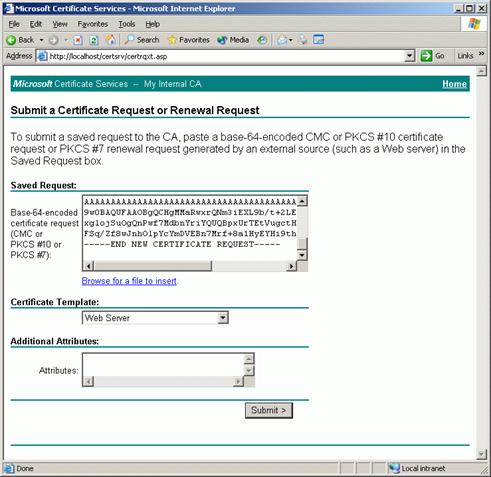
Figure 13
The next step is to install server certificate on the ISA Server computer, to enable a secure connection between the client computer and the ISA Server computer. If a private CA is used, the root CA certificate from the private CA will need to be installed on any client computer that needs to create a secure connection (an HTTPS connection) to the ISA Server computer.
This certificate can be the same as that installed on the Exchange CAS/Front-End, if the internal name matches the public name. In that case, we’ll perform the following procedure to export the server certificate:
- On the CAS / Front-End, in IIS Manager, expand the local computer, and then expand the Web Sites folder. Right-click the Web site for the Exchange services, and click Properties.
- On the Directory Security tab, click Server Certificate to start the Web Server Certificate Wizard. Click Next on the Welcome page.
- Select Export the current certificate to a .pfx file on the Modify the Current Certificate Assignment page.

Figure 14
- Type the path and file name on the Export Certificate page and click Next. Enter a password for the .pfx file, preferably a strong one. This password will be requested when a user is importing the .pfx file.
- Copy the .pfx file created in the previous section to the ISA Server computer.
- On the ISA Server, click Start, and then click Run. In Open, type MMC, and then click OK. Click File, click Add/Remove Snap-in, and click Add to open the Add Standalone Snap-in dialog box. Select Certificates, click Add, select Computer account, and then click Next. Select Local Computer, and then click Finish. Click Close and click OK.
- Expand the Certificates node, and right-click the Personal folder. Select All Tasks, and then click Import. This starts the Certificate Import Wizard.
- On the File to Import page, browse to the file that you created previously and copied to the ISA Server computer, and then click Next.
- On the Password page, type the password for this file, and then click Next.
- On the Certificate Store page, verify that Place all certificates in the following store is selected and Certificate Store is set to Personal (the default settings), and then click Next.
- On the wizard completion page, click Finish.
- If you’re using a private CA, you also need to import the CA certificate. Again, if it’s a Microsoft CA, browse to http://CAServerName/CertSrv and select Download a CA certificate, certificate chain or CRL. Repeat steps 6 to 11, but when asked where to put the certificate (step 10), select Trusted Root Certification Authorities.
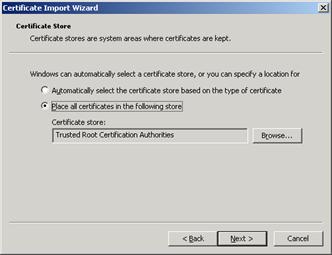
Figure 15
- Verify that the server certificate was properly installed. Double-click the new server certificate. On the General tab, there should be a note that shows You have a private key that corresponds to this certificate. On the Certification Path tab, you should see a hierarchical relationship between your certificate and the CA, and a note that shows This certificate is OK.

Figure 16
Summary
In this first part we explored the solution topology and set our main goals. We also saw how to configure ISA Server in a unihomed configuration and how to generate, export and import certificates.
In the next part we’ll cover the necessary configuration settings for Exchange CAS/Front-End Server and also how to configure the authentication mechanism for ISA Server when it is not part of an Active Directory domain.
Related Links
How to set up SSL by using IIS 5.0 and Certificate Server 2.0
ISA Server 2006: Installing ISA 2006 Enterprise Edition (beta) in a Unihomed Workgroup Configuration
If you would like to read the next parts in this article series please go to
Publishing Exchange Client Access with ISA 2006 – The Complete Solution (Part 2)
Publishing Exchange Client Access with ISA 2006 – The Complete Solution (Part 3)