As we learned earlier in this article, good housekeeping practices such as how best to plan and organize your network cabling are important for keeping your server rooms and datacenters functioning well. But proper feeding and care of your racks and cabinets is also an essential part of that discipline, and that is what this article is all about. So once again I’m going to share some tips I’ve learned over the years from visiting datacenters and talking with IT pros who design and administer them. And as with planning and implementing wiring in a server room or datacenter, best practices for selecting and deploying the right racks and cabinets is also something that is often learned from trial and error after finding out that initial choices and solutions don’t meet your expectations.
One IT pro who has learned a lot about this over the years is Ken Chase the founder of Heavy Computing Inc. in Toronto, Canada, and he has some helpful thoughts on these matters which he shared a while back with a group of network operators and which he has given me permission to share here with our TechGenix readers. Ken founded Heavy Computing 11 years ago after starting out in the early Internet industry in the mid-1990s and he has been providing clients with datacenter and processing solutions that range from wiring and cooling plans to hardware procurement and deployment, management and operations, and user experience design. Ken currently services a boutique set of clientele in custom-run datacenters in the greater Toronto area and I’ve included some excerpts from the comments he shared in the sections below to pass on some of his hard-earned wisdom to our readers.
Know your budget

If the budget is in the millions of dollars then you can afford to go all-in with purchasing your racks and cabinets from a single vendor. Full-rack solutions that come with extendable arms for customizing how you arrange your servers, switches and other networking hardware are terrific if you can afford them. But they are also both expensive and vendor-specific in their design so if you decide and can afford to go that way you basically need to buy everything from a single vendor. But as Ken says, such an approach is “not practical for varied species installed over longer periods” so if you can afford to purchase everything up front and don’t plan on later incremental expansion of your datacenter then this is probably the way you should go.
Watch for vendor compatibility issues
If your budget is more limited and you expect to grow your rack and cabinet infrastructure over time, you still need to be aware of issues with compatibility between different vendors of infrastructure hardware. For example, as simple a matter as whether servers are powered from the left side or the right varies between different vendors, with IBM and Dell on one side and HP and Sun Microsystems on the other. Ken’s response to this kind of vendor behavior is refreshingly vocal: “Curse vendors for not picking a standard side for power ingress!”
Choose the right size cabinets
If your cabinets won’t have any side panels or have any neighbors, then it’s probably all right to use 24×30-inch cabinets in your server room. But generally speaking, it’s best if you go for cabinets that are 30 inches wide and 36 inches long as Ken says this “make all the difference” since you can position your cable wrangling ladders on one side of the cabinet and your 0U power distribution units (PDUs) for A/B redundant power for your servers on the other side of the cabinet. Ken adds that cabinets that are 36 inches deep also “allow facing the PDUs backward, not sideways, i.e. cable heads extend backward, not into the rail-tail path or airflow.”
Favor cage nuts over screws
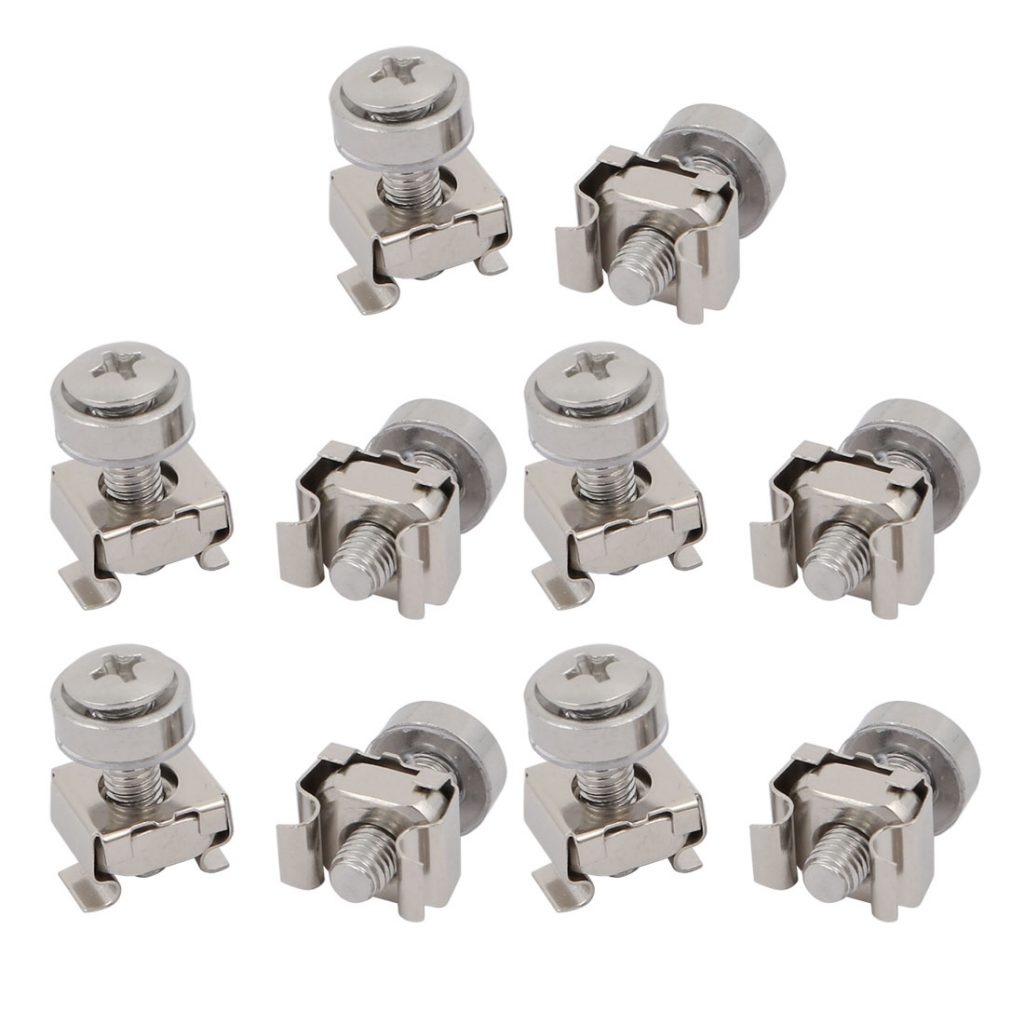
Ken says flat out to “avoid racks that don’t use cage nuts” and have pre-threaded holes for rack screws. The reason is simple: “Pre-threaded holes get abused and stripped.” Watch out also for the kinds of cage nuts you buy as there are several different sizes available and some of those sizes may fit poorly on your rack or cabinet. And as we’ll see later in this article, poorly fitting cage nuts can lead to painful accidents if you’re not careful when installing them.
PDU installation tips
Ken also shares several hard-earned tips concerning installing PDUs and networking hardware in cabinets. First, he says he “offsets his PDUs vertically by half a plug-spacing distance as it allows the cable from the left one to fit between the cable heads of the right one.” Then for those whose cabinets are limited in space, he suggests that it’s “worth getting the 90-degree bent-head cables too if you need the spare inches.” Ken also laments why power cables are often either too short or too long for proper installation of servers and switches in cabinets. “Not having zip-tied loops of 12-gauge wire hanging around makes things much nicer” in how they look, but more importantly it also “makes better airflow,” Ken says. So where possible try to mix and match power cables of different lengths so you can avoid having bundles of cables interfering with the cooling system in your cabinet.
When you first get your hands on your rack, it’s also a good idea to start off by pre-wiring any gear you’re going to mount in the rack that needs to be powered from the front instead of the back. Ken takes a careful preplanned approach on this matter, and usually has “five pairs (A/B) going to the front permanently zip-tied and labeled, with 3×2 in use for back-facing switches, one for small pieces of gear, and others as spares.” Ken also suggests pre-wiring as much of your Ethernet cabling as you can since fishing Ethernet cabling through the side afterward “can be impossible in a full cabinet in a dense row” as is often the case in an overcrowded server room or budget-constrained datacenter. As a tip, Ken also suggests to “leave some string in there too” so you can pull more cabling in afterward if necessary, and possibly more string as well.
Keep safety in mind when configuring racks and cabinets
Finally, always keep safety in mind as you install and configure racks and cabinets in your server room or datacenter. Whenever you deal with equipment like this there is the potential for danger, both of the mechanical and electrical varieties. For example, you should watch out for certain special features that vendors include in the design of their products to differentiate them from those of other vendors. The long fins or tails on the end of the rails of Dell’s racks are a good example of this as they may not fit properly into your 30-inch cabinet, depending on how the vertical mounting rails have been placed and the power cord head has been positioned in the cabinet. Ken, for instance, shares a story of how he saw an administrator “jam a long Dell rail’s tail into his fully assigned cabinet in between a power cable head and the power distribution unit it was plugged into.” The result? “BZZT! Took 20 minutes to get a monkey to reset at central panel.” As Ken says, “Thank goodness for proper cabinet grounding cables!”
But electrical shock isn’t the only hazard you may face when you setting up or reconfiguring your racks and cabinets. For example, if your rack screw or cage nut doesn’t fit properly you might try to force it in using a screwdriver. This is not a good idea however as Ken says he has “seen people stab themselves in the hand” when trying to do this. Ken’s suggestion in this regard is worth remembering: “Ask for a cage nut tool, a J-hooked shaped piece of metal that looks like a bent desktop-case PCI slot cover.” Using the right tool for the job not only makes your work more efficient, it can also save you from a trip to the hospital or clinic to get stitches. And who likes visiting the hospital?
Featured image: Shutterstock


Having wired and setup more than a few cages over the years, I have to agree with much of Ken’s comments. Things I have learnt from my personal voyage.
1. Try to ensure that you have adequate cable management. Allow for at least 1RU cable management between patch panels and 2RU above your switch. Don’t forget cable management for the rear of your cabinet if needed.
2. Try to get your Ethernet patch leads in appropriate lengths to minimise the excess you need to hide.
3. Many server vendors provide telescoping arms for their servers that allow the server to be removed from the rack whilst still cabled. Make sure that your cabling is long enough for your server to be removed from the rack without having to unplug cabling.
4. If you can, resist the temptation to sit smaller kit (modems, telco gear) on top of your servers at the rear. This makes tracking down that faulty gear really difficult and removing servers impossible. Get separate shelves for this gear.
5. Make sure that if you have rack mounted UPS in your rack, that they go in the bottom. However make sure that you leave sufficient space in the bottom of the rack for extra cables to be drawn. I’ve seen a few techs over the years try to kill themselves lifting UPS up higher than they need to be.
6. On UPS, always get help putting these in the rack. It is very easy to injure yourself trying to wrangle these on your own.
7. If you can afford it, self tracing cabling is the bees knees. This has a fibre cable moulded in each RJ45 termination of the cable, that allows for a light sender unit to make tracing cables simple. However this cabling can often be 3 to 4 times the cost of standard patch cables.
8. Resist the urge to make your own cables, it is much simpler and more efficient to purchase ready made patch cables, in a variety of lengths and colours to allow for colour-coding. These cables are certified, making tracing faults much easier.
9. Try to minimise the cabling between cabinets. Try to concentrate all the components that may inter-connect in one cabinet if possible. If this is not possible, make sure that you allow sufficient length in your inter-connects to allow for adjustment, i.e. assume that you are going from the bottom of one rack, up through the top, across a cable tray and down into the bottom of the other rack. The excess can be coiled on top of the cable tray.
10. Velcro and cable ties- Cable ties are used for fixed cabling (i.e. desk reticulation cables back to patch panels) that is not going to be moved once it is in place. Use Velcro for any other cables (or gardening twist tie wire if you are really cheap, but this is not recommended) to allow for addition/removal of cabling without losing your tidy cabling. Only ever use velcro on Fibre optic cables, to avoid kinks or sharp edges.
11. Tools – cage nut tools are invaluable and very cheap. I always have one in my toolkit. Also cordless drill and long driver bits. This saves on the RSI from trying to do up multiple screws. Make sure that the driver bit is magnetised, or failing that place a blob of Blu-tac on the tip to hold screws while you do them up.
12.However… resist the urge to torque screws so tight that you need a rattle gun to get them out. The screws are there simply to hold things in place and not holding on a wheel.
13. Labelling – label things as you go, preferably with a specialised labeling machine. Label both ends of cables if you do not have self tracing cables.
This is just a few things I have learnt over the years but could save a bit of time for people, particularly if you are regularly setting up racks.
Wayne these are all terrific suggestions, thanks for sharing them with our readers! –Mitch
One of the major wins not mentioned was the new thinner ethernet cables (around 12-14ga). Some may decry them mainly because they come very close or exceed the noise standards when extended to ethernet’s max 100m lengths. But you’re using 1, 1.5, 2, 2.5, 3, 4, 5, etc ft cables in a rack, way below max length. I’ve never had a problem with them.
Cables2Go and other vendors have been selling these for years, and I’ve been using them for years. Being able to bundle 20 ethernet cables around 14ga thickness instead of just 6 at 4ga or so is a huge win for rack cleanliness and airflow.
I also stand by using random ethernet cable colours (I’ve never seen bi-colour ethernet but wish I had). Random may not look pretty but it removes bias: you aren’t assuming the cable is specifically connected to something/for a purpose so wont make a mistake. Code the colour into the switch config — when you go to move/unplug the cable you check the switch. If the colour doesnt match, trace it.
Beware labels: the glue cooks off. I’ve seen a client with 100s of pretty little white labels littering the cables at the bottom of the rack where it’s cooler. Also, cables often get reused without labels replaced (and many leave their glue on the cable, creating a nice black dust-collection spot on the cable, ready to get on your hands). I just don’t use labels and refer to single-point-of-authority for all my configuration details, on electronics (the switch) which can be backed up nightly and versioned into git &c.
Your boss may not like it if it’s not pretty but she’s not the one running the rack and risking job security. I havent found a server that cares how pretty its rack is to determine its uptime yet either.