In a recent article, I proposed that investing in training is a key driver for the success of any IT project. I produce a lot of professional training programs, and it is fun to do. Recently, I purchased a course that was essential to my job but the guy’s dog was barking in the background, and about 10 minutes into it, I heard a toilet flush. Obviously, I never finished the training and am left with a sense the trainer is not professional and does not know what he is doing. I want to help you deliver excellent, distraction-free training. To start, you need the right gear.
Disclaimer: I make some product recommendations in this article, and they are my own opinions. Neither TechGenix nor I have received compensation from the companies or products listed.
Why create online training?
If you work at a company and want to deliver training, you could be the rock star who puts it together as a self-paced training guide. If you are a subject-matter expert in a particular field, you might want to share your work with others online. Maybe you want to get paid for your training, so you build it and sell the course to any number of online training companies.
Creating great online training is like creating a book. You get recognized, grow your career, and will find you have more influence, especially if you do it right.
Note: This article focuses on delivering software training. I offer some good general advice, but if you are creating car-repair videos, my gear guide will be less helpful to you.
Why the need for special gear?
Go to YouTube and search for terms like Photoshop tutorial, create excel macros, or any other topic related to software. Don’t watch anything from Microsoft or Adobe, look at the homemade training videos. I will wait here until you get back…
Now that you watched a few videos, I can bet you saw or heard a few things that might be very distracting:
- The audio was not tuned (too loud, muted, too soft, scratchy).
- Noises were in the background (even mouse and key clicks might be loud).
- If the person put a video of themselves on the screen, their faces were washed out and dark.
- The video is cropped on the left and right side of the screen because it was not shot in HD.
- The person delivering the training forgot some steps or it felt like they were doing it on-the-fly.
When speaking with my students, they tell me they enjoy my courses because they are easy to follow and distraction free. If you are going to produce great online training, you need to gear up and make sure you have what is required to reduce the distractions in your environment. Let’s get started.
The audio setup
I live in San Francisco where there is beautiful weather all year long. Like most San Franciscan’s, I like to keep the windows open and let the cool breeze flow through the house. Unfortunately (and sometimes fortunately), I live around the corner from a hospital, children’s school, and a dog park. All day, I hear dogs barking, kids yelling, and ambulances screaming by. No one watching (or listening) to my training wants to hear all these distractions.
1. Buy a great microphone
Even if I sat in the quiet of my bedroom with the doors closed, a basic headset or the computer’s speaker would still pick up the noise of me shifting around, the sound of footsteps overhead, my loud breathing, those distracting keyboard and mouse clicks, and the echo of the room. You need a good microphone.
If you search online for podcast microphone or quiet headset you will find a laundry list of products that are probably no good, and believe me, I have tried a lot. This does not mean you need to spend a fortune either.
Here is what not to buy (or ever use):
- Your computer’s microphone (it is close to the keyboard and is designed for Skype calls, not recording training).
- Your fancy phone’s headset.
- Cheap plastic headphones that fit around your head with a foam ball on it.
Here is what you should buy:
- A microphone from a reputable company that specializes in audio.
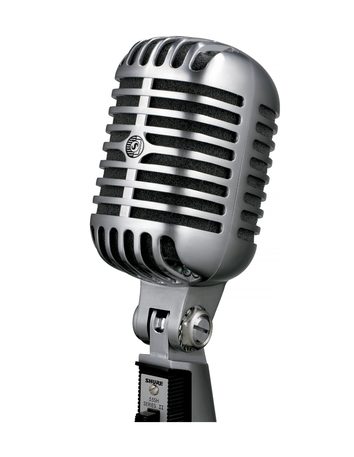
Shure 55SH Series II - A microphone designed for voice, preferably a vocal mic.
- A mic that does not require special gear like pop filters and foam coverings (not for any reason other than making it easier to deal with).
My microphone of choice is the Shure 55SH Series II (or the Elvis mic, as my brother calls it). I particularly like this mic because it focuses all the audio on the voice in front of it, blocking out noises behind it (in my case those windows with the kids outside). The only downside to the mic is I do have to speak a little louder to get my voice heard. (I don’t have to yell, but I definitely speak a little louder.)
A good microphone will probably cost you between $100 to $200.
2. Cables and mixers

Professional mics rarely use a USB port, so you will need special cables and equipment to get the audio into your computer. You can go to Amazon and find some cables that convert the signal to USB, but they don’t work well, and you can run into compatibility problems.
You can buy a mixer and connect that to your computer, but they just seem too complicated with the buttons, dials, and switches. Shure has a nice answer to that, and it is a tiny little mixer called the X2U. It has a few knobs, a connector for your mic, a standard USB out and a little headset port so you can actively listen through your headphones. Rather than invest in (and learn how to use) a mixer, I use the Shure X2U USB signal adapter.
The X2U retails for $99, but you can find cheap mixers and similar XLR-to-USB products in the $50 to $150 range.
3. A stand
Most profes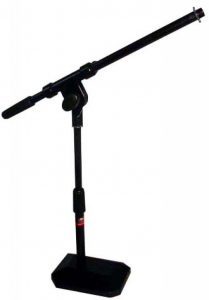 sional mics have no stand, so you need to purchase one. Make sure you find a stand with a hefty base. My stand looks weak and frail, but it could bludgeon an attacker. That is good because you don’t want your mic falling and breaking something (or worse, falling onto your water glass). My stand looks like this image on the left. Notice how the base is not just a circle? That is good because if I stretch my mic out, I want the stand to have more strength at the base.
A decent home mic stand will run you between $15 to $50. I believe mine (a no-name brand I got at Guitar Center) cost $25.
4. Cables
You will need an XLR cable that connects to your mic and a USB cable that plugs into your mixer, and of course, your computer.
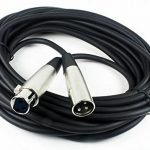
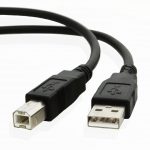
These cables are relatively cheap. You can purchase shielded cables, but I think for purposes of creating training videos, you should not pay more than $25 for both.
Total audio purchase
You can buy a professional audio setup for $300 to $400. Believe me, it is worth the investment. I have some training videos where an ambulance went down my street and I made only the tiniest of adjustments to remove it from the background. You can record nearly anywhere with a good vocal mic, including conference rooms that tend to echo.
By the way, this audio set up is ideal for podcasts, and if you are musically inclined, using them for singing.
The headset
When I purchased my little X2U unit, there was a place to plug in the headset so I can listen to what I am saying. I did not bother with this before, but recently I am learning how valuable it is.
When you connect a headset to a converter or mixer, you will hear yourself talk. It is a little odd at first, but it is helpful for some reasons. The primary benefit is that you are monitoring what you are saying and if the microphone is picking up any external noises. This feature also helps you manage more granular control of the input and output settings. Nowadays, when I deliver my training, the only time I take the headset off is if I am doing some on-camera work.
Since I travel a lot, I already own an excellent headset, which is the Bose Quiet Comfort headset. I am sure there are better headsets out there, but that is what I use. Her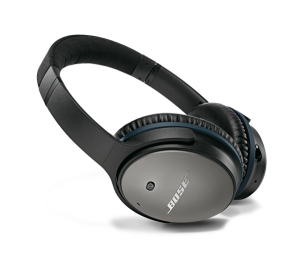 e are some important thoughts when purchasing a headset:
- Noise canceling is nice, but you do not want to use that feature while recording (it creates some distracting noise, believe it or not). My previous Quiet Comfort headsets only worked when they were turned on, using the battery. The newer models can run without the noise canceling, so you want to make sure your headset has that option. Check with the manufacturer to make sure they work in a mode that does not use the noise-canceling feature.
- Get a headset that completely engulfs your ears. You do not want an on-ear headset or a headset that just plugs into your ears.
The total cost for a good headset will run you between $200 to $400.
The computer
You can record online training with nearly any computer. However, I do recommend you look for a few particular features:
- Get a computer that can display in hi-def (or can switch to hi-def). YouTube and most other video sites prefer a 16:9 video ratio. Minimally, you should record at 1920×1080 pixels. You can, of course, go higher or lower, but stay within the 16:9 aspect rather. A link here helps you with various video sizes.
- Your computer should be powerful enough to record at least 30fps (frames per second).
- Make sure you have plenty of disk space on your computer. For one of my 40-minute training videos, it takes up about 6GB of space. That might seem like a lot, but you are working with raw video and audio output files.
Note: Even if you cannot set your computer’s screen to a 16:9 ratio, there are other options. I will share how to do this in another article.
Most computers manufactured after 2013 can meet the standards I list in this section.
Computer accessories
Chances are, you are going to move the on-screen arrows, windows, and other elements around the screen. If you are a trackpad user, you will probably have to lift your finger and start a few times again. That constant starting-and-stopping with the mouse can be distracting to the person watching your training.
I recommend you purchase an oversized mouse pad and a quiet mouse. I use a SteelSeries mousepad designed for gaming. It might look a little obnoxious, but it does a great job when you need full movement across the screen.
 I develop training on my Mac but also run Windows so that I can create training on that operating system as well. My favorite mouse is the Apple Magic Mouse. I like it because it is nearly silent and has a touch area for scrolling. You want to find a similar nonmechanical mouse that does not have one of those scroll wheels that make lots of clicking sounds. It should use touch for scrolling and use optical sensors to track movement.
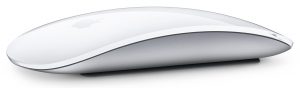 A large format mouse pad should run you between $25 to $40.
A nonmechanical mouse will cost between $50 to $100.
Live video recording
I do very little video recording, but when I do, I avoid using the camera that comes with the computer. Just like your computer’s built-in microphone, the camera is designed for making web calls. The images are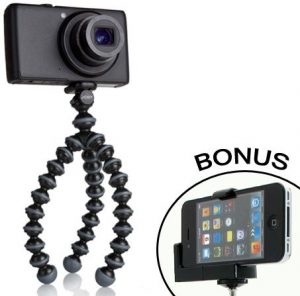 grainy, and the lighting is pretty terrible. You can purchase DSLR cameras that record live video, or you can even use your phone.
For my setup, I use my iPhone’s camera with a stand. You can pretty much use any modern phone with a good camera. Any iPhone after the 5S and any Samsung made in 2014 or later should do the trick. For me, I do the recordings sitting down, so I use a Joby desk stand (make sure you can  one that can hold a camera).
You can purchase a larger kit if you want to stand up and record the full length of our body.
Your phone will need an audio input. While you could set up your expensive microphone to connect with the iPhone, it can be a challenge to set up. That is why I purchase a good lavalier mic. Using a lavalier mic, you can speak from a distance, are not required to put another headset on, and can get decent audio quality. I do not recommend you use a lavalier for recording the entire on-computer training with this device because it will probabl
y scratch up against your clothing or chin and produce distracting noises
For this setup, I spent $20 on the stand and $20 on the mic.
Total investment
Assuming you already own a computer with the ability to output hi-def videos and has some decent disk space, your total investment for recording video training will run you about $765.
If you want to deliver the best training, it requires an investment in some professional equipment. You will find people like your training over others if only because of the lack of disruptions and professional audio quality.
In a future post, I will show you how to set up your computer so you can deliver the training.


Hi Bill,
Thanks very much for this excellent information on the mic and additional equipment required of the set up.
I have a couple of questions.
I am a university professor, and due to the current COVID situation, I need to teach all of my classes virtually for the next 10 weeks. I plan to do most of my teaching this Spring via Zoom videoconferencing from my home, where I will have an old-fashioned whiteboard set up to write on (like I would in a real classroom) and will Zoom “broadcast” my classes synchronously with my students in real-time.
I want my video and audio quality to be as good as possible for my students.
I have a MacBook Pro laptop (OS 10.13.6) and that is what I will use as my device for Zooming . I just purchased a webcam (Logictech C930e) to improve the video quality of my Zoom “broadcasts” to my students. Supposedly this webcam should also improve the audio quality. My question for you is whether you think it would be worth it to get the Shure 55SH mic that you recommend in your article to improve my audio further for my Zoomed classes. Or if you think there is a different sort of mic set-up that would work even better for my Zoom teaching purposes. Thank you very much! Sunny
Hi Sunny,
For your situation, I would not invest in that particular Shure mic because it is a condenser mic. A condenser mic does an excellent job of recording a voice right in front of it. While that feature is great for teaching a lesson while you sit in front of the mic, it is not very good for when you get up to the board. I suggest you get a lavalier so you have more freedom of movement, and your voice does not change pitch. Those pitch changes make for a distraction that can lead to your students having less focus on your words.
I hope this helps and good luck with your classes!