Here’s the situation: Your organization just hired a brand new fresh out of MCSE boot camp assistant administrator so that you can finally get some time off. You’ve packed your bags and boarded the plane. You thought you left all forms of office communication in your desk, but it seems the Boss was one step ahead of you and snuck your cell phone into your laptop case. Upon deplaning, you shrug your shoulders and turn your phone on. You’ve got new voice mail:who’d a thought that would happen? It seems that Skippy, the new assistant administrator, was “playing” around in Active Directory Users and Computers and has deleted the user account for Joe Q. User, who still works at the company, instead of Joe P. User, who left last week. The Boss wants it fixed now and given Skippy’s performance already, he’s certainly not about to let him perform an authoritative restore again Active Directory. For once, you agree with your boss. Fortunately for you, you’ve taken steps to help mitigate the fallout in cases just like this one. Finally, something in life that actually works the way it’s supposed to!
The Setup
Before we get any further, let me take a couple of steps back. Up to this point, we have been working with the scenario of a user who has been deleted from Active Directory and subsequently recreated. The problem lies in the fact that since we recreated the user manually, vice performing an authoritative restoration of Active Directory (always a risky choice, no matter what you’ve been told) and thus the SID of the “new” account does not equal the SID of the “deleted” account. The mailboxes of deleted users are orphaned for a set time, which we will configure shortly. Mailboxes that have been directly deleted from with the Exchange System Manager truly are gone–unless you perform a restoration of your Exchange organization. In this article, we are going to stick with the assumption that the user has been deleted and subsequently recreated from within Active Directory Users and Computers.
In order to ensure that you have the capability to retrieve “orphaned” mailboxes, you will want to take some precautionary steps ahead of time and configure some time limits for mailboxes. You can configure time limits for mailbox stores in one of two ways: either directly on each mailbox store of concern or by creating a mailbox policy (or multiple policies as desired) and applying it to the mailbox stores of concern. I will demonstrate both methods, although since I believe in making life easier, I recommend using the policy-based method and applying it to all of your mailbox stores.
Configuring A Specific Mailbox
In order to configure a mailbox to allow for recovery of mailboxes that belong to users who have been deleted, you need only configure two settings. Configure your mailboxes to support recovery as follows:
1. Open the Exchange System Manager.
2. Expand the nodes until you have found the private store of concern.
3. Right-click the applicable private store and select Properties.
4. Switch to the Limits tab, as shown in Figure 1.
5. Configure the settings as you desire and click OK to accept them. The settings are explained below in some detail.
Figure 1 – Configuring limits on a Mailbox store.
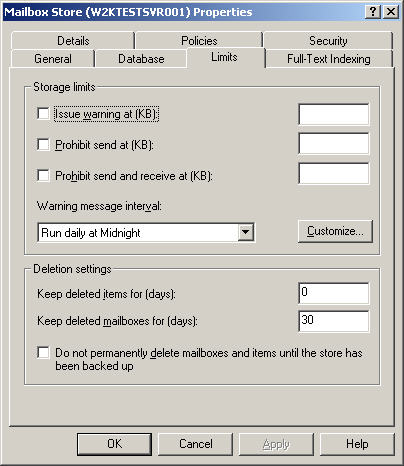
- Keep deleted items for (days) – Sets the number of days that that deleted items (such as e-mail messages) remain on the server before they are permanently removed. You can type a number from 0 to 24,855. If you type 0, deleted items are removed from the server immediately.
- Keep deleted mailboxes for (days) – Sets the number of days that deleted mailboxes remain on the server before they are permanently removed. You can type a number from 0 to 24,855. If you type 0, deleted mailboxes are removed from the server immediately.
I recommend setting the deleted items setting at something around 14 days (in case the Boss deletes that important internal memo on accident) and setting the deleted mailboxes setting at something between 30 – 45 days to give you a fair shot at fixing an error such as this, should one occur.
That’s all there is to configuring an individual mailbox store for recovery, we will next look at creating a policy to apply to all private stores.
Configuring A Mailbox Policy
Should you have more than one mailbox store, you may want to consider creating and applying a mailbox policy to implement a recovery setting across all of your mailboxes equally. Of course, you can create mailbox and public store policies for other reasons as well:so get in there and see what’s up!
To create, configure and implement a mailbox policy, follow the steps below:
1. Open the Exchange System Manager.
2. Ensure that viewing of Administrative Groups is on. If not, right-click the organization, and then click Properties. On the General tab, select Display administrative groups. You will have to exit and restart Exchange System Manager.
3. Open the administrative group that contains the mailbox(es) you want to work with. If it does not already contain a System Policies folder, create one by right-clicking on the Administrative Group node and selecting New | System Policy Container.
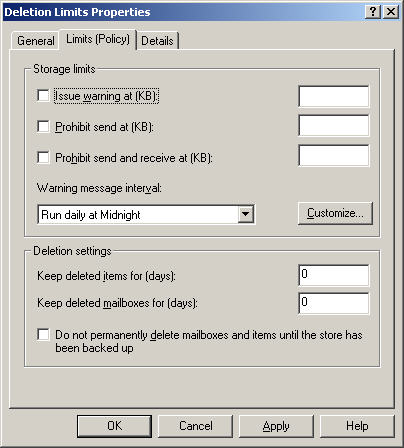
4. Right-click the System Policies folder and select New | Mailbox store policy, as shown in Figure 2.
Figure 2 – Creating a new mailbox store policy.

5. From the New Policy window, check the boxes of the tabs you want to use in the policy. For this example, we want the Limits box at a minimum.
6. On the General tab of the Properties window, type a policy name.
7. On the Limits tab (see Figure 3), configure the deletion settings as you desire. Close out the policy by clicking OK.
Figure 3 – Configuring the mailbox store policy
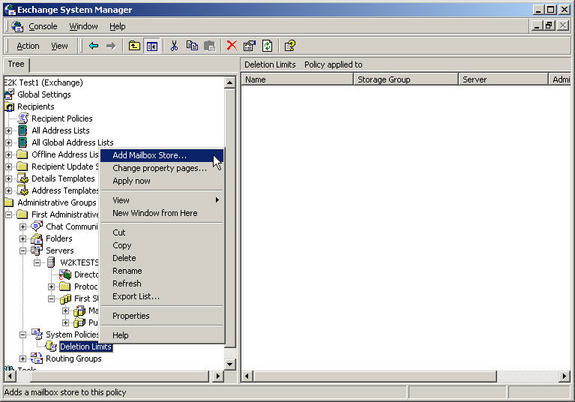
8. To apply the policy to one or more mailbox stores, right-click on it in the System Policy container and select Add Mailbox Store, as shown in Figure 4
9. Select the mailbox stores you want to add the policy to and click OK.
Figure 4 – Associating the policy with a mailbox store.
If click on the Policies tab of the Properties page the mailbox store, you can see that the policy is indeed in effect. Additionally, any settings you configured via a policy will cause those boxes to be made unavailable for configuration from the Properties page.
Now that we’ve seen how to configure for recovery on one or many mailboxes, let’s get down to actually recovering an orphaned mailbox–so we can get our administrator back on his vacation and get Skippy off the hook. After all, we wouldn’t want to get him fired on his first day at work, would we?
The Exchange 2000 Server Orphanage
The process to actually recover (reconnect) an orphaned mailbox is pretty simple, once you actually get to that step. To reconnect a mailbox with a user account, proceed as follows:
1. From Active Directory Users and Computers, create a new user object for the user. Ensure that you clear the Create an Exchange Mailbox check box.
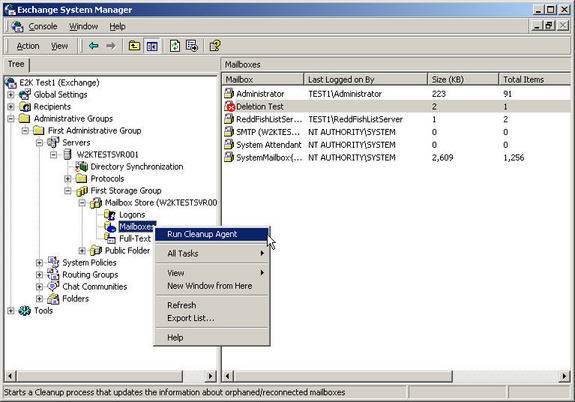
2. In the Exchange System Manager, navigate to the mailbox store where the mailbox is located.
3. Verify that the mailbox icon has a red X on it. Only mailboxes that display this icon have been deleted (but will be retained for the time period specified). If the mailbox does not have the red X on it, then you will need to run the mailbox cleanup agent by right clicking on the Mailboxes object and selecting Run Cleanup Agent, as shown in Figure 5.
Figure 5 – Running the Cleanup Agent.
4. Right-click the mailbox and select Reconnect. This will open the New User for this Mailbox window as shown in Figure 6.
Figure 6 – Picking the user to reconnect with.
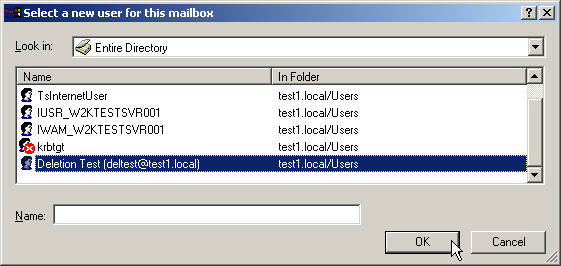
5. Select the user you wish to associate with this mailbox and click OK.
That’s it. You’re done. The only thing you really have to watch out for here is possible replication delays you may experience if you are not working on the Exchange Server locally. Since the user account must be replicated throughout Active Directory and be “seen” by the Exchange Server, you may want to force replication if required. Not a big problem, but something to be aware of.
Wrap-Up
Accidentally deleting a user account from the Active Directory database is never a welcome thing. Performing an authoritative restore for just one account is not really a likely event. At least you can rest easy knowing that you can reconnect the new user account with the orphaned mailbox:see, not everything is all bad. Now, back to that hard earned vacation!


