In today’s world, connecting to a remote computer has become commonplace, given that many companies have adopted a work-from-home culture. However, this can bring up many technical issues, including common errors such as “remote desktop can’t connect to the remote computer.”
So, how to fix this error? Well, let’s get a bit into the basics first.
Remote desktop is a convenient feature that allows you to virtually connect to other computers running the Windows operating system. With this feature, you can connect to computers located in any part of the world, provided you have the right credentials (username and password) to connect. Also, a good Internet connection is absolutely essential!
If you have the right credentials and the Internet connection and still face this issue, let’s address them.
Top reasons for ‘remote desktop can’t connect to the remote computer’ error
Before you read this section, check if your Internet connection is working fine and if you’re using the right credentials to log in because these are two of the most common causes of this error. Besides these two causes, there are also other reasons for this error.
Windows update
Many times, the Remote Desktop (RDP) functionality may get corrupted after a Windows update or upgrade as one of the newly installed files can interfere with the working of the RDP. You’ll have to manually identify the exact cause and fix it.
Antivirus
Sometimes, antivirus software can block RDP completely or partially, and this leads to the “remote desktop can’t connect to the remote computer” error. The good news about this error is it is easy to identify. Disable your antivirus and see if you can connect now. If you can, you’ve found the root cause of the problem!
Public network profile
If you have a public network profile or a network group, your computer can block the remote desktop functionality as a protective measure. While this is not an exhaustive list of reasons, these are the most common ones. Now comes the big question — how to fix the “remote desktop can’t connect to the remote computer” error.
Fixing the ‘remote desktop can’t connect to the remote computer’ error
There are many ways to fix this error, so you’ll have to try them one after the other until the problem is fixed. This is true, especially when you don’t know the root cause of the error.
Change your firewall settings
This is one of the easiest solutions to the “remote desktop can’t connect to the remote computer” error. Turn off your firewall and see if you can connect to the remote computer, and if you can, you’ve identified the cause.
Here are the steps to fix this problem.
- Open the start menu and type “Allow an app through Windows firewall.” Alternatively, navigate to Control Panel > System and Security > Windows Defender Firewall > Allowed apps.
- Look for a button called “Change Settings” on the right-hand top corner of the page and click it.
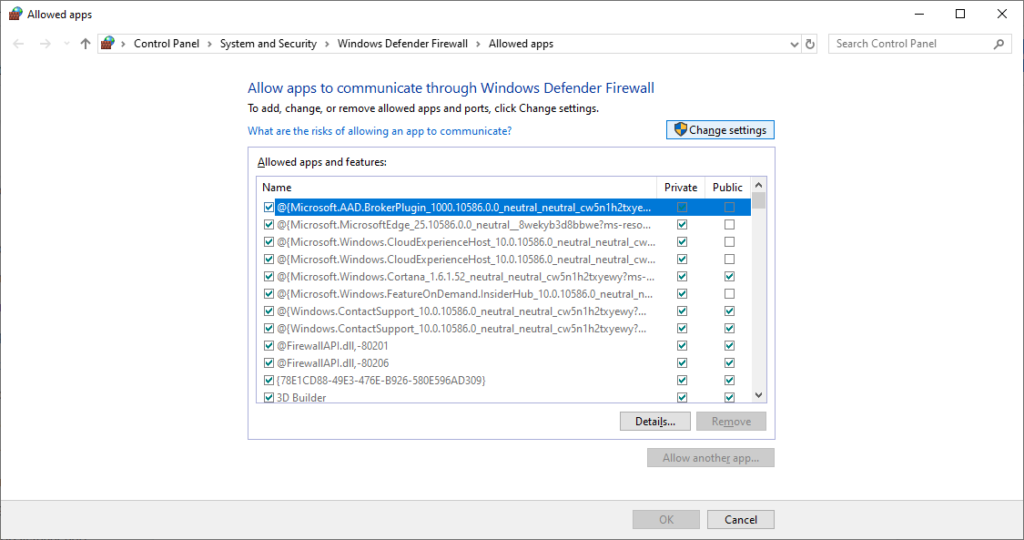
- You’ll see the list of apps that were allowed or blocked by your firewall. Scroll through the options until you get to “Remote Desktop.” Check the private and public checkboxes.
- Close the window and try connecting. If the firewall was the problem, you should be able to connect to the remote computer now.

Check your permissions
You have to be a member of the local Remote Desktop Users group to access a remote machine through RDP. By default, this group is empty and only administrators have the option to add users. So, check with your admin and see if you have the permission to connect via RDP.
Allow remote desktop connections
Remote Desktop Connection (RDC) is the technology that allows your computer to connect to a remote computer over the Internet. You won’t be able to connect if this functionality is blocked.
To check if this is blocked, and to allow in case of blocked connections,
- Go to the Start menu and type “Allow Remote Desktop Connections.”
- Look for an option called “Change settings to allow remote connections to this computer.”
- Click on the “Show settings” link right next to it.
- Check the “Allow Remote Assistance Connections to this Computer.” Click Apply and OK.
These steps will enable the RDC on your computer.
Reset your credentials
When you connect to a computer frequently, you’ll save the credentials. However, the same credentials may be used when you connect to a new computer too, and this could cause problems. So, check if you’re using the right credentials for the right computer.
To reset the credentials,
- Open the Remote Desktop Connection. You should find it in the Start menu.
- Type the IP address of the computer you want to connect to.
- If the credentials are already saved, you’ll have the option to edit or delete it.
- Make the necessary changes.
This will reset or change your credentials.
Verify the status of RDP services
The “remote desktop can’t connect to the remote computer” error can be because RDP services are not enabled either on the local or on the remote computer.
Check if the following services are running on both computers.
- Remote Desktop Services (TermService).
- Remote Desktop Services UserMode Port Redirector. Look for UmRdpService.
You can’t connect to a remote computer if the UmRdpService was disabled through a central Group Policy. Start these services if you have admin privileges or request the admin to start them for you. Also, you may have to reboot the machine after this service starts.
Add the host’s IP address
Sometimes, Windows won’t allow you to connect to those hosts whose IP address is not saved in your hosts file. So, if you’re connecting to a computer for the first time:
- Open the command prompt. Go to Run and type cmd to open it.
- Type cd C:/Windows/System32/Drivers/etc. This will list down all the hosts saved on your computer. If you don’t find the IP of the computer you want to connect to, open this file in notepad and manually add the new IP.
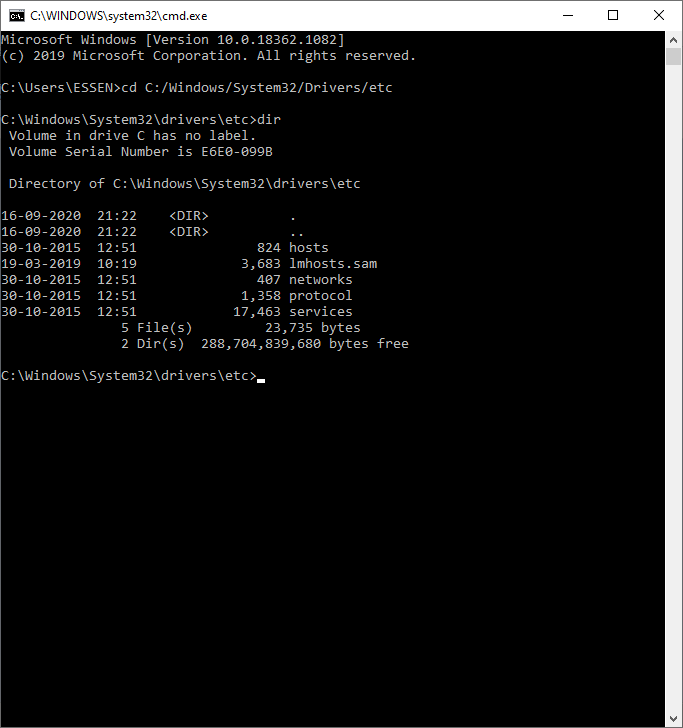
- To do this, type notepad hosts.
- Once the file opens, add the IP address at the end of the file, save, and close it.
Now if you check, you should see the IP hostname in your hosts file.
Check the Group Policy
A possible cause of the “remote desktop can’t connect to the remote computer” error can be incorrect Group Policy settings.
To verify and change (if needed):
- Open the Run window (Windows key + R) and type gpedit.msc.
- Navigate to Computer Configuration > Administrative Templates > Windows Components > Remote Desktop Services > Remote Desktop Session Host > Connections.
- Look for the “Allow users to connect remotely by using Remote Desktop Services” option.
- If this setting is disabled, change it to Enabled or Not Configured setting.
Add the RDGClientTransport Key
This is a technical fix, so watch out while doing it.
In this option, you’ll be tweaking the registry key to force the RDP to use RPC/HTTP connections instead of HTTP/UDP connection.
To do this,
- Press Windows + R to open run and type Regedit. Press the Enter key.
- Navigate to HKEY_CURRENT_USER > Software > Microsoft > Terminal Server Client.
- Navigate to the right-hand pane, right-click, and choose New > DWORD (32-bit value).
- Name this option as “RDGClientTransport.”
- Double-click this newly-created file. Its properties will open, and here, look for an option to set the value data. Enter the value 1. Click OK and close the Windows registry.
Check the RDP listener port
Next, check the RDP listener port. By default, Remote Desktop service will use port 3389 unless you change it. If some other application is using the same port, you won’t be able to connect.
To check the remote desktop port that’s being used:
- Type Windows + R and in the dialog box, type Regedit
- Navigate to HKEY_LOCAL_MACHINE > System > CurrentControlSet > Control > Terminal Server > WinStations > RDP-Tcp.
- Look at the right-hand pane and check the value of “PortNumber.”
- If the value is 0x00000000d3d, it means the default port is configured and its value is 3389.
- Change it to 3388 and try connecting to the remote computer in the new port.
Change the network properties
The cause of the connectivity problem could be the network settings as sometimes, Windows may block public networks as a security measure. So, change the settings to private and see if it works.
To do that:
- Navigate to Control Panel > Network and Internet.
- Open the Status.
- Click the “Change Connection Properties” option. Look for this on the right-hand pane.
- When this window opens, choose the “Private” radio button, and close.
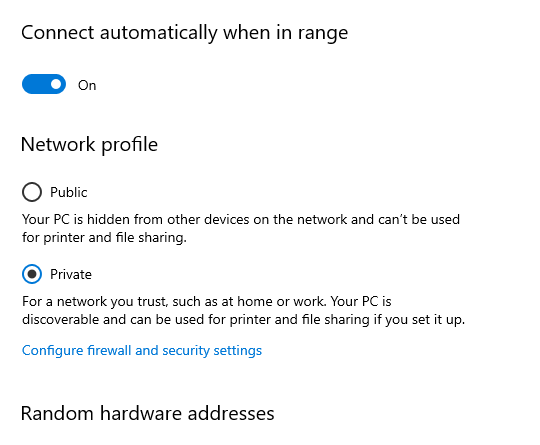
Try connecting now to see if it works.
Overall, the “remote desktop can’t connect to the remote computer” is a common error, but it can have many fixes as the cause may vary greatly. Though it can be a little arduous, your best bet is to run through each solution until you find the one that fixes your problem.
Thanks for reading and share with us the fix that worked for you. If you know any other solutions, please share that too with our readers.
Featured image: Shutterstock


This was very helpful thank you so much ! my Antivirus was blocking the connection all this time
This was very helpful thank you so much ! my Antivirus was blocking the connection all this time
oh c’mon, no Windows 10 Pro no remote desktop.
Thanks to Amit, after trying a bunch of things from this and other articles elsewhere. I disabled my antivirus and that was the culprit for me as well.
Thank you so much!
Hi,
I am facing this issue is windows 10 pro. While switching on the laptop. I am facing this issue.
Issues: windows couldn’t connect to the Remote Desktop Configuration services.
Please consult your System Administrator.
How did you solve yours???
Regedit “RDGClientTransport” solved by problem on windows 10
windows couldn’t connect to the remote desktop configuration service
Particularly windows 10 home single language ( not able gpedit.msc)
I can connect to RDP within my home network but not over the internet. I could do this until about two weeks ago. It may possibly be something within the router as an update to the router firmware was done about the same time. Any thoughts?
Hi, I had the same problem and what solved it for me was the following :
Add the RDGClientTransport Key
This is a technical fix, so watch out while doing it.
In this option, you’ll be tweaking the registry key to force the RDP to use RPC/HTTP connections instead of HTTP/UDP connection.
To do this,
Press Windows + R to open run and type Regedit. Press the Enter key.
Navigate to HKEY_CURRENT_USER > Software > Microsoft > Terminal Server Client.
Navigate to the right-hand pane, right-click, and choose New > DWORD (32-bit value).
Name this option as “RDGClientTransport.”
Double-click this newly-created file. Its properties will open, and here, look for an option to set the value data. Enter the value 1. Click OK and close the Windows registry.
In my case it was the client certificate did not install correctly.
The server refused to accept my speciffic client.
This article saved the day, Win11 Pro. GPedit and setting network to private worked.