Recently, I decided to replace an aging HDD in a desktop computer with a modern SSD. I was planning to use the computer to record some screencasts and needed the higher-performing disk. Initially, I assumed that replacing the disk was going to be a simple matter. After all, it’s something that I have done countless times over the years. In reality, though, the process was anything but simple. As such, I wanted to share my solution with you.
Replacing an HDD with an SSD: Why the complexity?
I’m sure that right now you are wondering what made the hard drive replacement so complex. The problem was that my HDD was larger than my SSD. Windows contains built-in tools for creating a system image and then restoring that image to another disk. The problem is that those tools do not work if you are trying to restore Windows to a smaller disk.
In my case, the new drive was plenty large enough to accommodate everything on the computer. As you can see in the screenshot below, I was only using 156GB of space on the original drive. Even so, the simple fact that the new drive had a smaller capacity than the old drive greatly complicated things.
 Shrinking the volumes
The first step in my successful migration to a smaller disk was to shrink the volume to a size that the new drive could accommodate. Initially, I opened the Windows Disk Management Console (diskmgmt.msc) and tried using the Shrink Volume command, which you can see in the screenshot below.
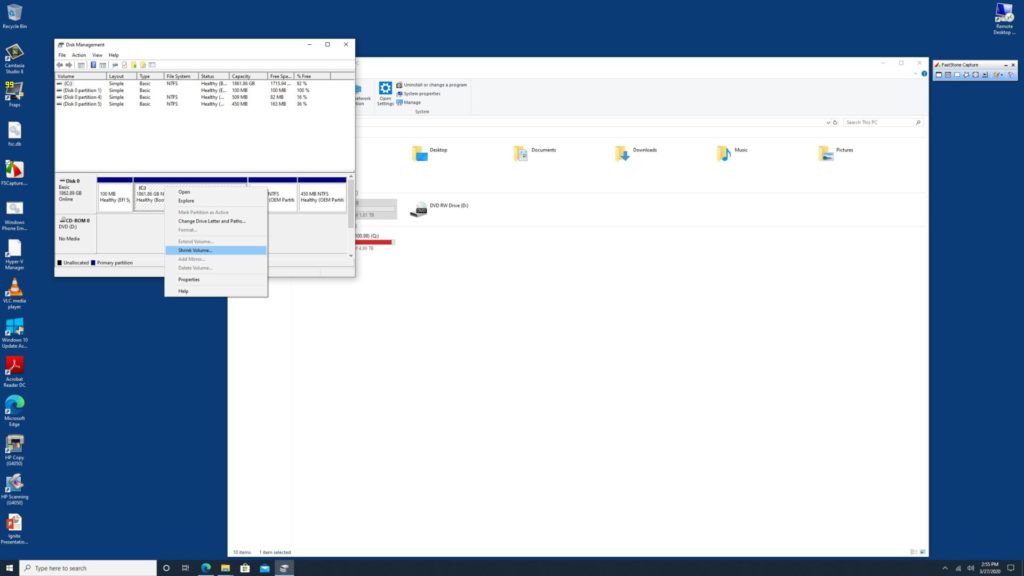
The problem that I ran into is that some of the Windows operating system files are unmovable. This often limits the extent to which you can shrink a volume, even if you have plenty of free space. As you can see in the next screenshot, Windows would only have been able to shrink the volume to about a terabyte.

Since there was a limit to the amount that Windows was able to shrink the volume, I ended up using a third-party tool called AOEMI Partition Assistant. This tool is free for personal use and is really easy to use. Just select the volume that you want to resize and then specify the new size, as shown in the screenshot below. It is worth noting, however, that the operation will only be performed when you click the Apply button found in the upper left corner of the toolbar.

Upon clicking the Apply button, the tool will provide you with a summary of the change that you are about to make. You can see what this looks like in the screenshot below. Assuming that everything looks good, you can click the Proceed button to continue.

Initially, I had planned to shrink the partition, and then use Windows to create an image, which I was going to save to a USB hard drive. My plan was then to install the new hard drive, boot the computer using the Windows installation media, and then use the boot media to restore my backup image. Although I have used a similar technique in the past, for whatever reason I had trouble getting it to work this time around.
Being that I was short on time, I only spent a couple of hours trying to get my Windows image to restore. Eventually, I gave up and used the free version of Veeam Agent for Microsoft Windows instead. Admittedly, I’m not super familiar with the free version of Veeam Agent for Microsoft Windows. I have written about it a few times in the past, but it’s not something that I use every day.
I reinstalled my old hard drive and then backed it up to an external USB drive. I then reinstalled the new SSD, booted the Veeam recovery media, and attempted to perform a bare-metal recovery.

The recovery environment had no trouble finding my backup, but it did have issues mapping the recovered volumes to the system’s disk because the new disk was of a different size than the old one. I wondered if I was going to have to look for a different backup and recovery tool, but decided to try the Manual Restore option first.
The manual restore section gives you the option of creating a customized disk mapping. Upon choosing this option, the interface displays a graphic of your backup drive and the drive that you are trying to recover data to. Right-clicking on the unallocated space causes the software to display a pop-up menu that lets you choose the resource that you want to restore, as shown below.

By repeating this process for each recoverable resource, you can partition the disk in a way that matches your backup. You can see what this looks like in the next screenshot.

Replacing HDD with SSD: Don’t think small!
With the partition table redefined, completing the restoration process was a simple matter. As I said before, replacing a hard disk is a common task, and it is something that I have done many times throughout my career. Even so, there seems to be a general assumption that the new drive will either be the same size as the old drive or larger. Replacing a computer’s original hard drive with a smaller one greatly complicates the recovery process.
Featured image: Shutterstock


Hi Brien,
I feel your pain and frustration on expecting a simple job to not take forever.
It feels like using a hammer where a screwdriver is required.
Next time please use Macrium free edition, create a bootable USB stick, and clone one disk to the other, RESIZING partitions on the fly so that you can clone a large disk to a smaller SSD.
Next time just use macrium reflect free.
1. Plug both HDD and SSD into the computer.
2. Click clone in reflect. It will automatically resize everything for you.
3. Once completed shut down the PC.
4. Either remove the HDD or change boot priority to the SSD.
All done