If you missing the other parts of this article series please read:
- Rights Management Service and Exchange 2003 (Part 2)
- Rights Management Service and Exchange 2003 (Part 3)
Rights Management Service (RMS) is an add-on to many RMS aware applications. In this article my main focus is to explain how we can utilize RMS technology with Exchange 2003 and how we can take advantage of RMS technology to increase the email security. This article is divided into two parts. Part I will explain the details of RMS architecture and its installation procedure. Part II will focus on Exchange 2003/Outlook 2003 integration with RMS. I would not be explaining the architecture details of Right Management Service here since all the details can be found on the following Microsoft web site:
http://www.microsoft.com/windowsserver2003/technologies/rightsmgmt/default.mspx
RMS Technology – an Overview
Rights Management Service (RMS) is a technology used to protect sensitive information and keep internal information internal. A document author can use the RMS technology to limit the access to a file or emails to a few users from the Global Address List. This access permission list is embedded with the document or email. When a person tries to open an RMS protected document, the RMS client applications send a request to the RMS server for the validation and a valid user license. Only named users on the embedded access permission list can open the file. Unauthorized users will receive a deny access message and all the information will be logged into a SQL database.
RMS Components
RMS technology mainly consists of an RMS server and RMS client. The RMS server is the machine that runs Rights Management Service. Rights Management Service can be installed on a Windows Server 2003 Standard, Enterprise, Web or Datacenter Editions. The main function of the RMS server is to provide certificates and validate the client access. A RMS server requires SQL or MSDE for the database.
RMS technology highly relies on Active Directory. A minimum of Windows 2000 Active Directory with SP3 is required to use RMS technology in the organization. When an Author tries to add the users to the access permission list, it uses Global Address List to find the appropriate user accounts. This information also resides in the Active Directory. Also, a mail-enabled user account is required in the Active Directory to give permission to the document through RMS technology.
The RMS Server software can be downloaded from the following location:
http://www.microsoft.com/downloads/details.aspx?FamilyId=8EF6D80A-6A9C-4FB9-AB51-790980816FFE&displaylang=en
RMS Client is a client side or desktop software required for creating or viewing the rights-protected document or email. RMS client software can be downloaded from the following location:
http://www.microsoft.com/downloads/details.aspx?FamilyId=A154648C-881A-41DA-8455-042D7033372B&displaylang=en
The RMS client software can be deployed through Group Policy, SMS or any of your existing application deployment methods. RMS is only used with RMS aware applications. Microsoft Office Professional 2003 is an RMS aware application. There is a Rights Management Add-On (RMA) for Internet Explorer 5.5 or later to view, but not to create the rights protected document in the Internet Explorer. The RMA can be downloaded from the following location:
http://www.microsoft.com/downloads/details.aspx?FamilyId=B48F920B-5AF0-46B4-994F-2F62582CC86F&displaylang=en
Also, an SDK for RMS, can be download from the following location for developers:
http://www.microsoft.com/downloads/details.aspx?FamilyId=3C918424-40E6-4CB9-BCBD-E89686F036A3&displaylang=en
In the following sections, I will explain the details of installing and provisioning an RMS server, Service Connection Point (SCP) registration in Active Directory and installing RMS client.
RMS Server Installation
My lab consists of an Active Directory 2003 Domain, Exchange 2003 Server, SQL Server 2000, Windows 2003 member server and Windows XP desktop with MS Office 2003 Professional edition. I will use the Windows 2003 member server as my dedicated RMS server. APS.Net, Message Queuing and IIS is a pre-requisite for installing RMS. So make sure all the pre-requisites are met before installing the RMS server software.
- Download the RMS installation file from the following location:
http://www.microsoft.com/downloads/details.aspx?FamilyId=8EF6D80A-6A9C-4FB9-AB51-790980816FFE&displaylang=en - Double click on the WindowsRightsManagementServicesSP1-KB839178-Server-ENU.exe file
- Click Next in the Welcome window
- Select Agree and click Next in the License Agreement window
- Select the installation folder in the Select Installation Folder window
- Click Install in the Confirm Installation window
- Click Close in the Installation Complete window.
If you open the Enterprise manager, you can validate the database installation and configuration on the SQL server. During the installation, RMS will create three databases (Configuration, Directory Services and Logging) in the SQL server.
Figure 1
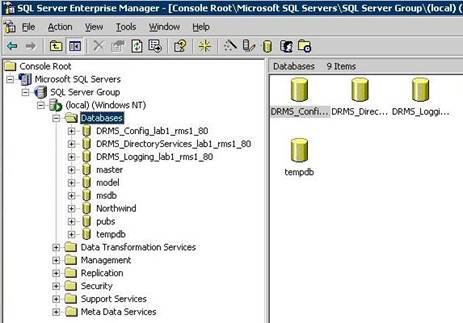
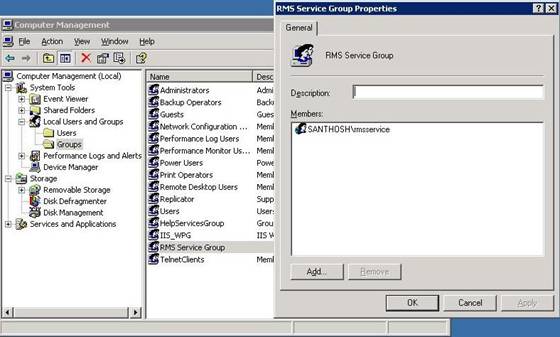
Also, during installation, RMS creates a security group called RMS Service Group on the local computer. Later when you provision RMS on a server, the RMS service account will be added to RMS Service Group.
Figure 2
Provisioning an RMS Server
Go to Start -> All Programs -> Windows RMS and click on the Windows RMS Installation. The default administration port is 5720.
- Under the Provisioning and Administration section, click on Provision RMS on this Web site link
- In the Configuration database section, enter the SQL server information (local or remote)
- In the RMS service account section, enter the RMS Service Account name and password. The RMS service account cannot be the same domain account that was used to install RMS.
- Enter the URL name in the Cluster URL section. Default cluster URL is http://servername/WMCS.
- In the Private key Protection and enrollment section, select the appropriate software and hardware based private key encryption method. In my lab, I selected to use default RMS software private key password option. Enter the password in both password fields. By default the Server licensor certificate name is the name of the local RMS server.
- Enter an administrative contact in the Administrative Contact column
- In the Server Internet Connectivity select Online – automatically obtain a certificate over the network option.
Note:
If your RMS server is not connected to the internet you can select the Offline – manually obtain a certificate after provisioning option.
- Click Submit.
The following web page will be displayed with a status of Server Licensor Certificate process:
Figure 3
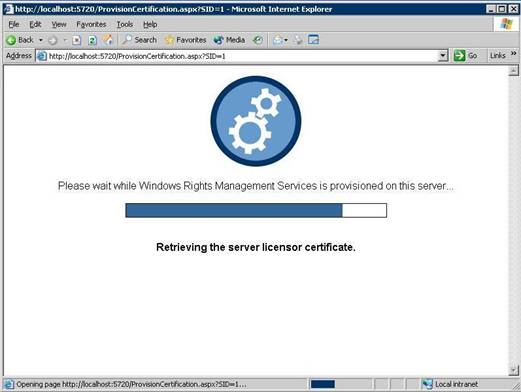
- Check and make sure no errors are displayed on the page.
If you select the Offline – manually obtain a certificate after provisioning option in the Server Internet Connectivity section,
- Open the Windows RMS Administration web page (Go to Start->All Programs ->Windows RMS).
- Under the Provisioning and Administration section, click the RMS on this web site link.
- Click the Enroll button.
- Click the Export button and save the file into the local hard drive.
- Copy the exported certificate XML file into an internet connected machine and access the following link from the internet connected machine:
https://activation.drm.microsoft.com/OfflineEnroll/Enrollment.aspx
Follow the procedure to download the ServerCert.XML certificate file and copy back to the RMS server.
- Open the Windows RMS Administration page again on the RMS server.
- Under the Provisioning and Administration section, click the RMS on this web site link.
- Click the Enroll button.
- Click Browse and select the ServerCert.XML and click Import.
- Click OK and make sure no errors are displayed.
RMS Service Connection Point
The registration of Service Connection Point (SCP) is not an automated process. When you open the Administrator page, you will see a warning message “RMS did not detect the service connection point in Active Directory”. The next step is to manually register the Service Connection Point (SCP) in the Active Directory.
- Open RMS Administration web page (Go to Start -> All Programs -> Windows RMS)
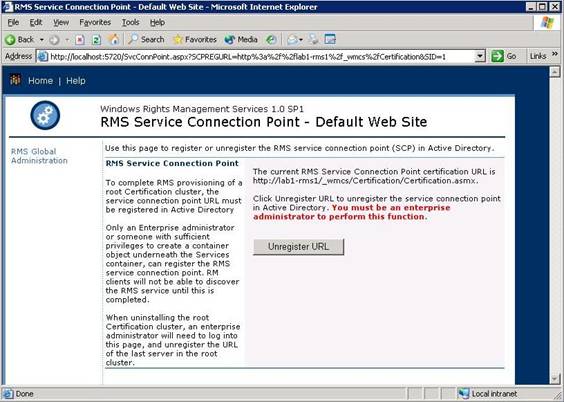
- Click on Register URL. You must be an enterprise administrator to register SCP in the Active Directory. It will take a few minutes to complete the registration process.
- The following web page will display with the status of the SCP registration.
Figure 4
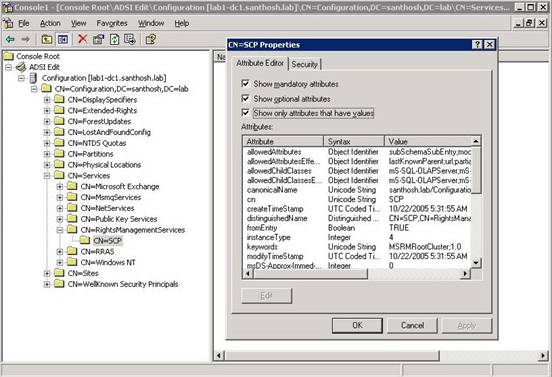
Validate the SCP Registration in the Active Directory
- Logon to a Domain Controller and open ADSI edit (make sure you have support tools installed on the machine)
- Expand the Configuration container, then expand Services and click on Right Management Services and make sure there is an SCP folder underneath it. If you go to the Properties on the SCP folder, you will see all registered attribute there.
Figure 5
RMS Client Software Installation
RMS client requires activation. With SP1, the client machine activation step no longer requires connection to Microsoft hosted activation servers. This activation service generates a unique lockbox and machine certificate, validating the client machine allows the use of RMS. Client activation occurs upon first use of RMS by any user on the machine. There are no additional steps to activate the RMS client software.
To install the RMS client software:
- Download the file from the following location:
http://www.microsoft.com/downloads/details.aspx?FamilyId=A154648C-881A-41DA-8455-042D7033372B&displaylang=en - Double click on the WindowsRightsManagementServicesSP1-KB839178-Client-ENU.exe file.
- Click Next in the Welcome window.
- Select Agree and click Next in the License Agreement window
- Select the installation folder in the Select Installation Folder window
- Click Install in the Confirm Installation window
- Click Close in the Installation Complete window.
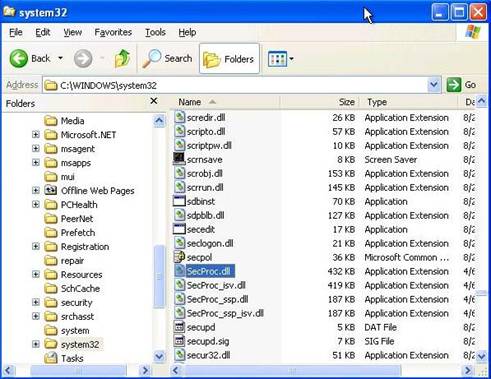
To validate the lockbox installation, you can go to C:\Windows\System32 folder and make sure the secproc.dll file exists. Lockbox is a RMS client component. It is responsible for authentication and the valid use of RMS protected documents.
Figure 6
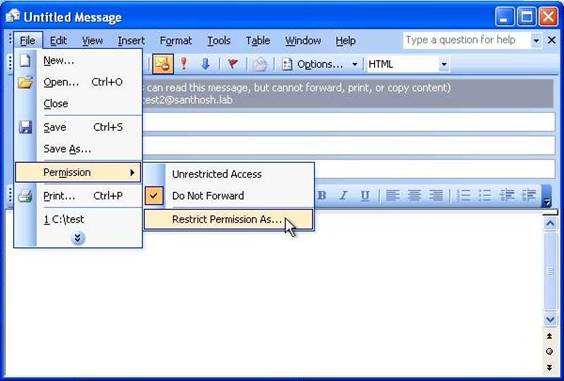
When you open an Office 2003 professional application, you will see new items in the Permission menu called Restrict Permission As.. and a new item in the tool bar ( ).
).
Figure 7
I hope this article provides a better understanding of RMS technology and its installation process. In the next part, I will explain the details of RMS integration with Email. If you have any questions regarding this article, feel free to email me or post a comment on the newsgroup.
If you missing the other parts of this article series please read:
