Introduction
The best way to learn about anything is to try it. However, running VMware vSphere (the ESXi hypervisor, in particular) can take some time and resources if you opt to run it on physical servers. The first hurdle is the cost of the one, or handful, of physical servers you would use to create a vSphere lab. The second hurdle is finding space for those servers, getting them set up, and then powering / maintaining them for years. Most vSphere labs are used only periodically so powering physical servers that take up space and cost money is so inefficient. The best answer is running a virtual lab in a type-2 hypervisor like VMware Workstation or VMware Fusion. In the past doing that was always unsupported and took some tweaking. Now, with the latest version of VMware Fusion (and Workstation) running the ESXi hypervisor (either the free edition that doesn’t expire or the one of the commercial vSphere edition, paid or trial) is much easier than before.
Why Run vSphere in Fusion?
Before I show you how to run vSphere in Fusion, let me first give you some justification as to why you need a virtual lab. Here are 3 reasons to setup your own virtual vSphere lab, today:
- Certification – one of the most common reasons to build a virtualization lab is if you are pursuing your VMware VCP or VCAP certifications. These certs require that you have some hands-on experience with vSphere. You can’t learn on the production infrastructure so doing it inexpensively and quickly in a virtual lab makes the most sense. The VCAP-DCA, being a 100% hands-on exam, requires many hours of hands-on experience and a virtual lab is the best way to practice.
- Learning – even if you aren’t pursuing certification, a virtual lab is a great way to learn vSphere, quicker and easier than with physical servers
- Test / Development – whether you are a developer and want to test your app with vSphere or an admin who wants to test a third-party app with vSphere, doing it virtually is the easiest way
So why use Fusion? You could use VMware Workstation on a PC and it would work well. However, I’ll tell you why I’m using Fusion. I just purchased a new Macbook Pro with Retina display. The i7 quad-core CPU, 8GB of RAM, and 256GB SSD can run numerous virtual machines including ESXi. Inside ESXi, as a VM, I can even run a nested virtual machine. In other words, the power offered by the Macbook and Fusion allows me to do more than ever before with a virtual lab.
Creating a VMware ESXi VM in Fusion
One of the best things about the virtual lab option is that you can get free evaluations of all the software you need. VMware Fusion is available with a 30-day evaluation. VMware vSphere is available in a 60-day evaluation.
As for hardware, just make sure that you have a relatively recent Mac with a CPU that has Intel VT enabled. The more RAM and storage I/O (like SSD) that you have, the better performance you will get and the more virtual machines you’ll be able to run.
With Fusion installed and the ISO file for VMware ESXi ready to go, create a new virtual machine.
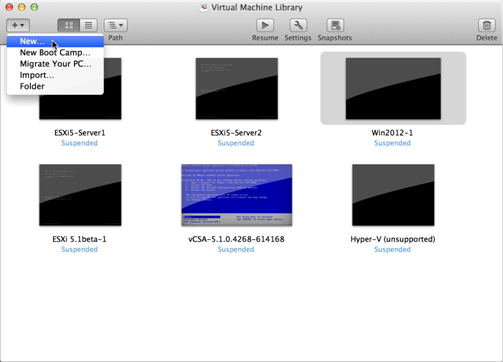
Figure 1: Creating a Virtual Machine
Say that you want to Continue without Disc. Specify that you want to Use operating system installation disc and provide the vSphere ESXi 5.1 ISO. Click Continue.
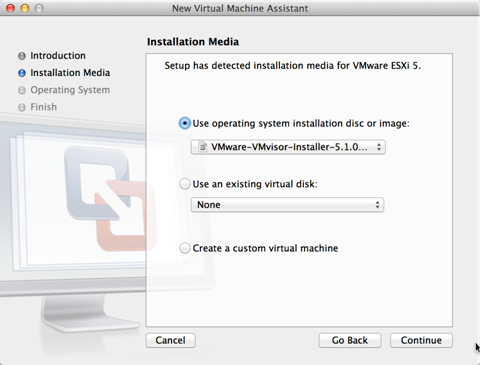
Figure 2: Specify the VMvisor Installer 5.1 ISO
Notice how Fusion automatically recognizes the OS (VMware ESX) and version (VMware ESXi 5).
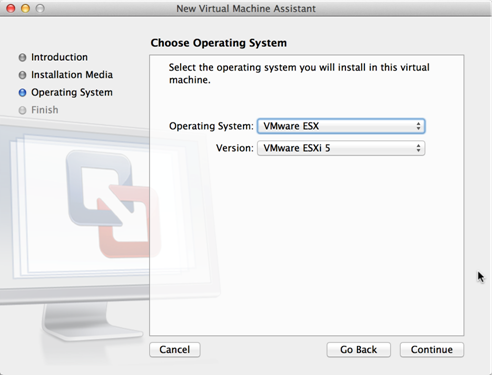
Figure 3: Choosing the Operating System
Click Continue.
Now, review the final settings for the ESXi VM that you are about to create.

Figure 4: Reviewing your settings
Notice that you are about to create a VMware ESXi VM with 2GB of virtual RAM and a 40GB virtual disk (thinly provisioned). It will boot from the ESXi ISO that you specified. Click Finish.
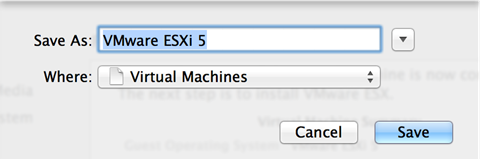
Figure 5: Naming the VM
Unless you want to name the VM something else, just take the default VM name and click Save.
The VMware ESXi installer begins its boot process.
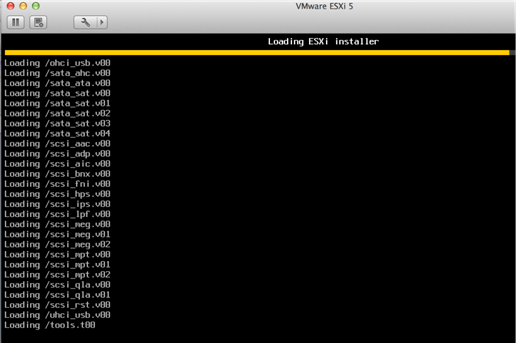
Figure 6: Installing ESXi in a VM
From here, you’ll see the typical VMware ESXi installation.
Testing vSphere 5.1 in VMware Fusion
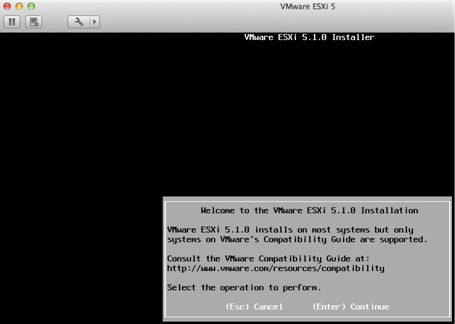
Figure 7: The VMware ESXi Installation Process
While I won’t go into the process in detail, the basic process is:
- Accept the end user license agreement (EULA) with F11 (you’ll have to press Function (fn) and F11 on the Mac keyboard)
- Take the default location for ESXi to be installed by pressing Enter
- Select your language and press Enter
- Enter, what will be, your root password (twice) and press Enter
- And press F11 to confirm the installation (again, on the Mac keyboard you’ll need to press function or fn) and F11)

Figure 8: Confirming the Installation
When the installation is complete, you’ll need to press Enter to reboot the new host.

Figure 9: Rebooting the ESXi server after installation
And, after a few minutes, your new virtual ESXi server is ready for use:

Figure 10: VMware ESXi installation is complete
Once rebooted, you’ll want to set up the new ESXi host, just as you would any other new physical ESXi server. To login, you’ll have to press F2, or function (fn) + F2 on a Mac. Here is what I usually recommend that you configure when you press F2, to access the configuration:
- Connect your ESXi VM to your LAN.
- Set a static IP address – for a production server you would set a static IP address, subnet mask, default gateway, DNS servers, and hostname for the VM. However, for just a lab environment, I would consider static IP address configuration to be optional.
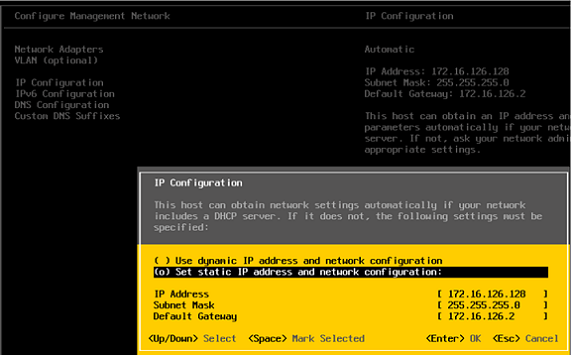
Figure 11: Configuring a static IP address in ESXi
- Test your network settings
- Configure ESXi shell and SSH for remote access and local console troubleshooting
- Restart the management agents
Once your ESXi host is ready to go, you need the vSphere client to start using it. To get the vSphere client, open your web browser and point it to the IP address of the new ESXi VM. From there, you’ll see the link to download the vSphere client.
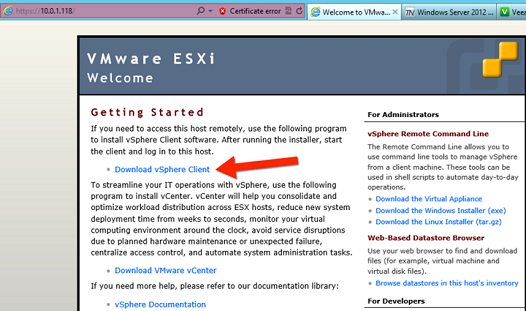
Figure 12: Downloading the vSphere Client
The installation process for the vSphere client is just like any other Windows application so I won’t go into that. Once installed, you’ll want to run the vSphere client and make your first connection to the new virtual vSphere 5.1 virtual machine.
The default username is root and the password will be the password you set when you installed ESXi. It’s likely that you haven’t put the IP address for this virtual ESXi server into DNS so likely you’ll be using just the IP address to make the vSphere Client connection, instead of the traditional DNS server hostname.

Figure 13: Connecting to the new vSphere 5.1 VM
Once connected, here’s what you’ll see.
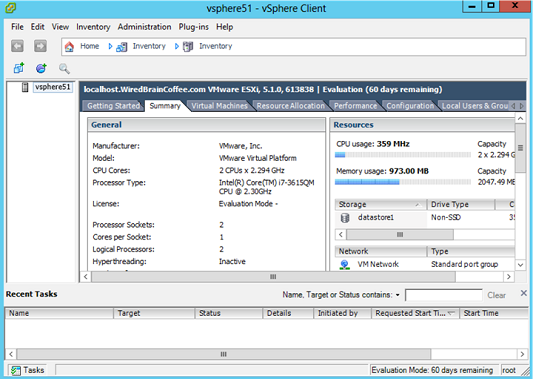
Figure 14: Successful Connection to the New Virtual ESXi 5.1 Host
From here, you should be able to create and even power on nested virtual machines running inside the new virtual ESXi server. You could also create a new Windows virtual machine and install vCenter 5.1 (or even import the vCenter Server Appliance, or vCSA).
Best of luck in your new virtual vSphere 5.1 lab, self-contained inside VMware Fusion!


