Introduction
AppLocker is a new feature available in Windows 7 and Windows Server 2008 R2 that helps to prevent the use of unknown or unwanted applications within a network. Its functionality boasts both security and compliance benefits for a wide array of organizational environments.
As a mischievous kid growing up in rural Kentucky I was very aware of the concept of rules. Whether it was cleaning my plate before I left the table at supper time or making sure the animals were fed before bed, the rules were in place for a reason. Of course, I was also very aware that breaking the rules resulted in consequences. Albeit an effective means of making sure I followed the rules, this was not always 100% effective. A prime example of this was the “no cookies before supper” rule. Although I was sure to get a switch to my tail end if I ruined my appetite, I could not always resist the temptation. That being the case, after my Mom tired of that method, she changed her means of rule enforcement. Realizing I was significantly shorter than her, the cookies got moved to the top shelf of the pantry very much out of my reach. At this point, I could not break the rules if I tried.
The moral of this story is that although rules can have consequences, sometimes we have to put rules in place that do not just discipline people for breaking them, but that prevent people from breaking them. This related to my cookie infatuation growing up and it relates to keeping users secure and compliant today.
The desire to block particular applications from running on network computers is not new by any means, but the methods of doing so have continued to evolve over time. In previous cases network administrators may have found this task best served by the use of third party software, however, the advent of AppLocker in Windows 7 and Windows Server 2008 R2 allows for application execution restriction on a very useful level. AppLocker is the next evolution of Windows Software Restriction Policies.
Blocking Individual Applications
I have always thought it was easier to learn by doing, so that is exactly how I am going to introduce AppLocker to you. In this scenario and the ones to follow we will be editing the local security policy and performing our actions on an individual computer. All of these things can be performed from Windows Server 2008 R2 Group Policy Management, but until you are more comfortable with AppLocker and its concepts, I recommend sticking to the local security policy. AppLocker is very flexible and very powerful which means it only takes a few wrong clicks to make changes that will result in your computer not booting.
In our scenario, we have noticed that employees have begun using the remote desktop client to access their home computers in order to bypass Internet content filtering and goof off during work hours. We are going to use AppLocker to get these guys back to work by blocking the execution of mstsc.exe executable.
You can access AppLocker by typing gpedit.msc into the Windows 7 start menu, or by creating a new group policy object in Windows Server 2008 R2. Once here, browse to Computer Configuration, Windows Settings, Security Settings, Application Control Policies, AppLocker.

Figure 1
You will immediately notice that when you expand AppLocker in the left pane there are three options available to you. These three items are rule collections and are categories used to separate the types of file extensions that can be controlled by AppLocker. The following table displays the file extensions associated with each rule collection:
Rule Collection | File Types |
Executable files | .exe, .com |
Scripts | .ps1, .bat, .cmd, .vbs, .js |
Windows Installer files | .msi, .msp |
In our case, the file we will be blocking is an executable file, so we want to create a new rule in the executable files rule collection. This process is started by right clicking the Executable Rules heading and selecting Create New Rule.
The Create Executable Rules wizard will pop up. Click Next to advance past the introduction screen. We want to deny access to mstsc executable so select the Deny option. On this screen you can select the user or group the policy applies to. We want to ensure that administrators and power users still have access to this application should they ever be logged into the machine, so we are going to select the Users group to apply this policy to.
One the next screen we will be prompted to select the primary condition for our rule. There are three options available to us and they are used in all rule collections. They are:
Publisher – This option allows to most flexibility when selecting a condition but can only be used on software applications signed by their creator.
Path – This condition creates a rule for a specific file or folder path.
File Hash – This option is best used when an application is unsigned. The rule is created based upon the hash of the application.
The MSTSC application is a signed application, so we will select the Publisher primary condition. Click next to advance to the next screen. Press the Browse button and browse to the file you want to block. Our file is located at C:\Windows\System32\mstsc.exe. Once this file is selected you will the vertical slider on the screen become active. With a signed application we have several levels of granularity we can leverage for our rule. We can block any application from this publisher, any application signed with this product name, the file name itself, or even a relative version number of the application.

Figure 2
As you can imagine, there is a lot of flexibility and power in these options. We can block users from running any application designed by a computer game developer, block file names related to large virus outbreaks, and even force users to maintain updated software by not allowing them to run an application below a certain version number. For our purposes here we want to block all instances of mstsc.exe regardless of version, so the slider will be set next to the file name option.
The next screen will allow you to add exceptions if necessary, and the final screen allows you to name your new rule. As your comfort level with AppLocker grows you will find these rules being created very quickly, so it is best to come up with a standard naming scheme for your rules so that they can be found and modified easily. Once you have named your rule, click Create to finish the rule creation process. If this is the first rule you have created you will be prompted to create “Default Rules” which allow access to system files for users and administrators. This is a must (especially if you are running a pre-release version of Windows 7) because if these are not in place it could prevent the system from booting. After clicking yes on this prompt the rules will be created automatically for you.

Figure 3
There is one final step to ensuring your rules apply properly. The Application Identity service must be enabled and set to run automatically so that AppLocker can properly identify applications. You can do this by typing services.msc into the Start Menu search box, locating the Application Identity service, double clicking it, clicking Start, and choosing Automatic in the Startup Type field. After a final reboot of the system your users will be presented with this lovely message should they attempt to run mstsc.exe…

Figure 4
Blocking All Untrusted Applications
In the last scenario we knew the exact application we wanted to prevent users from accessing which made our job fairly easy. That scenario fits well in environments where users are allowed to have a bit of free access on their systems, but in some organizations IT policy will designate that users are not allowed to run any programs that are not explicitly approved by the IT department. The only effective way to enforce this is to block all untrusted applications.
AppLocker allows us to do this fairly easily. AppLocker was designed with a security focus and because of this it will assume that if we create an allow rule that all other applications except for the one specifically allowed should be blocked. For instance, if I create a single allow rule for the application at C:\folder\file.exe, once this rule is applied all other applications at the C:\folder path will not be allowed to execute except for file.exe. This means that in order to accomplish our goal all we have to do is create an allow rule for every allowed application.
Now, I know what you are thinking….how in the world would you expect someone to create an allow rule for every single application that a user runs. In order to do this we would have to create a rule for every single executable, including applications we have specifically installed as well as all of the default installed Windows applications. Luckily, the folks at Microsoft realized this was a concern as well and made it a bit easier for us. AppLocker allows us to automatically generate rules based upon the applications installed to a particular workstation. Let us go through this process.
If you have not yet created the default rules for allowing all of the required system applications to run then that is your first step. You can do that by right clicking the Executable Rules collection and choosing Create Default Rules. Once these have been created we will want to delete the allow rule which allows everyone to execute anything in the C:\Program Files directory since this is counter intuitive to our task.

Figure 5
Our next step is to automatically generate the allow rules for our system. In order to begin this process, right click on the Executable Rules collection and select Automatically Generate Executable Rules. There are two main locations where applications are stored. The first of these is our Windows directory, but since there is a default rule in place to allow all users to execute anything in this directory (and its recommended you leave that rule in tact) we do not need to create any allow rules for that folder. This leaves the Program Files directory. Select this folder in the first dialog box. Below this, you can select the user group the policy should apply to, which in our case will be the Users group. Lastly you should select a name to identify the set of rules. This name will appear in parenthesis before the description of each rule. Once you have addressed these fields click Next to advance to the next screen.

Figure 6
The rule preferences screen allows you to select the type of rules that you want to create. Ideally you will want to create publisher rules for all files that are digitally signed and create file hash rules for those that are not. These are the default options for this screen. You can also select the option to reduce the number of rules created by grouping similar files. This will create significantly fewer rules but if you require a great deal of granularity in your access control then I would recommend deselecting this option. Click Next to begin the rule application discovery process. After a few moments you should be presented with a dialog where you can review the rules being created. Click Create to create these rules and complete the process.
The DLL Rules Collection
Although I have only listed three rule collections to this point, there is one more that should be mentioned. The DLL rules collection is used to block applications that call specific DLL files. This is an advanced rule collection and should not be used unless you are certain you know what you are doing. This type of rule can also severely impact system performance as it requires AppLocker to check every DLL an application uses when it initializes.
The DLL rules collection is not enabled by default due to the reasons mentioned above. If you want to create a DLL rule you can do so be going to the main AppLocker configuration screen, choosing Configure Rule Enforcement, selecting the Advanced tab, and placing a check mark next to the Enable the DLL rule collection option. After doing this you will see the DLL rule collection in the left pane alone with the three other rule collections.

Figure 7
Auditing vs. Enforcing Rules
Up until this point all of the rules we have created have been designed to enforce policies which allow or deny the use of applications. In some environments we may be best served simply auditing the use of particular applications before enforcing a policy. AppLocker provides an audit setting for this very purpose. When a user runs an application that is affected by an AppLocker rule, information about that application is added to the AppLocker event log. This setting is configured on a per rule collection basis.
This audit setting can be configured by clicking Configure Rule Enforcement on the main AppLocker configuration screen. On this window you can select the Configured checkbox for the rule collection you want to audit and choose the Audit Only option. This feature is very useful in determining what your application use policy should look like.
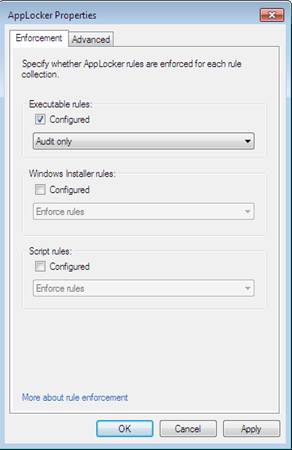
Figure 8
Conclusion
It is not hard to see that AppLocker can bring a great deal of managerial flexibility into a network. Using its dynamic rules system you can block individual applications ranging from games to malware increasing both productivity and security. Along with this, AppLocker can be a vital component to enforcing your IT acceptable use policy by only allowing approved applications onto network computers. The enhancements to Windows 7 and Windows Server 2008 R2 are numerous but this is one that you surely would not want to skip over.