This is an excerpt from the book “Securing Exchange Server 2003 & Outlook Web Access”

By the time you reach the end of this chapter, you will have gained a proper understanding of the different authentication methods available in OWA as well as insight into how to secure the OWA 2003 server by enabling SSL, how to control user access, and how to allow users to change their passwords through the OWA interface.
Securing the Outlook Web Access Server
On Your Radar
With OWA 2003, your organization’s users can access their mailboxes using a Web browser. OWA 2003 has come a long way since Exchange 5.5 and 2000; it now looks and feels very similar to the full Outlook 2003 client. If we were to describe all the new, cool features of OWA 2003, we would end up writing several hundred pages, but because this book is about the security aspects of Exchange 2003 and Outlook Web Access, this chapter focuses strictly on OWA security:
OWA authentication
Enabling SSL on OWA
Restricting user access
Allowing password changes through OWA
Redirecting HTTP to HTTPS
By the time you reach the end of this chapter, you will have gained a proper understanding of the different authentication methods available in OWA as well as insight into how to secure the OWA 2003 server by enabling SSL, how to control user access, and how to allow users to change their passwords through the OWA interface. To finish the chapter, we show you a little trick on how to redirect HTTP requests to HTTPS. For readers who wonder why we don’t have a section on the new and exciting forms-based authentication feature, refer to Chapter 7.
What are we waiting for? Let’s get started!
OWA Authentication
To begin, let’s look at each of the authentication methods available in OWA 2003.
By the Book…
The OWA virtual directories (also called HTTP virtual servers) allow you to support a collaborative authoring environment. For example, when you collaborate on confidential material, it is important to control who has access to the data. However, if you also want users outside your organization to access public information, you can enable anonymous connections on a separate HTTP virtual server. To restrict user access, you can use several authentication methods, but normally a combination of anonymous access, Integrated Windows authentication, and basic authentication is sufficient.
When you install Exchange 2003, several virtual directories are created under the Default Web Site in Internet Information Services (IIS). By default, the OWA (Exchange) Virtual Directory is configured with basic authentication (no default domain/realm specified) and integrated Windows authentication as the authentication methods. If for some reason you need to change or edit these authentication methods, you should always strive to change any settings through the Exchange System Manager and not through the IIS Manager. If authentication method changes are made in the IIS Manager, Exchange changes them back to the configurations set in the Exchange System Manager every 15 minutes or after a reboot.
OWA Virtual Directories
Before examining each of the available authentication methods, which can be set on the OWA virtual directories, we thought it would be a good idea to give you a short description of each default virtual OWA directory:
Exadmin: This directory provides Web-based administration of the HTTP Virtual Server. Among other things, it’s used to administer public folders from within the Exchange System Manager. It’s also possible to make custom third-party applications communicate with the Exadmin folder. This folder is only configured for Integrated Windows authentication access (see Figure 5.1).
Figure 5.1: The Exadmin Folder

- Exchange: The Exchange directory provides mailbox access to OWA clients. By default, this folder is configured with Basic and Integrated Windows authentication access. The Active Directory (AD) domain name is also specified (see Figure 5.2).
Figure 5.2: The Exchange Folder

- ExchWeb The ExchWeb folder provides most of the OWA control functionalities. By default, this folder has anonymous access enabled, but don’t let this setting fool you. The subfolder BIN that contains the controls is set to basic and Integrated Windows authentication (see Figure 5.3). Also note that this folder is viewable through only the IIS Manager and not the Exchange System Manager.
Figure 5.3: The ExchWeb Folder

- Microsoft-Server-Activesync: This directory provides support for wireless synchronization (Activesync) by Microsoft Pocket PCs, smartphones, and the like. The folder is by default set to basic authentication and the default AD domain (see Figure 5.4).
Figure 5.4: The Microsoft-Server-Activesync Folder
- OMA: The OMA folder provides Web-based mailbox access to Pocket PCs, smartphones, and the like. The folder is set by default to basic authentication and default domain \ (see Figure 5.5).
Figure 5.5: The OMA Folder

Public: The Public folder provides users with access to the Public folders. This folder is set by default to basic and Integrated Windows authentication and the default AD domain (see Figure 5.6).
Figure 5.6: The Public Folder

Authentication Methods
By default, the authentication method for accessing OWA is basic and/or Integrated Windows authentication, but actually there are five different authentication methods that can be used to validate your OWA users:
Anonymous access: Enabling anonymous connections allows HTTP clients to access resources without specifying a Microsoft Windows 200x user account. Passwords for anonymous accounts are not verified; the password is only logged in the Windows 200x Event Log. By default, anonymous access is not enabled. The server creates and uses the account IUSR_computername.
Integrated Windows authentication: The Integrated Windows authentication method is enabled by default (except on front-end servers). This authentication method also requires HTTP users to have a valid Windows 200x user account and password to access information. Users are not prompted for their account names and passwords; instead, the server negotiates with the Windows 2000 security packages installed on the client computer. This method allows the server to authenticate users without prompting them for information and without transmitting unencrypted information across the network.
Digest authentication: Digest authentication works only with Active Directory accounts. It’s quite secure because it sends a hash value over the network rather than a plaintext password, as is the case with basic authentication. Digest authentication works across proxy servers and other firewalls and is available on Web Distributed Authoring and Versioning (WebDAV) directories. To use this form of authentication, your clients must use Internet Explorer 5.0 or later.
Basic authentication: Basic authentication transmits user passwords across the network as unencrypted information. Although this method allows users to access all Exchange resources, it is not very secure. To enhance security, it is strongly advised that you use SSL with basic authentication to encrypt all information. We will show you how to enable Secure Socket Layer (SSL) on your OWA virtual directories in the next section.
.NET Passport authentication: .NET Passport authentication allows your site’s users to create a single sign-in name and password for easy, secure access to all .NET Passport-enabled Web sites and services. .NET Passport-enabled sites rely on the .NET Passport central server to authenticate users rather than hosting and maintaining their own proprietary authentication systems. However, the .NET Passport central server does not authorize or deny a specific user’s access to individual .NET Passport-enabled sites. It is Web site’s responsibility to control user permissions. Using .NET Passport authentication requires that a default domain be defined. You probably know the .NET Passport authentication method from services such as Microsoft’s MSN Hotmail and Messenger. Note that this authentication method can be set only through the IIS Manager, not the Exchange System Manager.
As you can see in the Figures 5.7 and 5.8, you can set all types of authentication methods on either the HTTP Virtual folders in the exchange System Manager and/or on the OWA virtual directories under the Default Web Site in the IIS Manager. As a general rule, you should set the authentication methods through the Exchange System Manager whenever possible, and through the IIS Manager only as a last resort.
Figure 5.7: Setting Authentication Methods Through Exchange System Manager
Figure 5.8: Setting Authentication Methods Through IIS


Reality Check…
Before you start experimenting with OWA configuration options, it’s vital that you know the ins and outs of the DS2MB process. DS2MB stands for Directory Service to Metabase, a method by which Exchange configuration information in Active Directory is synchronized to the metabase. The function of the DS2MB synchronization process is to transfer configuration information from Active Directory to the local metabase. DS2MB is a one-way process, meaning that you always should make any changes to your OWA directories through the Exchange System Manager and not the IIS Manager. Any changes you make to the Exchange and Public virtual directories via the IIS Manager will be lost once the System Attendant service is restarted (such as after a reboot) or when the DS2MB process kicks in, which is normally every 15 minutes. The reason is that the DS2MB process always overwrites the settings in IIS Manager with the settings that exist in Exchange System Manager.
Read, Write, Browse, and Execute Permissions
In addition to the available authentication methods we’ve discussed, you can set Read, Write, Browse, and Execute permissions on the various HTTP virtual folders in the Exchange System Manager (see Figure 5.9). In general, you’ll rarely have reason to change the default settings. We will therefore not go into further detail about them in this book, but instead suggest you take a look at the Exchange Help files for any information you require.
Figure 5.9: Read, Write, Browse, and Execute Permissions Through ESM

Connection Limits
By default, an HTTP virtual server accepts an unlimited number of inbound connections (or more precisely, 1000—the default limit set in IIS), but to prevent an Exchange server from becoming overloaded, it’s possible to specify a limited number of simultaneous connections. This is done the following way:
1. Open the Exchange System Manager.
2. Drill down to Servers | Server | Protocols | HTTP.
3. Open the Properties of the respective HTTP virtual server.
4. Under the General tab, put a check mark in Limit Number of Connections.
5. Specify the amount of allowed connection, then click OK.
Reality Check…
For some reason, it’s not possible to enable the limited number of inbound connections on the default HTTP virtual server in the Exchange System Manager. You can only enable this feature on additionally created HTTP virtual servers. If you need to set it on the default one, you need to use an identical feature in IIS (more specifically, by right-clicking the Default Web Site, then choosing the Performance tab).
You can also limit the length of time that idle connections remain logged on to the server, also specified under the General tab. If you don’t use forms-based authentication, it could be a good idea to do this to reduce the risk of a malicious person accessing your messaging environment through a running OWA session that a user forgot to disconnect on a kiosk machine or similar.
Notes from the Underground…
OWA 2003 Security Flaw
In November 2003, the NTBugTraq mailing list found a security flaw in OWA 2003. Users who use OWA for Exchange Server 2003 to access their mailboxes could connect to another user’s mailbox. An attacker seeking to exploit this vulnerability could not predict which mailbox they would connect to or if they would connect to another user’s mailbox at all. The vulnerability causes random and unreliable access to mailboxes and is specifically limited to mailboxes that have recently been accessed through OWA. This behavior occurs when OWA is used in an Exchange front-end server configuration and when Kerberos (the preferred Windows authentication protocol, used whenever possible, and the default protocol used by Exchange Server 2003 between front-end and back-end Exchange servers for OWA) is disabled as an authentication method for the IIS Web site that hosts OWA on the back-end Exchange servers. By default, Kerberos authentication is used as the HTTP authentication method between Exchange Server 2003 front-end and back-end servers.
This vulnerability is exposed only if the Web site that is running the Exchange Server 2003 programs on the Exchange back-end server has been configured not to use Kerberos authentication and OWA is using NTLM authentication. This configuration change can occur when Microsoft Windows SharePoint Services are installed on a Windows Server 2003 server that also functions as an Exchange Server 2003 back end.
Read more about this security issue in Microsoft Security Bulletin MS04-002 at: www.microsoft.com/technet/security/bulletin/MS04-002.mspx.
Enabling SSL on OWA
If you have OWA clients accessing the organization’s Exchange 2003 server from an external network, you normally use the basic authentication method, but by default this method transmits all traffic (including usernames and passwords!) between the server and the client in cleartext. Therefore, it’s highly recommended that you encrypt the traffic using SSL. In this section, we show you step by step how to create and implement your own SSL certificate using your own certificate authority (CA). Instead of creating your own SSL certificate, you could buy a third-party certificate from a provider such as VeriSign, Thawte, or InstantSSL. If you choose the latter option, the third-party certificate provider typically has the necessary instructions for you install its specific certificate.
By the Book…
By implementing SSL on your OWA virtual directories, you encrypt the communication between the client browser and the OWA server itself. This means that your OWA users can safely access their mailboxes without you having to worry that either passwords or confidential information in e-mail messages will be intercepted and used by third parties for malicious purposes. If you use the basic authentication method and don’t implement SSL, all data transmitted between the client browser and the OWA server will be sent in cleartext and unencrypted, meaning that anyone with a sniffer program could retrieve all information transmitted. As you might guess, this would be quite a security hole. Another benefit of enabling SSL is your users’ option to change their passwords through the OWA interface.
The first thing to do is to decide what server should hold the CA role. This could be any server, but it’s recommended that you use at least a member server of your Active Directory domain/forest. Many Exchange admins in small to midsize organizations choose to install it on one of the Exchange servers, which is absolutely fine, especially if you use the Certificate Authority Web Enrollment component, which requires IIS to be installed on the server.
Installing the Microsoft Certificate Service
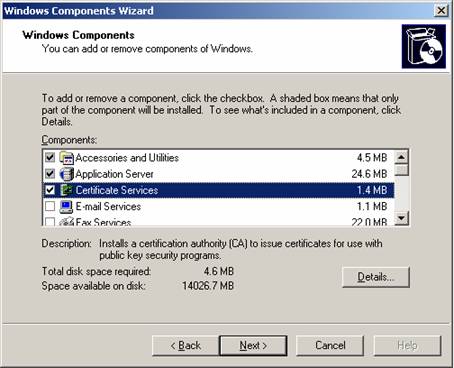
To install the CA component, log on to the server that’s going to hold the CA service, and then do the following:
1. Click Start | Control Panel | Add or Remove Programs.
2. Select Add/Remove Windows Components.
3 Put a check mark in the Certificate Services box (see Figure 5.10).
Figure 5.10: Windows Component Wizard
A Microsoft Certificate Services warning dialog box will appear (see Figure 5.11). The box informs you that you cannot change the machine name or the domain membership of the machine while it acts as a certificate server. Read and take note of this message; otherwise, you could end up in quite a mess.
Figure 5.11: Microsoft Certificates Services Warning box

4. Click Yes, then click Next.
5. Select Enterprise root CA (recommended when you have an AD), then click Next (see Figure 5.12)
Figure 5.12: Choosing the CA Type

Reality Check…
When dealing with OWA environments, you should typically choose to install an enterprise root certificate service unless a standalone root certificate service is specifically required. We won’t go into detail on the differences between the types of CA in this book, but if you want to read more about them, we suggest you take a look at the following two links at Microsoft Technet:
Enterprise certification authorities www.microsoft.com/resources/documentation/WindowsServ/2003/standard/proddocs/en-us/sag_CSEnterCA.asp?frame=true
Stand-alone certification authorities www.microsoft.com/resources/documentation/WindowsServ/2003/standard/proddocs/en-us/sag_CSStandCA.asp?frame=true
Alternatively, check your CA server’s Help file.
In the screen that appears (see Figure 5.13), type in a common name for this CA. The common name of the CA is typically the DNS host name or NetBIOS name (computer name) of the server running the certificate services. In this specific example, the name of the machine is TESTS01, so we will enter TESTS01 in the Common name field. The default Validity Period of the CA’s self-signed certificate is five years, which in most cases should be sufficient, so leave this setting at the default. Click Next.
Figure 5.13: Common Name for this CA

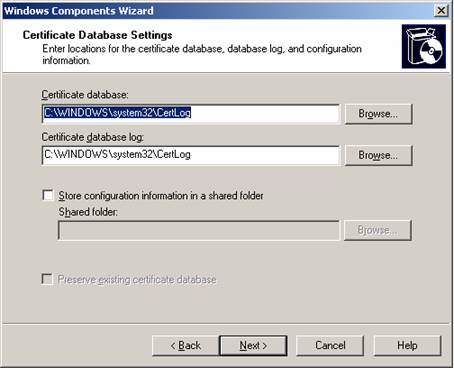
6. On the Certificate Database Settings page (see Figure 5.14), use the default locations for the Certificate Database and Certificate Database Log. Note that when the server is part of an Active Directory, it’s typically not necessary to store configuration information in a shared folder. Click Next.
Figure 5.14: Certificate Database and Log Settings
7. Another warning dialog box will appear (see Figure 5.15). This time it informs you that to complete the installation, the IIS must be stopped temporarily. Click Yes.
Figure 5.15: Warning Dialog Box

Note
If you haven’t enabled Active Server Pages (ASPs) during the IIS installation, a dialog box will notify you that you need to do so if you wish to use the Certificate Services Web enrollment site. The dialog box will then give you the choice of enabling ASPs immediately. If you want to use the enrollment site, click Yes.
8. The wizard will now complete the installation of the Certificate Authority Services. Click Finish (see Figure 5.16).
Figure 5.16: Completing the Windows Component Wizard

9. Close the Add or Remove Components window.
The CA is now installed, and we can issue the necessary SSL certificate to our OWA virtual directories.
Creating the Certificate Request
Now that we have installed the online Certificate Authority Service, it’s time to create the Certificate Request for our Exchange 2003 server’s default Web site. Do the following:
1. Click Start | Administrative Tools | Internet Information Services (IIS) Manager.
2. Expand Web Sites, right-click Default Web Site, and select Properties.
3. Click the Directory Security tab (see Figure 5.17).
Figure 5.17: The Directory Security Tab

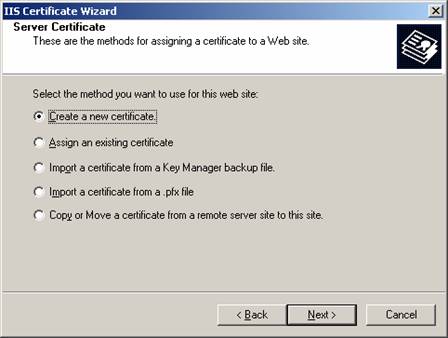
3. Under Secure Communications, click the Server Certificate button. You will be presented with the Web Server Certificate Wizard screen shown in Figure 5.18. Click Next.
Figure 5.18: Web Server Certificate Wizard

5. Because we are going to create a new certificate, leave this screen to with its default settings (see Figure 5.19). Click Next.
Figure 5.19: Create a New Certificate
6. Because we’re configuring an online enterprise authority, select the Send the request immediately to an online certificate authority option from the Delayed or Immediate Request screen (see Figure 5.20). Click Next.
Figure 5.20: Delayed or Immediate Request

7. In the next screen that appears, enter a name for the certificate in the Name text box (see Figure 5.21). This is only a descriptive name, meaning it doesn’t affect the functionality of the certificate in any way, so enter something that describes the certificate. Because the default bit length key in most situations is sufficient, leave it at its default value of 1024. (This bit length is capable of generating 128-bit encryption, which is what we’re going to use.) Click Next.
Figure 5.21: Name and Security Settings

8. We now have the option of specifying our organization and organizational unit. Using the defaults is just fine (see Figure 5.22). Click Next.
Figure 5.22: Organization Information

10. In the screen that appears (see Figure 5.23), we need to pay extra attention, since the common name reflects the external fully qualified domain name (FQDN). This is the address external users have to type in their browsers to access OWA from the Internet. If this common name doesn’t match the name (FQDN) that the OWA clients connect to, the client will see an error message. Type your site’s FQDN in the Common name field. Click Next.
11. Type your information in the Country/Region, State/province, and City/locality boxes (see Figure 5.24). Click Next.
Figure 5.23: Your Site’s Common Name

Figure 5.24: Entering Your Geographical Information

12. We now have the option of specifying the SSL port for the Web site (see Figure 5.25). Because SSL typically uses port 443, leave the defaults. Click Next.
Figure 5.25: Choosing the SSL Port

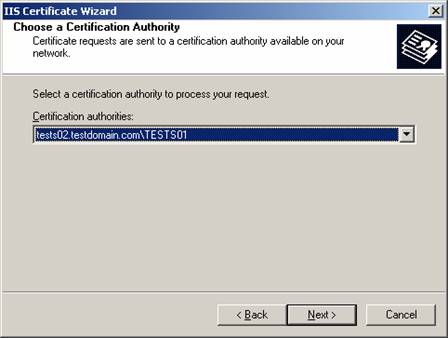
13. In Figure 5.26, select the respective certification authority. Since we only have one in this example, leave the defaults. Click Next.
Figure 5.26: Choosing a Certification Authority
14. We now have a chance to review the information we specified throughout the IIS Certificate Wizard. If you find you made a mistake, this is your final chance to correct it. Carefully review the information in the Certificate Request Submission screen (see Figure 5.27), and if you’re satisfied, click Next and then click Finish.
Figure 5.27: Certificate Request Submission

Note
Because the SSL certificates were created using an online CA, SSL has been enabled automatically (see Figure 5.28). If you used a third-party certificate or an offline CA, you would have to manually put a check mark in Require secure channel (SSL) and Require 128-bit encryption.
Figure 5.28 Secure Communications

SSL has now been enabled on our default Web site using our own Enterprise Certificate Service. Let’s see if it works as it’s supposed to.
15. From a client, launch Internet Explorer, then type http://exchangeserver/exchange. You should see an error message like the one shown in Figure 5.29.
Figure 5.29: This Page Must Be Viewed Over a Secure Channel Error Message

16. Now type https://tests01/exchange instead. You will be presented with a Security Alert box like the one shown in Figure 5.30.
Note
The yellow warning icon tells us The name on the security certificate is invalid or does not match the name of the site. This is expected, since during this little test we aren’t accessing the site via its common name (mail.testdomain.com).
Figure 5.30: Security Alert Box

17. Click Yes. You will now be prompted for a valid username/password, as shown in Figure 5.31.
Figure 5.31: User Validation Box

18. Enter a valid username and password, and your OWA session will load (see Figure 5.32).
Figure 5.32: Outlook Web Access Session
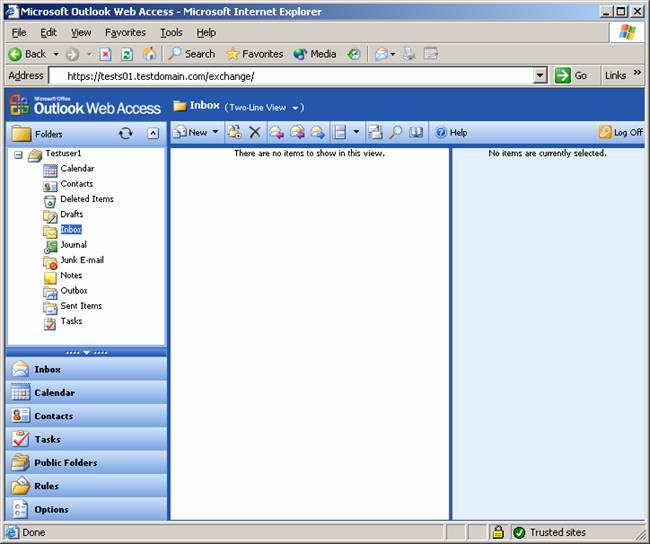
Notice the little yellow lock icon in the lower-right corner of the screen; this indicates we’re viewing a secure site, so fortunately our SSL-enabled OWA site works correctly.
Notes from the Underground…
SSL in a Front-End/Back-End Scenario
Although it’s possible to implement SSL on a front-end (FE) server, resulting in all transmitted data between the FE and your client browsers being encrypted, you should be aware that you can’t use SSL between any FE and back-end (BE) servers—it simply doesn’t work. This means that if your FE server is placed in a perimeter network (also known as a demilitarized zone, or DMZ), all traffic between the FE and BE would be unencrypted. So if you’re planning such a scenario, consider using IPSec between the FEs and BEs. More and more organizations place their FEs directly on their private networks (and instead place an ISA server or similar in the DMZ), which eliminates this security risk. We will talk more about FE/BE scenarios in Chapter 6.
Third-Party Certificates
In this section so far, we’ve focused strictly on using certificates issued by our own certificate services authority, but it’s important to mention that you also have the opportunity to buy a certificate from a third-party provider such as VeriSign, Thawte, and InstantSSL. In regard to OWA, the primary benefit of buying a third-party certificate instead of creating your own is that it automatically will be trusted by your browser clients, which means the users won’t get the dreaded security warning box, similar to the one we saw back in Figure 5.30. You also have the option of having your private certificate trusted by your browser clients, which is done by installing the certificate on each client. If you go that route, you won’t get the security warning box either; therefore, third-party certificates are mostly only of interest for service providers and other similar organizations. But keep in mind that if you work in a big corporate OWA environment, it could be a good idea to consider a third-party certificate to decrease support costs, since the security warning box can generate lots of help desk calls.
Restricting User Access
By default, any mail-enabled user in your Exchange organization is allowed access to his or her mailbox using OWA 2003. Depending on the type of organization you have to deal with, you might want to restrict who has access and who doesn’t. You might even want to go as far as disabling the OWA feature completely. In this section we look at the various options available for restricting OWA access.
By the Book…
Although all users have permissions to access their mailbox through OWA by default, you might run into situations where your organization would want to restrict access. This can be accomplished in several different ways: You can disable access for specific users or by stopping the HTTP virtual server on the Exchange server. In addition, you can go as far as to limit what OWA features should be available to your users. This is done through what is known as OWA segmentation.
Disabling OWA Access for a Specific User
Disabling OWA access for a specific user is done through the Active Directory Users and Computers Microsoft Management Console (MMC) snap-in. The following procedure will show you how.
1. Click Start | Administrative Tools | Active Directory Users and Computers.
2. Choose Properties of a mail-enabled user account.
3. Select the Exchange Features tab (see Figure 5.33).
Figure 5.33

4. Under Protocols, click Outlook Web Access.
5. Click Disable near the bottom of the screen (refer back to Figure 5.33).
You have now disabled OWA for this particular user. Now when this user tries to access his or her mailbox through OWA, he or she will see an “HTTP Error 403—Forbidden” message (see Figure 5.34).
Figure 5.34: HTTP Error 403—Forbidden

Notes from the Underground…
Disable OWA Access on Users in Bulk
Suppose you need to disable OWA access for 500 user accounts. You wouldn’t want to do this manually, would you? Don’t worry—the nifty little graphical user interface (GUI)-based ADModify tool comes to the rescue. With ADModify you can make bulk changes to the attributes for user accounts in your AD forest/domain, and to your advantage, one of the options is to disable HTTP access for them. When you disable HTTP access for a user, that user can no longer access OWA. You can download ADModify directly from Microsoft Exchange Product Support Services FTP site from the following URL: ftp://ftp.microsoft.com/PSS/Tools/Exchange%20Support%20Tools/ADModify.
Note
The Microsoft Exchange Product Support Services FTP site contains a lot of other brilliant Exchange utilities, so it’s highly recommended that you check out its main FTP folder: ftp://ftp.microsoft.com/PSS/Tools/Exchange%20Support%20Tools
Disabling OWA Access for a Server
You might find yourself in situations where your organization doesn’t want to allow its users to connect to their mailboxes through OWA at all. If this is the case, the easiest way to accomplish this goal is to stop the HTTP Exchange Virtual Server, as follows:
1. Click Start | All Programs | Microsoft Exchange | System Manager.
2. Expand Servers | Server | Protocols | HTTP (see Figure 5.35).
Figure 5.35: HTTP Exchange Virtual Server
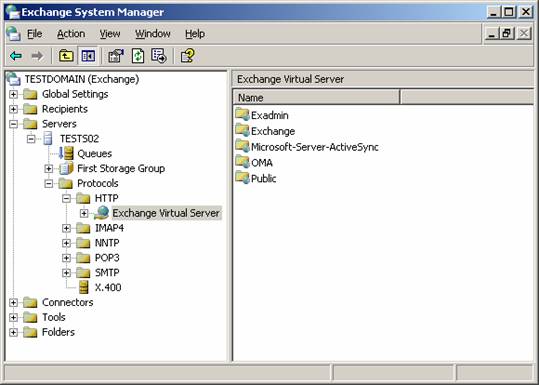
3. Right-click Exchange Virtual Server, then select Stop.
A red cross will now appear over the Exchange Virtual Server icon, indicating it has been stopped. Any user will from now on receive a “The Page Cannot Be Displayed” error message when trying to access his or her mailbox through OWA.
OWA Segmentation
With OWA segmentation, it’s possible to modify the features that are available in OWA 2003. You could, for example, hide the Tasks, Contacts, or Public folders from the user’s OWA interface. OWA segmentation can be done on a per-server or a per-user basis. Per-server segmentation requires that you modify the Windows registry on the Exchange computer. Per-user segmentation requires that you modify an Active Directory attribute.
Per-server segmentation Per-server segmentation in OWA determines the features that are available for all OWA users who are hosted on a particular server that is running Microsoft Exchange Server 2003.
Per-user segmentation Per-user segmentation in OWA determines the features that are available for a particular OWA user or group. Per-user segmentation settings override the per-server value that you configure on the Exchange 2003 server.
We will not go into detail on how you configure OWA segmentation in your Exchange 2003 environment in this book, but instead suggest you read the following Microsoft KB article on this subject: 833340: “How to modify the appearance and the functionality of Outlook Web Access by using the segmentation feature in Exchange 2003,” which you will find at http://support.microsoft.com/default.aspx?scid=kb;en-us;833340.
Allowing Password Changes Through OWA
In this section you will learn how to enable the Change Password functionality in OWA 2003.
By the Book…
Because of Microsoft’s Trustworthy Computing initiative, one of the OWA 2003 things that is disabled by default is the user’s option to change his or4 her account password through the OWA 2003 interface. As you might remember, this option was enabled by default in Exchange Server 2000, but many organizations actually disabled the feature because, before Windows 2000 Service Pack 4, it was considered quite insecure. Before Microsoft released Windows 2000 Service Pack 4, the technology for changing passwords through OWA (or more specifically, through IIS) was based on HTR files and an ISAPI extension (Ism.dll), which potentially exposes the Web server to quite a security risk because the ISAPI extension (Ism.dll) needed to run under the security context of System. This basically means that if the system is compromised, a hacker could get full control over the local machine.
Now the Change Password functionality has been modified to use Active Server Pages (ASPs), which makes the functionality more secure, since it is run under the configurable security context of the current process (such as DLLHost, which uses the user, IWAM_<MachineName>, by default).
Before adjusting the Change Password functionality in OWA 2003, you first need to implement SSL on your OWA server, as shown earlier in this chapter.
Creating the IISADMPWD Virtual Directory
We first need to create a new virtual directory in the IIS Manager, you should therefore do the following:
1. Log on to the Exchange server.
2. Click Start | All Programs | Administrative Tools | Internet Services Manager.
3. Expand Local Computer | Web Sites.
4. Right-click the Default Web Site and point to New, then click Virtual Directory.
5. The Virtual Directory Creation Wizard is launched. Click Next.
6. In the Virtual Directory Creation Wizard, type IISADMPWD in the Alias box, then click Next (see Figure 5.36).
Figure 5.36: Virtual Directory Creation Wizard

7. You now need to specify the directory path. Type C:\windows\system32\inetsrv\iisadmpwd (see Figure 5.37), then click Next.
Figure 5.37: Web Site Content Directory

8. Verify that only the Read and Run scripts (such as ASP) check boxes are set, as shown in Figure 5.38, then click Next and then Finish.Note
Note
It’s important you only give Read and Run Scripts permissions in Step 8. Giving write permissions would allow a potential hacker to replace the scripts with his own versions!
Figure 5.38: Virtual Directory Access Permissions

As you can see in Figure 5.39, we now have a IISADMPWD virtual directory under our default Web sites.
Figure 5.39: IISADMPWD Virtual Directory

We now have to verify that the IISADMPWD virtual directory has anonymous access enabled. Otherwise, we can end up in situations where the client and server go into a so-called endless loop when you attempt to authenticate users who are prompted to change an expired password. You can read more about this issue in MS KB Article 275457: “IIS 5.0 May Loop Infinitely When A User Is Forced to Change Their Password,” at support.microsoft.com/?id=275457.
9. Right-click the IISADMPWD virtual directory, then select Properties.
10. Select the Directory Security tab, and then under Authentication and access control, click Edit (see Figure 5.40).
Figure 5.40: Directory Security Tab

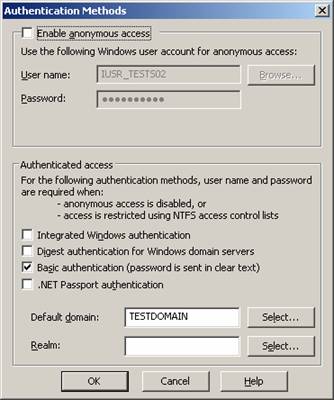
11. Put a check mark in the Enable anonymous access box, as shown in Figure 5.41.
Figure 5.41: Authentication Methods

12. Click OK twice and close the IIS Manager.
If you are running Exchange Server 2003 on a Windows Server 2000-based machine, there is one more thing to do: You need to reset the PasswordChangeFlags flag in the IIS 5.x Metabase to zero. This is done the following way:
13. Click Start | Run, and type CMD.
14. Change to the C:\Inetpub\Adminscripts directory by typing cd c:\inetpub\adminscripts, and type adsutil.vbs set w3svc/passwordchangeflags 0.
Enabling the Change Password Button in OWA
Now it’s time to make the Change Password button visible in OWA. You do this in the registry of the Exchange 2003 server:
1. On the Exchange server, click Start | Run and type Regedt32.
2. Navigate to HKEY_LOCAL_MACHINE\SYSTEM\CurrentControlSet\Services\MSExchangeWEB\OWA (see Figure 5.42).
Figure 5.42: Enable Change Password in Registry Editor

3. Change the value of DisablePassword REG_DWORD from 1 to 0 (see Figure 5.43)
Figure 5.43: Edit DWORD Value

4. Close the registry editor.
5. Restart the IIS Services—for example, by opening a command prompt and typing IISRESET.
Testing the Change Password Feature in OWA
We now need to check to see if the Change Password option is available, and last but not least, working as it’s supposed to:
1. Launch Internet Explorer.
2. Enter the URL to OWA—in this example, https://mail.testdomain.com.
3. Log on with your username and password.
4. Click the Options button.
5. In the Options window, scroll all the way to the bottom, and click the now visible Change Password button under Password (see Figure 5.44).
Figure 5.44: Change Password Button

If it works, you will be presented with the window shown in Figure 5.45.
Figure 5.45: Internet Service Manager

6. To test if we are able to actually change a password, fill out the fields with a valid user account, as shown in Figure 5.44, then click OK. You should now see a message stating that your password was changed successfully.
Depending on your organization’s specific setup, you might experience what is known as lag time (delayed change) when users change their passwords. This is especially true if your domain controllers are located at another site than the OWA servers.
Reality Check…
Be aware that if you have installed Exchange Server 2003 on a Windows Server 2000 machine (with SP3 or earlier), on which you also have run the Urlscan 2.5 security tool, you will get an error message when trying to change your password through OWA. The reason is that by default, the Urlscan 2.5 security tool blocks files with the .HTR extension. (Remember, Windows 2000 SP3 and earlier uses the HTR technology for changing passwords.) To resolve this problem, remove .htr from the Deny Scripts section of the urlscan.ini file (by default located in C:\WINDOWS\system32\inetsrv\urlscan). If you plan to install the Urlscan 2.5 security tool on your Exchange 2003 server, there are quite a few things you should take into consideration, so it’s highly recommended that you read MS KB article 823175, “Fine-Tuning and Known Issues When You Use the Urlscan Utility in an Exchange 2003 Environment,” at http://support.microsoft.com/?kbid=823175.
Note
If OWA is installed on a Windows Server 2000 with Service Pack 4 applied or on a Windows Server 2003-based computer, OWA uses the IIS 6.0 ASP Change Password program. Therefore, OWA is not affected by .htr files that are not enabled.
Redirecting HTTP Requests to SSL Requests
Now that we have enabled SSL on our OWA server, your phone is glowing with calls from frustrated users who can no longer access their mailboxes through OWA. What do you do? Make the SSL implementation invisible to your users, of course. In this section we show you how it’s possible to automatically redirect HTTP requests to SSL requests, simply by creating a small Web page containing a few snippets of ASP code.
By the Book…
When using OWA 2003, it’s recommended that you require SSL to encrypt or secure the data to ensure that all data is hidden from malicious users. We already discussed how to enable SSL on your OWA site. However, when you configure OWA 2003 to require SSL for all incoming requests, and a request comes in using non-SSL such as http://mail.testdomain.com, OWA (or more specifically, IIS) will respond with the following error message similar to the “HTTP 403.4—Forbidden” message: “SSL required Internet Information Services.” You know that no matter how much you try to educate your users to type HTTPS:// instead of HTTP://; there will always be some who just don’t understand the difference. Therefore, you might want to create an automatic redirection page that translates all HTTP requests (HTTP://) to SSL requests (HTTPS://).
To accomplish our goal, we need to perform the following steps:
1. Start Notepad.
2. Insert the text shown in Figure 5.46 into your Notepad window.
Figure 5.46: Redirect Script in Notepad

Note
The SERVER_PORT and SERVER_NAME in this code should not be replaced with an actual server port or server name. They are variables, and the code snippet should be entered as it is shown without modification.
3. Save the Notepad file in your C:\Inetpub\wwwroot\owaasp directory (create the owaasp directory) as owahttps.asp or some other meaningful name (see Figure 5.47).
Figure 5.47: Save OWAHTTPS.ASP Page

4. Click Start | Administrative Tools | Internet Information Services (IIS) Manager.
5. Expand Local Computer | Web Sites | Default Web Site.
6. Right-click the Exchange Virtual Directory, then click Properties.
7. Select the Custom Errors tab (see Figure 5.48).
Figure 5.48: The Custom Errors Tab

8. Select the 403;4 HTTP error, then click Edit. You will now be presented with the box shown in Figure 5.49.
Figure 5.49: Error-Mapping Properties

9. In Message type, select URL, then type /owaasp/owahttps.asp (or whatever you called the ASP page back in Step 3) in the URL text box. Click OK.
If you have installed Exchange Server 2003 on a Windows Server 2000-based machine, you only have one thing left to do, and you can jump directly to Step 12. But if you are running Exchange Server 2003 on a Windows 2003 Server, you have an additional task to complete.
10. In the IIS Manager, choose the Properties of the OWAASP folder.
11. Under Application Settings, click Create, then select ExchangeApplicationPool under the Application Pool drop-down box (see Figure 5.50).
Figure 5.50: Select Application Pool

12. Restart IIS, as was shown earlier, by opening a command prompt and typing IISRESET.
We can now type http://mail.testdomain.com in a Web browser and automatically be redirected to https://mail.testdomain.com.
Note
You should NOT enable SSL on the OWAASP virtual directory!
Your A** Is Covered If You…
Have a general understanding of OWA authentication and permissions
Enable SSL on your OWA virtual directories
Know what options you have in regard to restricting user access to OWA
Set up an automatic OWA redirect page

Click here to buy the book!
Click here to download Chapter 5 in PDF format.