Microsoft has long given System Center Virtual Machine Manager admins the ability to create private clouds that allow for self-service administration. At one time, access to these self-service environments required the use of an external portal such as Azure Pack. Today, however, Virtual Machine Manager admins can simply provide self-service users with a copy of the Virtual Machine Manager Console. Because Virtual Machine Manager supports role-based access control, self-service administrators are only able to see and manage resources for which they have been given permission.
Creating user role with Virtual Machine Manager
Of course, the key to making all of this work is to define a self-service user role. To do so, open the Virtual Machine Manager Console, and click on the Settings workspace. Next, click on the Create User Role icon, found on the taskbar. This causes the console to launch the Create User Role Wizard.
The first thing that you will have to do within the wizard is to enter a name and a description of the role that you are creating. The important thing to remember is that you are defining a role, not a specific user account. Presumably, the role that you are creating will be assigned to several or even all of your self-service users. As such, you could create a generic self-service user role, or you might instead create a self-service user role that applies to a specific type of self-service user. For example, such a role might apply to all of the self-service users within a specific department.
Once you have entered a name and a description for the role that you are creating, click Next. You will now be taken to the wizard’s Profile page, which you can see in the image below.
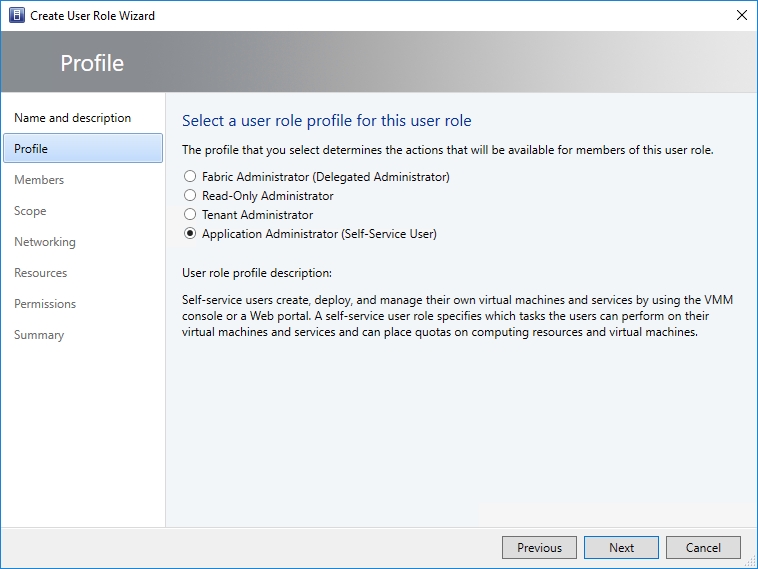
The idea behind the Profile screen is that the Virtual Machine Manager console is not the sort of thing that you are going to be giving to casual users. Anyone who is using the console is going to be performing some sort of administrative task. The Profile screen gives you a chance to specify what type of administrator role members will be. Because we are creating a self-service role, you will need to choose the Application Administrator (self-service user) role. Even though the profile’s name makes it sound as though the profile is only suitable for application deployment, the description clearly states that “self-service users create, deploy and manage their own virtual machines and services by using the VMM console.”
Click Next, and you will be taken to the wizard’s Members screen. This is where you specify which users will be assigned to the self-service role that you are creating.
Even though you can add Active Directory user accounts directly to the Members screen, doing so is considered to be a bad practice because it makes user management difficult in the long term. Instead, it is better to create a dedicated Active Directory group and add the group to the Members list as shown in the image below. You can then add individual users to the group.

Click Next, and you will be taken to the Scope screen. The Scope screen allows you to determine the scope of the role member’s administrative capabilities.
As you will recall, the wizard’s Profile screen asked you what type of administrative access the role members would need. Because the self-service option was selected, Virtual Machine Manager knows that members should not have global administrative privileges over all the resources that are exposed through Virtual Machine Manager. Instead, the assumption is that self-service users are going to be administrators within the confines of a private cloud (in this sense of the word, a private cloud is a logical grouping of resources that is defined as a named cloud within Virtual Machine Manager). As such, the Scope screen only exposes private cloud resources, as shown in the figure below. In this case, I created a private cloud ahead of time, but if you do not yet have a private cloud in place, then the Scope screen will be blank.

Make your private cloud selection, and click Next. At this point, you will be taken to the wizard’s Quotas screen. As you can see in the image below, the Quotas screen lets you place limits on the hardware resources that the role members can consume. By default, there are no quota restrictions in effect, but you can easily impose quotas on virtual CPUs, memory, storage, and virtual machines.
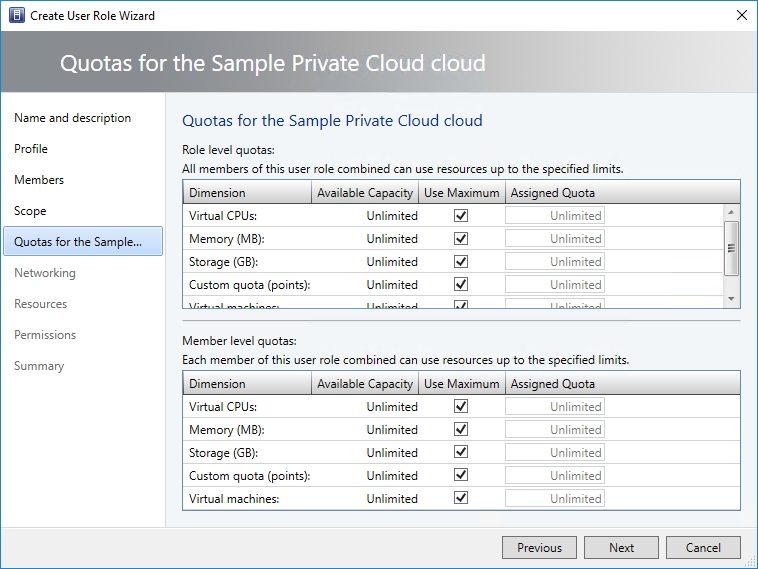
You will also notice that the Quotas screen allows for the use of quota points. The idea is that you can assign quota points to VMs or VM templates, and can limit the total number of quota points that self-service users can accumulate.
Click Next, and you will be taken to the networking screen. Self-service users are only allowed to access the virtual networks that you explicitly allow. The Networking screen allows you to specify these networks, as shown in the image below.

Click Next and you will be taken to the wizard’s Resources screen. Self-service users are only allowed to access the resources that you explicitly choose to allow. This screen is where you specify resources such as hardware profiles, app profiles, and VM templates. The Resources screen also allows you to specify an upload library path to be used by role members.
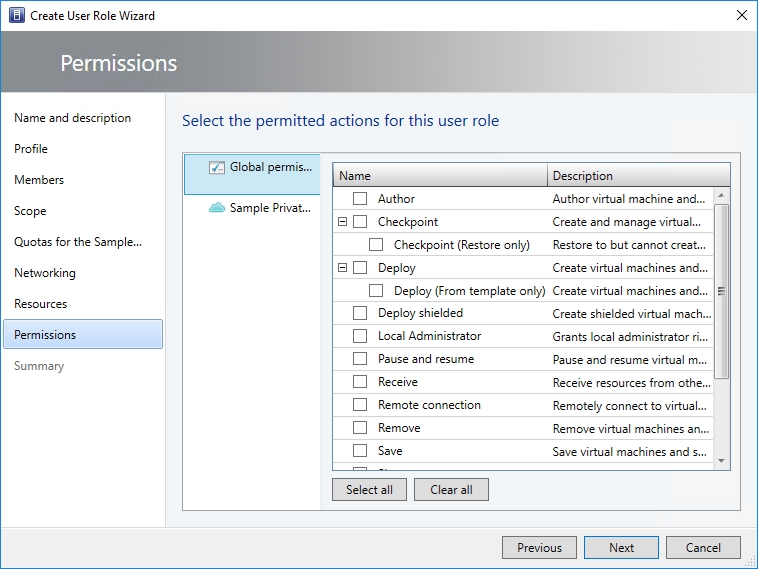
Click Next, and you will be taken to the Permissions screen. As you can see in the image below, you can set very granular permissions for role members. It is a good idea to spend some time familiarizing yourself with the options presented on this screen.
Click Next, and you will be taken to a screen that asks you to specify a RunAs account. When you are done, click Next once more and the wizard will display a summary of the options that you have chosen. Assuming that everything is correct, click Finish to create the new role.
Permission granted
As organizations increasingly transition to private or hybrid clouds, establishing permissions will become increasingly important. In Virtual Machine Manager, the preferred way of accomplishing this is through the use of user roles.
Photo credit: Shutterstock


