If you would like to read the other parts of this article series please go to:
- Setting Up Failover Clustering for Hyper-V (Part 1)
- Setting Up Failover Clustering for Hyper-V (Part 2)
- Setting Up Failover Clustering for Hyper-V (Part 3)
- Setting Up Failover Clustering for Hyper-V (Part 4)
- Setting Up Failover Clustering for Hyper-V (Part 5)
- Setting Up Failover Clustering for Hyper-V (Part 7)
- Setting Up Failover Clustering for Hyper-V (Part 8)
- Setting Up Failover Clustering for Hyper-V (Part 9)
Introduction
At the end of the previous article, I showed you how to create an iSCSI target that would be dedicated to a specific virtual machine. I also showed you how to allocate multiple virtual hard disks within that iSCSI target. In this article, I want to continue the discussion by showing you how to create a virtual machine, and link it to one of the virtual hard drives that we created in the previous article.
Connecting to the iSCSI Target
As was the case with the first method that I showed you, you will have to connect the cluster nodes to the iSCSI target before you will be able to use the storage that’s associated with that target. Thankfully, this is even easier to do than one we initially set up the iSCSI initiators. All you have to do is click the Refresh button and the iSCSI initiator should automatically detect the newly created target. The reason why this is possible is because the iSCSI initiator is already linked to a previously created target, and all we have really done is create a new target on the same server that the iSCSI initiator is already linked to.
The new iSCSI target should be listed as Inactive, as shown in Figure A. Select the new target and then click the Connect button. The target should become active.

Figure A: Click Refresh to reveal the newly created iSCSI target.
Now we need to verify that the storage resources that are associated with the target are accessible. To do so, open the Disk Management Console by typing DISKMGMT.MSC at the Run prompt. When the Disk Management Console opens, you should see all of the storage resources corresponding to connected targets. For example, in Figure B, you will see the 244 GB volume that I created in one of the previous article, but you will also see the two 20 GB drives that I just defined a moment ago.

Figure B: The Disk Management Console should show all of the storage resources.
As you will recall, when I initially showed you how to connect the cluster node to an iSCSI storage resource, the volume was initially off-line and we had to right click on it and choose the Online option to bring the volume online. In this case though, we can’t do that because we actually need for the volume to remain off-line at this point. In fact, opening the Disk Management console was completely optional. I only did it so that we could verify that the storage resources were indeed available to us. So with that said, go ahead and close the Disk Management console.
Creating a Virtual Machine
Now that we have verified that the iSCSI storage resources link to our target are available to us, it is time to create a virtual machine. As I said before, we aren’t actually going to use this virtual machine in our cluster. We are only creating it so that you can see how to go about connecting an individual virtual machine to iSCSI storage resources.
With that said, double had an open the Hyper-V Manager on your cluster node. Next, click the New link and choose the Virtual Machine option. When you do, Windows will launch the New Virtual Machine Wizard. Click Next to bypass the Wizard’s welcome screen.
The next screen that you will encounter asks you to provide a name for the virtual machine that you are creating. I’m just going to call this virtual machine Demo since that matches the description that I gave to the virtual hard drives that we created. If you look at Figure C, you will notice that there is an option to store the virtual machine in a different location. If we were using local storage then this is an option that we would want to use so that we could be sure to store the underlying virtual hard drive files on a high speed array. In this case though, we don’t have to worry about this option because we are using iSCSI storage.

Figure C: Assign a name to the virtual machine that you are creating.
Click Next, and you will be taken to a screen that asks you how much memory you want to allocate to the virtual machine. If this were a production virtual machine it would be necessary to carefully consider how much memory the virtual machine really needs. Since this is just a demo though, you don’t have to worry about the memory allocation. Instead, just click Next.
The following screen asks you to choose which network adapter your virtual machine will be using. I’m going to spend a lot of time talking about network adapters once we get into the clustering portion of this article series. For now though, the network adapter is irrelevant so just click Next.
At this point, you will see a screen asking you what type of virtual hard drive you want to create, as shown in Figure D. Because we are using iSCSI storage and we have already created a virtual hard drives it may seem as though you would want to use the Use an Existing Virtual Hard Disk option. However, using this option would require us to map a drive letter to the iSCSI storage, and in doing so we would be right back to creating a virtual hard drive inside of another virtual hard drive. That being the case, choose the Attach a Virtual Hard Disk Later option.

Figure D: Choose the Attach a Virtual Hard Disk Later option.
Click Next, and you will be taken to the Installation Options page. Choose the Install an operating system later option, and click Next. Finally, you’ll see a summary of the configuration options that you have provided. Assuming that everything looks to be correct, click Finish. When you do, the virtual machine will be created, as shown in Figure E.

Figure E: The new virtual machine has been created.
Connecting the Storage
Now that we have created a virtual machine, we need to link it to the storage that we have already created. To do so, click on the listing for the virtual machine and then click on the Settings link. This will cause Hyper-V to display a screen with all of the various settings for the virtual machine. Choose the IDE Controller 0 option, make sure that the Hard Drive option is selected, as shown in Figure F, and then click Add.
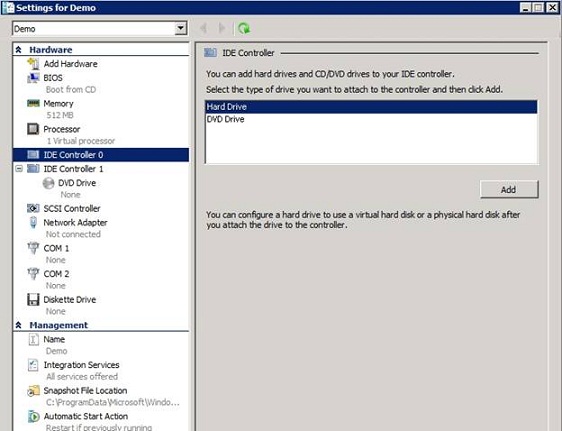
Figure F: You must add a virtual hard drive.
On the following screen, choose the Physical Hard Disk option, and then choose one of the storage allocations that you created earlier, as shown in Figure G.

Figure G: Configure Hyper-V to use the iSCSI storage as a physical hard disk.
Now repeat the process, and add the second storage volume. When you’re done, both of the virtual hard disks should be attached to the virtual machine as IDE hard drives. You can see what this looks like in Figure H.

Figure H: The new virtual machine is using the iSCSI volumes that we created earlier.
Conclusion
In this article, I have shown you how to create a virtual machine and link it to individual storage resources on an iSCSI target. Now that I have shown you how the underlying iSCSI storage works, I want to turn my attention to building a Hyper-V cluster in the next article.
If you would like to read the other parts of this article series please go to:
- Setting Up Failover Clustering for Hyper-V (Part 1)
- Setting Up Failover Clustering for Hyper-V (Part 2)
- Setting Up Failover Clustering for Hyper-V (Part 3)
- Setting Up Failover Clustering for Hyper-V (Part 4)
- Setting Up Failover Clustering for Hyper-V (Part 5)
- Setting Up Failover Clustering for Hyper-V (Part 7)
- Setting Up Failover Clustering for Hyper-V (Part 8)
- Setting Up Failover Clustering for Hyper-V (Part 9)


