If you would like to read the next part of this article series please go to Setting up Wi-Fi Authentication in Windows Server 2008 (Part 2).
Introduction
If you implement Wi-Fi connectivity on your business network, you should use the Enterprise mode of Wi-Fi Protected Access (WPA or WPA2) security—preferably WPA2 with AES encryption.
This Enterprise mode uses 802.1X authentication, which enables unique encryption keys for each user session. The Personal mode uses Pre-Shared Keys (PSKs), which are static encryptions and aren’t secure enough for businesses or organizations.
The Enterprise mode of WPA/WPA2 provides a couple of important benefits:
- End-users can logon with usernames and passwords, which can be their domain account if you use Active Directory. You can change the login credentials and revoke access per user. If you use the Personal mode, everyone would login with the same static encryption key. Thus if a laptop is stolen you’d have to change the encryption key on all the clients—but not with the Enterprise mode.
- This mode provides better encryption key security. The Personal mode’s PSKs are susceptible to guessing with brute-force dictionary attacks.
- End-users securely receive unique encryption keys at each session. Employees, for example, can’t sniff each other’s wireless traffic like with the Personal mode.
- This mode better supports VLANs. You can offer just a single wireless network (SSID) for all users, including employees, departments, and guests. You can assign users to different VLANs in the RADIUS server and it will put them onto the assigned VLAN when they connect wirelessly.
The only problem with the Enterprise mode is the overhead of setting up the required Remote Authentication Dial In User Service (RADIUS) server and configuring the client computers. It requires more time (and more money if you don’t already have a Windows Server) to setup the RADIUS server and configure the wireless access points (APs). Plus Windows doesn’t make it easy to connect to these types of networks—you may need to hire more help desk staff.
As you might have guessed already, Windows Server includes the RADIUS server functionality for doing the 802.1X authentication. This way you don’t have to purchase a separate RADIUS server, or learn an open source one like FreeRADIUS. Windows Server’s RADIUS functionality has previously been discussed on this site for Windows Server 2000 and 2003. However, we’ll now take you through using Windows Server 2008.
Starting with Windows Vista and Windows Server 2008, Microsoft has introduced a new feature called Network Policy Server (NPS). Its Microsoft’sNetwork Access Protection (NAP) implementation, letting you enforce health polices of clients on the following features or settings:
- Internet Protocol security (IPsec)-protected communications
- 802.1X-authenticated connections
- VPN connections
- Dynamic Host Configuration Protocol (DHCP) configuration
- Terminal Services Gateway (TS Gateway) connections
NPS also replaces and includes the Internet Authenticate Service (IAS) provided in previous versions of Windows Server. If you’re interested in the overall NPS features of Windows Server 2008, refer to a previous article on this site.
Considerations and requirements before implementation
In this tutorial, we’re setting up just the RADIUS functionality of NPS. We’re going to be using the Extensible Authentication Protocol (EAP)—Protected EAP (PEAP) in particular. This flavor of 802.1X authentication requires a security certificate at the server, but not at the clients. End-users login with usernames and passwords of accounts defined in Active Directory on the Windows Server.
Keep in mind, you’ll want each wireless controller or access point (AP) configured with a static IP address. Later you’ll create an entry into the Windows Server for each AP with its IP address and shared secret.
Make sure you’ve done the initial configuration of Windows Server 2008. Set the time zone, connect to the network with a static IP address, name the Windows Server, enable automatic updates, and install the available updates.
You also need to have an Active Directory Domain setup. Make sure the Active Directory Domain Services role is enabled and that you’ve configured it with the dcpromo.exe utility.
Install the Certificate Services role
To use the PEAP protocol, you must install the Certificate Services role. It lets you create a Certificate Authority (CA) to generate and sign the certificate required at the server. This is so the clients can validate the server before sending its login credentials.
On the Initial Configuration Tasks window, scroll down, and click Add roles. If you’ve closed or hidden that window, click Start > Server Manager, select Roles, and click Add Roles.
Select Active Directory Certificate Services (see Figure 1), and click Next.

Figure 1: Select to install the Active Directory Certificate Services role
Click Next on the information screen. Then select theCertification Authority and Certificate Authority Web Enrollment roles.On the prompt (see Figure 2), click Add Required Role Services. Then click Next to continue.

Figure 2: Continue by adding required role services
Select the Enterprise type (see Figure 3), and click Next.
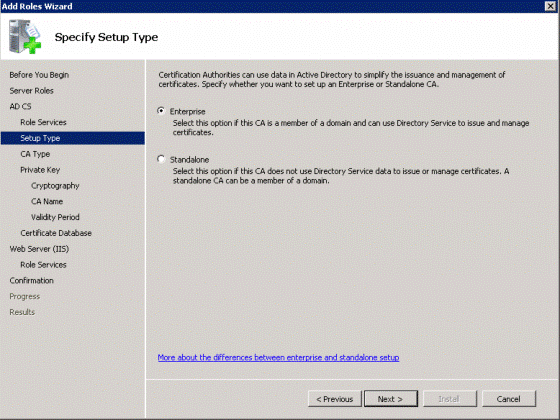
Figure 3: Choose the Enterprise type
For the CA type, select Root CA (see Figure 4), and click Next.

Figure 4: Select the Root CA
For the Set Up Private Key option, select Create a new private key (see Figure 5), and click Next.

Figure 5: Select to create a new private key.
Accept the defaults for the CA cryptography (see Figure 6), and click Next.

Figure 6: Continue by accepting the defaults
If desired, you can change the CA settings (see Figure 7 for an example), and click Next. For security reasons, you should not use the FQDN as the common name. To help identify this certificate from others, you should end it with –CA.
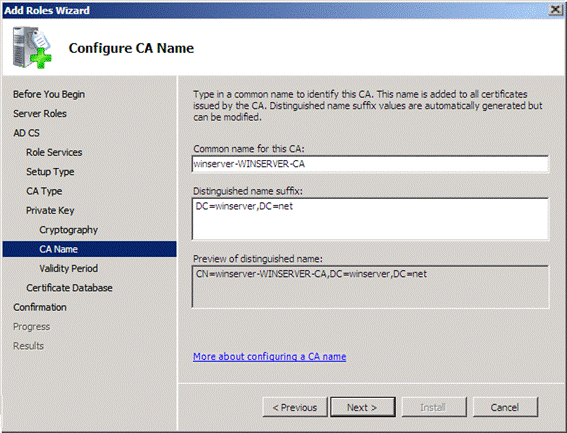
Figure 7: Choose a CA name.
For the validity period, you may want to extend to more than 5 years (such as to 20 years, like in Figure 8), so you won’t have to renew or regenerate the certificate later. Click Next to continue.

Figure8: Increase the validity period
Accept the default certificate database locations (see Figure 9) by clicking Next.

Figure 9: Continue by accepting the default locations
Review the Introduction to IIS and click Next.
If desired, modify the roles to be installed, and click Next.
Review the settings, and click Install.
Request the certificates
Now that you have the CA up and running, you can get the certificate required by PEAP for authentication server. First, you must create a Microsoft Management Console (MMC):Click Start, type MMC, and hit Enter.
On the MMC window, click File>Add/Remove Snap-in.
Select Certificates (see Figure 10), and click Add.

Figure 10: Choose to add the Certificates snap-in
Select Computer account, and click Next.
Select Local computer, click Finish, and then OK.
Tip:
You might want to save this MMC to your desktop for easier access later: click File>Save.
Expand Certificates (Local Computer Account), expand Personal, right-click Certificates and select All Tasks>Request New Certificate (see Figure 11).

Figure 11: Request a new certificate
On the information window, click Next to proceed.
Select the Domain Controller, and click Enroll. After it’s succeeded, click Finish.
Summary
In this article, we discovered how the Enterprise mode of Wi-Fi Protected Access along with 802.1X authentication provides superior wireless security. After performing the initial configuration of Windows Server 2008 and setting up Active Directory, we installed the Certificate Services to create a Certificate Authority (CA). Then we generated the certificate.
Stay tuned—in the next installment, we’ll continue by installing the Network Policy and Access Services role, configuring the wireless controllers or APs, and configuring the client computers. Then finally, we’ll be able to connect!
If you would like to read the next part of this article series please go to Setting up Wi-Fi Authentication in Windows Server 2008 (Part 2).


Great information. Lucky me I came across your site by accident (stumbleupon).
I have saved as a favorite for later!
Hi Eric Geier,
It’s very useful .I have a clarification, whether we can install CA on a server and NPS on another server?