Ever wanted to test out something on Exchange but you couldn’t because you only had a production environment? Even worse, you did try to test something and it broke your production environment. For quite a few years now, I have been using Azure as my testing platform for Exchange. I can spin up a domain controller and any version of Exchange that I need to test stuff on. It is much easier than having a test lab with limited resources — and you can only test when the machine decides to work.
There have been several requests on the Microsoft forums about running Exchange in Azure. First, you shouldn’t use Azure as your main platform to run your Exchange environment. It should be in your datacenters or on-premises, but you can use Azure to have a lab to test Exchange. I don’t leave my lab running for a full month, I switch it on and then when I am finished testing or trying out something, I turn it off again.
In this article, I will explain how you can provision your lab to test Exchange. This includes the following:
- Creating a resource group
- Creating a virtual network
- Creating a virtual machine that is strong enough to run as a domain controller
- Creating a virtual machine that is strong enough to run Exchange 2010, Exchange 2013, Exchange 2016, and Exchange 2019
You will be surprised as to how fast downloads are in the Azure machines. A 6.2GB Exchange 2019 ISO downloads in less than five minutes. Just remember that you need a subscription to download Exchange 2019, unfortunately. If you have one, log in to Visual Studio and download it along with your product key.
So, how do we set up an Azure test lab to test Exchange? Let’s jump right in.
Resource groups
What is a resource group? It is simply a collection of assets in a group. For example, if you use Azure for SQL, you might create a resource group for SQL and another one for your test lab so you don’t mix and match them. Your lab will fall under one group and your SQL servers and domain controllers under another group.
In Azure, you can click the menu (three lines) in the left-hand corner and then click Resource Groups. Now click the “+ Add” button and you will see a screen as per below:
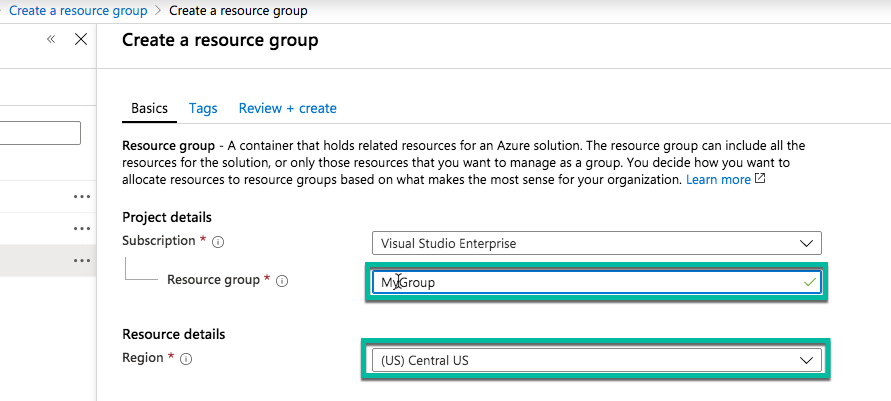
Here you can specify the group name. I called it “MyGroup” and from the subscription dropdown, you can select which subscription you are going to use and lastly select your region. Once done you can click “review and create” in the bottom left-hand corner and you will have a new resource group. Give it a couple of minutes for Azure to do its thing. You can check the notifications section for updates on the task.
Virtual networks
If you click the menu button again in the left-hand corner, you can now select virtual networks. Once you have done that, select the “+ Add” button to create your new virtual network, the new window should look something like below:
 Here you can configure the following:
- Name for your network.
- The address space you want to use. In my lab, I just leave the defaults.
- Next, select your subscription.
- Now select the resource group you created in the previous step.
- Choose your location.
- Provide you subnet with a name
- Select your option for DDoS
- Lastly, select the additional services you want like endpoints and firewall. Click the “i” button for more info on each.
Now click “Setup your network.
Virtual machines
The last step is to create your virtual machine. The same process as before: Click the menu button in the left-hand corner and click virtual machines this time. Now click on virtual machines.
This window should be blank as you don’t have any virtual machines. Click the “+ Add” button and a new window as per below will show:

On the “Basics” page, select the following:
- Subscription: Use the same one that you did for your networks and resource groups.
- Next, select the resource group you created for Exchange.
- Enter the virtual machine name. Azure will let you know on the side if it is a good one.
- Select your region.
- If you want high availability, you can create a set but we are not doing it for this lab.
- Image: Select the Windows Server image you want to deploy. Remember Windows Server 2019 will only work with Exchange 2019 and 2016.
The option below “Azure Spot Instance” is for sizing your machine as per below:

The VM size defaults to DS1_v2, which you can see is not at all powerful. For my domain controllers, I use D4s_v3. It gives you 4 CPUs, 16GB of RAM and 6400 iOPS. It is slightly slow, but for a domain controller, it’s perfect.
You can then enter in a username and password below these screens, accept the license terms for using your product key for Windows, and then click next, which will take you to disks. I leave the default of an SSD disk and then click “Next” to be taken to the network section as per below:

This is where you will select the following:
- Virtual network: This will be the one you set up in the beginning.
- If you want a dedicated public IP, then you can create one but you will have to pay for it.
- For Exchange, you can select 443 and 80 to do your downloads and leave RDP as you will be using it to get to your machine. It will be off so you cannot be attacked.
- For the rest of the options, just leave the defaults and then click “Next.”
There are four more tabs where you can go through options, but I leave them as is. Once you get to the final page, you can review and then create your virtual machine. Sometimes it jumps back to the default size so just keep an eye out for that.
Again, once you have clicked create, keep an eye on the notifications bar for when the machine has been built. You can follow the same process to create your Exchange server, but this time select “Standard D8s v3 (8 vcpus, 32 GiB memory)” as the VM size because Exchange 2019 won’t start services with anything less.
The final piece is to log in to your domain controller VM and install the role “Domain Services.” Promote it to a domain controller.
After the reboot, remember to turn off the firewall or you won’t get to the machine from your Exchange Server. On your Exchange Server, change the primary DNS to the domain controller’s DNS and keep the public IP currently assigned as the secondary DNS so you can get Internet access. Once you do that, reboot the server and then join your domain.
The rest is then easy. Download everything needed for Exchange and do your installation.


