If you would like to read the other parts of this article series please go to:
- Test Lab Guide: TMG Core Test Lab
- Test Lab Guide (Part 1) – Demonstrate TMG PPTP, L2TP/IPsec and SSTP Remote Access VPN Server
- Test Lab Guide (Part 3) – Demonstrate TMG PPTP, L2TP/IPsec and SSTP Remote Access VPN Server (Cont.)
- Test Lab Guide (Part 4) – Demonstrate TMG PPTP, L2TP/IPsec and SSTP Remote Access VPN Server (Cont.)
Introduction
In part one in this Test Lab Guide on configuring the TMG firewall as a PPTP, L2TP/IPsec and SSTP Remote Access VPN server, we began the configuration of the VPN server components. We included sections on how many connections to allow, which protocols to enable, and other basic settings. After we finish the VPN server configuration in this article, next time (in Part 3) we’ll create the Access Rules required for VPN clients to connect to resources.
Let’s get down to some Test Lab Guide business now!
Completing the VPN Configuration
In the left pane of the TMG firewall console, click the Remote Access Policy (VPN) node. Then in the Tasks Tab in the Task Pane, click Select Access Networks, as seen in Figure 1 below.

Figure 1
This brings up the Remote Access Policy (VPN) Properties dialog box and the Access Networks tab. Notice that by default, the TMG VPN server will listen on the default External Network. This means that the VPN server will listen on all IP addresses that are bound to the interface that is connected to the default External Network. You also have the option to configure the TMG VPN server to listen for connections on other networks. For example, if you had a NIC in a DMZ Network, you could configure the VPN server component to listen for connections on the DMZ NIC, which would allow users to connect, via VPN, to the default Internet Network, the Internet, or any other Network configured on the TMG firewall.
Figure 2 below shows that the External network is selected, and you should select the External network for this Test Lab Guide.

Figure 2
Click the Address Assignment tab. Here you configure the TMG firewall to assign IP addressing information to the VPN clients. You have two options:
- Static address pool
- Dynamic Host Configuration Protocol (DHCP)
If you use a static address pool, you will need to decide which addresses you want to use, and then add them to the collection by selecting the Static address pool option and clicking the Add button.
Note that you have to be careful when you use the static address pool option because if you decide to use on-subnet addresses (addresses that are currently included in the definition of the default Internet Network), then you’ll need to remove those addresses from the definition of the default Internal Network. If you don’t do this, the VPN clients will show up with a spoofing error when they try to connect because they are being assigned addresses that belong to the default Internal Network.
On the other hand, if you want to use on-subnet address (addresses that already belong to the default Internal Network) and not have to worry about removing those addresses from the definition of the default Internal Network, then you can use DHCP. For example, if the definition of your default Internal Network is 192.168.1.0-192.168.1.255, you can assign a pool of addresses in your DHCP scope that includes 192.168.1.50-192.168.1.100. Even though the addresses in this pool are part of the definition of the default Internal Network, the TMG firewall will allow you to use them when you use DHCP. It will not allow you to use the same addresses if you assign them to a static address pool.
In this Test Lab Guide, select the Dynamic Host Configuration Protocol (DHCP) option. We can do this because there is a DHCP server configured on DC1.
Notice the drop down box for Use the following network to obtain DHCP, DNS and WINS services. This is where you choose the NIC that is connected to the network closest to the DHCP server that you will use to assign IP addressing information to the VPN clients. In addition, this DNS and WINS configuration on the NIC you choose from the drop down list will be assigned to the VPN clients. If you click the Advanced button, you can get even more granular in terms of DNS and WINS server assignments.
In this Test Lab Guide, confirm that the drop down list box shows that Internal is selected, as shown in Figure 3.
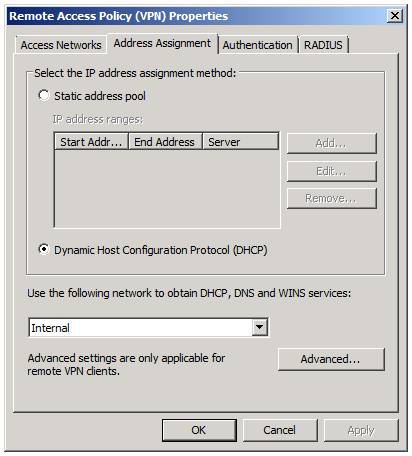
Figure 3
Click on the Authentication tab. On this tab, you can select which type of authentication you want the VPN clients to use when connecting to the TMG VPN server. By default, the selection is Microsoft encrypted authentication version 2 (MS-CHAPv2). There are other options, such as EAP options that you can use to support smart card authentication and NAP enforcement.
Note:
You should never use the CHAP or PAP options and I’m not sure why they still make these options available; it’s most likely because of some legacy code issues.
For this Test Lab Guide, make sure that there is a checkmark in the Microsoft encrypted authentication version 2 (MS-CHAPv2) checkbox. Do not put a checkmark in any of the other checkboxes.
We want to enable L2TP/IPsec connections to the TMG VPN server. There are two ways you can do this:
- You can assign certificates to the VPN client (a computer certificate) and to the TMG VPN server (a computer certificate)
- You can use a pre-shared key.
For purposes of this test lab, the TMG1 and CLIENT1 have computer certificates already installed, so we don’t actually need to use a pre-shared key. However, for the sake of showing you how it works, this Test Lab Guide will have you enter a custom IPsec policy.
The issue of when to use pre-shared key versus certificates comes up a lot. Since pre-shared keys are easy to configure, many admins like to use them. However, pre-shared keys aren’t easy to manage, and the management of pre-shared keys isn’t very scalable. In addition, and more important, pre-shared keys aren’t as secure as using certificate authentication. Thus I recommend that you use a pre-shared key when you’re testing the TMG VPN firewall setup and once you’re happy with it, change on over to certificate authentication. Just make sure that each client has a computer certificate and the TMG firewall has a computer certificate. Pretty easy stuff.
In this Test Lab Guide, put a checkmark in the Allow custom IPsec policy for L2TP connection, as shown in Figure 4. Then enter the following pre-shared key:1234567890. Notice that the pre-shared key appears in clear text, so you don’t need to worry about forgetting what you entered! You will need to enter this same key on the CLIENT1 VPN client. I’ll show you how to do that when we get to the client configuration.

Figure 4
Now click on the RADIUS tab. Notice that you have two options here:
- Use RADIUS for authentication
- Use RADIUS for accounting (logging).
You would use these options if you wanted to not join the TMG firewall to the domain and you wanted to use RADIUS authentication to authenticate the incoming VPN connections.
You can also use RADIUS authentication for outbound web proxy client connections and incoming web proxy client connections. However, RADIUS can be problematic because you can’t take advantage of Windows Users and Groups easily when creating Access Rules if you use RADIUS authentication – and user mapping only works when the TMG firewall is a domain member. In that case, why would you want to use RADIUS when you can use Windows integrated authentication?
In this Test Lab Guide, we will not be using RADIUS for authentication or reporting, so do not put checkmarks in either of the checkboxes that you see in Figure 5.

Figure 5
Okay, let’s click Apply and then click OK. At this point, you’ll see a dialog box informing you that “Applying these settings may cause the Routing and Remote Access service to restart. If a restart occurs, all active VPN sessions will be disconnected,” as shown in Figure 6.
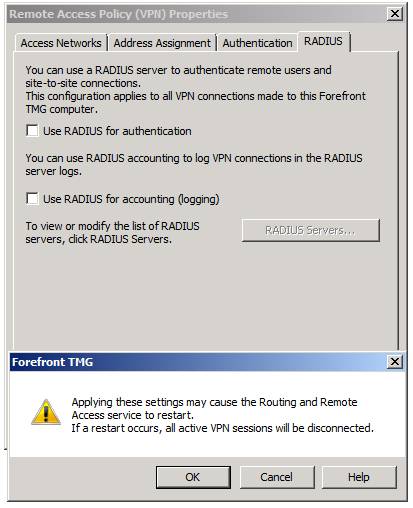
Figure 6
We don’t have to worry about active VPN sessions being disconnected now, since the VPN server isn’t functional yet. However, after you put the TMG VPN server into production, there will be some changes that you’ll make that will generate a similar dialog box, so you’ll want to be aware that the connections will be dropped. In most cases, the VPN clients are going to just reestablish the connections automatically, so the users shouldn’t even notice the short outage.
Summary
In this, part 2 of our Test Lab Guide for configuring the TMG firewall as a VPN server, we completed the VPN server configuration. This included configuring on which network the TMG firewall should listen for VPN clients connections, which IP addresses to assign the VPN clients, and which authentication protocol should be used by VPN clients when authenticating with the TMG VPN server. In Part 3 of this Test Lab Guide, we’ll create the VPN Clients Access Rule that will allow VPN clients to connect to the default Internal Network and to the Internet. See you then! –Deb.
If you would like to read the other parts of this article series please go to:
- Test Lab Guide: TMG Core Test Lab
- Test Lab Guide (Part 1) – Demonstrate TMG PPTP, L2TP/IPsec and SSTP Remote Access VPN Server
- Test Lab Guide (Part 3) – Demonstrate TMG PPTP, L2TP/IPsec and SSTP Remote Access VPN Server (Cont.)
- Test Lab Guide (Part 4) – Demonstrate TMG PPTP, L2TP/IPsec and SSTP Remote Access VPN Server (Cont.)


