Have you ever used the once popular Internet Relay Chat (IRC) services that used to be the rage in the early 90’s? If so, then you may have fond memories of them and the time spent in those chat channels. At the time, America Online was making its big push to sign up new members and there was basically two ways for the majority of Internet users to get together in large groups: either as AOL members in AOL chat rooms or using other dial-up ISPs and meeting in IRC chat rooms.
The Chat Service has been a part of Exchange Server since Exchange 5.5 Server, and remains still in Exchange 2000 Server as a part of the total collaboration solution that Microsoft aims to provide with Exchange 2000 Server. The neat thing about the Chat Service and the Instant Messaging Service is that they can be run from the Standard or Enterprise editions of Exchange 2000 Server. If you want real-time voice and data collaboration (such as that seen in NetMeeting), then you have to purchase an additional, separate, product from Microsoft: Exchange 2000 Conferencing Server.
Chat caveats
If you are planning to implement the Chat Service within your Exchange 2000 Server implementation, you should keep the following points in mind:
- The chat service no longer uses portals, as was the case with Exchange 5.5 Server. You can now house up to 20,000 concurrent chat users on each server (although you would be best not to).
- The infrastructure you design for your chat service should most likely match that of the rest of your Exchange design. In small companies that are highly centralized, you can easily get away with having one chat server providing services company wide. For larger companies, you will want to have the chat service spread out over the entire network, especially if there are slow (or expensive) WAN links to be dealt with. Placing one or more chat servers at each IP site will provide an adequate solution.
- If you will be operating in a mixed-mode environment with legacy Exchange 5.5 Servers, you will need to have the Active Directory Connector (ADC) installed to synchronize user display name and account information between the Exchange 2000 Servers and the Exchange 5.5 Servers.
- In a mixed-mode environment, as the number of users you must support increases, you should consider placing only one service on each Exchange Server…whether it be ADC, Chat or Instant Messaging.
- The IRC services offered by the Chat Service are not affected adversely by Network Address Translation (NAT) or by firewalls. The only requirement is that the clients can connect on the required ports. The Chat service uses the standard IRC ports of 6667 and 7000 (although this can be changed as desired) and also uses port 53 for DNS resolution. This port information should be provided to the group who maintains your firewalls if you will be allowing external clients access to your Chat services (more on this in the next paragraph).
- You should give careful consideration to whether or not you will be allowing connections to your Chat services from outside of your firewalls. Clients can connect to channels on the Chat servers as long as they can resolve the external DNS entries—this poses a risk, however, because there is no built-in protection (such as encryption) for the content of an IRC session. This fact is true regardless of whether or not the clients have been authenticated via a strong means such as MD5 Digest or the NTLM protocol (NT LAN Manager). The data transmitted over port 6667 is sent back and forth as clear text. You could alleviate this issue by the use of tunneling (either PPTP or L2TP with IPSec); however this solution is not viable with NAT in place. The best option remains to keep your Chat services open only to the internal network and close ports 6667 and 7000 on the firewall.
- By default, you can host two chat channels per IP address, one on each of the two default ports of 6667 and 7000. Should you need to add additional chat channels to a server, you can add additional ports for their use. Be sure to let Chat clients know which port they are to use. Note that a chat community cannot exist on multiple servers.
Putting the Chat Service into action
After you have installed the Chat Service on your Exchange 2000 Server, you can configure it as described in the following paragraphs:
- To create a new chat community, right-click on an existing chat community and select New > Chat Community… This will bring up the Properties window (shown in Figure 1) from which you can configure the chat community. Note that you have one chat community (Default-Chat-Community) created by default when you install the chat services.
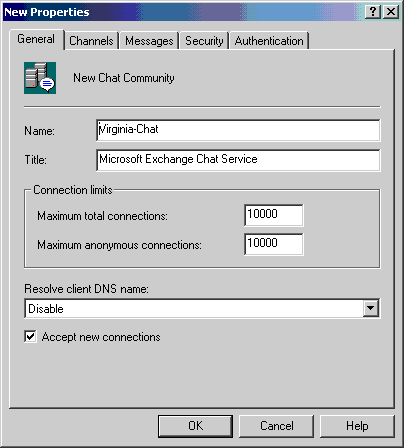
Figure 1 – Configuring a new chat community.
- Before you can start using the chat community, you will need to host it on a server. This is done by right-clicking the IRCX node under Protocols for the Server on which it will be hosted and selecting Properties. The IRCX Properties window is shown in Figure 2 and you can see that I have already added our new chat community on Port 6667. Note that I have removed the default community created upon the installation of the Chat Service.

Figure 2 – Hosting a chat community.
- Once you have hosted the chat community, you will need to populate it with Channels (chat rooms). This is done by right-clicking on the Channels node and selecting New > Channel… which brings up the window shown in Figure 3. Note that all chat channel names must either start with a #, &, % or %# (these are per standard IRC and XIRC conventions). Selecting the Create this channel when the service starts option will create a persistent channel that will survive service and server restarts.

Figure 3 – Configuring a new chat channel.
- You find the need to ban users from a specific chat community for one reason or another. You can ban users one by one or by Windows group. A user banned from one chat community will still be able to access other chat communities, unless they have been banned in the other communities as well. To create a new ban, right-click on Bans and select New > Bans… which opens the window as shown in Figure 4.

Figure 4 – Configuring a chat ban.
- If you want to organize users into different chat groups (classes), then you can create a new class that they will be grouped into and set the permissions on that class as required. In our example, we are going to make all users from the nc.dontpanic.local domain unable to connect to the chat server. You have many options with classes available to you. To create a new class, right-click on Classes and select New > Class… which opens a window as shown in Figure 5. User classes are approximately the equivalent of Windows groups in the chat service.
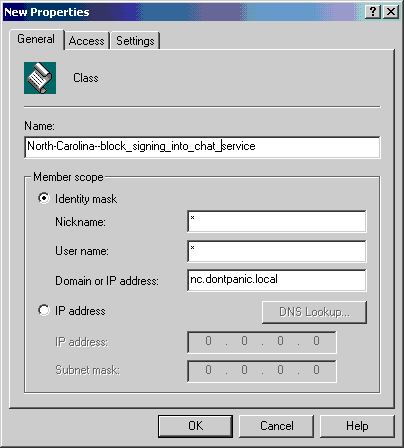
Figure 5 – Configuring a new user class.
Figures 6 and 7 show the chat service in action: we can see a successful login and a chat channel in action. In figure 8, you can see how configure the server properties (using mIRC as your IRC client) to allow a password. The password combined with the email address supplied is what grants you different privileges within the chat service.

Figure 6 – A successful logon to the chat service.

Figure 7 – Chat in action.

Figure 8 – A place to put a password.
Figures 9 and 10 show the connection information that a user has supplied and the subsequent rejection by the chat service to his connection request (he was banned from the chat community in question).

Figure 9 – A banned user configures his logon information…

Figure 10 – …but is unable to connect to the chat service.
Chat options and controls
Up to now, we have covered all the basics of the Chat Service and gone through some walkthroughs about getting it up and running in your network. There are some other points that require our attention, however, such as channel configuration and user permissions (not part of Windows permissions).
There are two types of chat channels that you can have:
- Dynamic – These are created by chat clients.
- Registered – These are persistent on the server.
There are four modes that a channel can be operated in, as show in Figure 11, and can be selected from the Access tab of the Channel Properties window:
- Public – A channel that is visible to all chat clients.
- Private – A channel that can only be entered by members who are allowed to. Non-members can see only the name of the channel.
- Hidden – A channel that is not listed on the channel list, but can be viewed if the client enters the specific name of the channel.
- Secret – A channel that will never show in a non-members list and limited to members only access.

Figure 11 – Configuring the chat channel visibility.
There are three different levels of permissions assignment on a chat community, as shown in Figure 12, which can be configured from the Security tab of the Chat Community Properties window:
- User – A user who is allowed to use the chat service.
- Sysop – A user who is allowed to moderate the specified channels.
- Administrator – A user can visit and view all channels. Additionally, a chat administrator can override a Sysop. Administrators create bans, change viewing status of channels and require the use of password.
< src=”/content/mse/images/tutorials/the_exchange_2000_server_chat_service/chat_12.GIF”>
Figure 12 – Configuring chat community permissions.
There are three different levels of permissions assignment within a chat channel, as shown in Figure 13, which can be configures from the Security tab of the Chat Channel Properties window:
- User – A user is allowed to participate in the chat room, but has no control over the chat channel.
- Host – A host, also know as the “op” or “operator” maintains order in the chat channel. A host can op any other user of their choosing. Hosts can de-op themselves or other hosts, and can also op themselves again.
- Owner – The owner of a channel is like a super operator. The host of the channel over rides all hosts. No host can de-op a host, but an owner can op and de-op hosts and users as required.
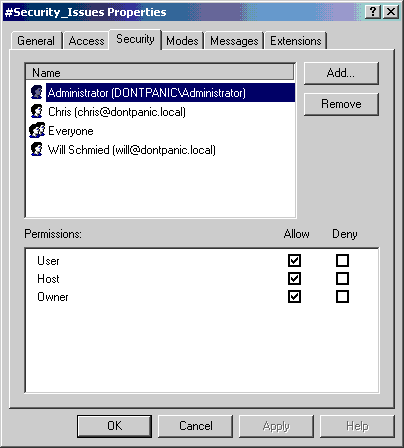
Figure 13 – Configuring chat channel permissions.
You can see in Figure 14 a user connecting to the Chat server as a Sysop and in Figure 15 you can see a user connecting to the Chat server as an Administrator.

Figure 14 – A Sysop connecting to the Chat server.
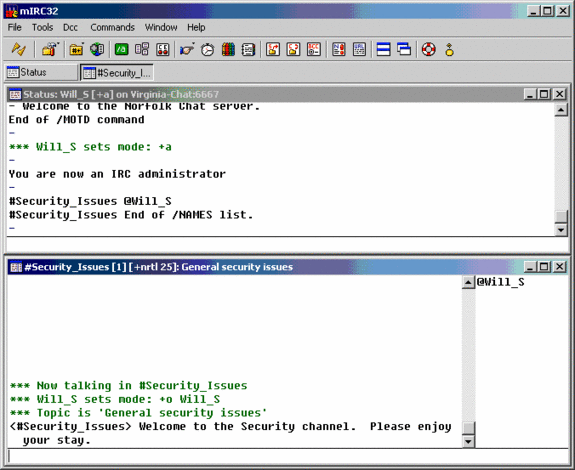
Figure 15 – An Administrator connecting to the Chat server.
Figure 16 shows a user connecting to the Chat server as a channel Host and Figure 17 shows a user connecting to the Chat server as a channel Owner. You can see where the Owner oped another user and then that user tried to de-op the Owner.
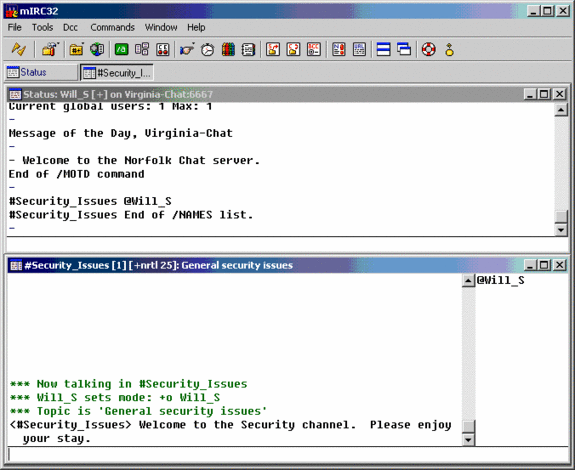
Figure 16 – A channel Host logs in to the Chat server.

Figure 17 – A channel Owner…and some trouble.
Wrapping it up
The Chat Service is a very useful and simple service that you can quickly put into place on your network if you find the need to host multimember conferences. It is a lightweight and easy to set up solution. The clients required to connect to the service are varied, and many are available as freeware or shareware. If security is a concern, and the Chat Service will not need to be accessed by users outside of the internal network, you can simply close ports 6667 and 7000 on your firewall. Personally, I prefer the Chat Service over the Instant Messaging Service where several users will be involved in the conference, as you have much greater control over the Chat Service (i.e. you can set Ops and Moderators)…plus it reminds me of the good old days gone by.