Most of the time your Exchange 2000 Server implementation probably runs fine with no problems at all. Unfortunately, problems can and do occur with any complicated system, and Exchange is no different. In the case of Exchange, however, you also have to take in account the email client software and it’s particulars. Since it’s safe to assume that most of your internal clients will be using Outlook as their email client, we can broaden our view of the Exchange implementation to include the Outlook client and its processes as well.
The Tools
We are going to take a look at some tools available to you to troubleshoot and repair problems associated with data-both the data used with Outlook and the actual Exchange 2000 Server databases themselves. The tools we will be looking at include:
- Inbox Repair Tool
- OST Integrity Checker
- Information Store Viewer
- Information Store Integrity Checker
Outlook Tools
The first two tools we are going to look at come not with Exchange Server, but with the Outlook client itself. It’s a fact of life that some of the problems that you will have to deal with in an Exchange organization will not be related to the Exchange Server itself. Most users have personal folders and offline folders associated with their Outlook profile.
Personal folders are stored as a single file with the extension of .pst and offline folders are stored as a single file with the extension of .ost. Unfortunately, as with all files, these are subject to corruption. Unlike most other files (except perhaps for that sales proposal you just spent three months working on), corruption of a user’s personal folders or offline folders tend to cause much grief. Fortunately for us, Microsoft has provided the Inbox Repair Tool which can help you repair corrupt personal and offline folders in Outlook 98 and Outlook 2000. Additionally, in Outlook XP, the OST Integrity Checker tool has also been provided, which provides additional capabilities beyond those of the Inbox Repair Tool when working with offline folders.
Inbox Repair Tool
The Inbox Repair Tool is installed by default with a typical installation of Outlook, but there is no shortcut created for it. The SCANPST.EXE file can be found in the one of the following locations (by default), depending on the version of Outlook installed on the client machine:
- Outlook XP: \Program Files\Common Files\System\Mapi\1033\
- Outlook 2000: \Program Files\Common Files\System\Mapi\1033\NT\
- Outlook 98: \Program Files\Common Files
The Inbox Repair Tool (as seen when using Outlook XP) is shown in its directory location in Figure 1.
Figure 1 – Finding the Inbox Repair Tool.
Before using the Inbox Repair Tool to repair either personal or offline folders, it is recommended that you backup the file to be worked on. During the repair process of repair any corruption noted in the file, the Inbox Repair Tool will often discard messages that it cannot repair-without a current backup, these messages will be permanently lost. As the Inbox Repair Tool performs its work it will move all messages that can be repaired to the Lost And Found Folder.
The process to use the Inbox Repair Tool is outlined below:
- Open Windows Explorer and navigate to the location of the SCANPST.EXE file.
- Double-click the file to launch the Inbox Repair Tool, as shown in Figure 2.
Figure 2 – The Inbox Repair Tool.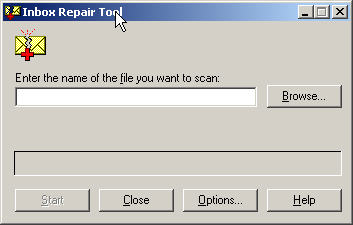
- In our case, we have picked a .pst file. After clicking the Start button, you can see the status bar progress as shown in Figure 3.
Figure 3 – The Inbox Repair Tool in action.
- If errors are found you will be presented with a dialog box similar to the one shown in Figure 4. Click Repair to fix the problems.
Figure 4 – Errors found.
- Next we are going to use the Inbox Repair Tool to examine an .ost file as shown in Figure 5.
Figure 5 – Working with a .pst file.
- Errors were found, and the Details button was clicked to display the error listing, as shown in Figure 6. In this case, click OK to repair the errors.
Figure 6 – Description of the errors found in the .pst file.
After the Inbox Repair Tool has completed, you should open the .pst file you have scanned and then open the Lost And Found folder. All repaired messages will be moved to the Lost And Found folder. You should then create a new personal folder file and move the recovered messages into it and delete the original personal folder file.
OST Integrity Checker
A tool new to Outlook XP, the OST Integrity Checker expands on the capabilities of the Inbox Repair Tool for working with offline folders, .ost files. The Inbox Repair Tool only scans the offline folder file, making sure that its file structure is intact. It does not scan your actual mailbox on the Exchange Server itself-this is where the OST Integrity Checker differs from the Inbox Repair Tool. But how do you know when to use each tool? You should use the Inbox Repair Tool if you cannot open the offline folder file. You should use the OST Integrity Checker if you experience problems while attempting to synchronize your offline folders with the Exchange Server.
The OST Integrity Checker tool compares the contents of the .ost file and the contents in the mailbox on the Exchange Server. If any differences are found between the two files, the OST Integrity Checker attempted to correct them. All discrepancies are logged so you monitor the tools actions and results. Additionally, the scan log will identify any issues that the tool itself was unable to correct and will require your attention.
Before you actually run the OST Integrity Checker, ensure the following conditions exist:
- Outlook must be configured to start up in online mode.
- Outlook must not be open during the scan.
Running the OST Integrity Checker is outlined below:
- Open Windows Explorer and navigate to the \Program Files\Common Files\System\Mapi\1033\ directory.
- Double-click the SCANOST.EXE file to launch the OST Integrity Checker, as shown in Figure 7.
Figure 7 – The Inbox Repair Tool.
- Select the scope of the scan and whether or not to repair errors and then click Begin Scan. The scan options are explained in detail following this procedure.
- After the scan is complete, you will receive the dialog box as shown in Figure 8.
Figure 8 – OST Integrity Checker completed.
- Opening Outlook, we find a message waiting for us, detailing the OST Integrity Checker’s actions as shown in Figure 9.
Figure 9 – OST Integrity Checker completed.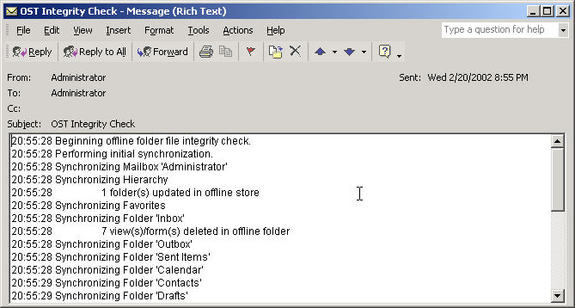
The scan options you have when working with the OST Integrity Checker are: (1)
- Scan all folders. This is the default, and it checks every folder in the offline folder file.
- Choose folders to scan. This option enables you to specify the folders so you can minimize the number that are scanned. It’s the quickest method if you are experiencing synchronization problems in only a few folders or are attempting the scan over a slow connection to the Exchange server. After clicking the option, locate in the folder list the folders you want to scan, then select the check box next to each one. (Only folders you made available for offline use have check boxes and can be scanned. For information about making folders available offline, see Outlook Help.)
Exchange Server Tools
The previous two tools we have discussed come with Outlook and can be used to repair problems associated with user’s files. The next two tools are part of the Exchange Server installation and take a different approach. They look at the actual Exchange databases themselves.
Information Store Viewer
The Information Store Viewer allows you get a very in-depth look at specific mailboxes, public folders and the messages contained within. Using the Information Store Viewer (Mdbvue32.exe), you can view or set details about a user’s message storage files. These files consist of the previously mentioned personal folder file (.pst) and the offline folder file (.ost).
The Information Store Viewer can be used to show the properties available for each message, how you can use them, and in what format they appear. You can use the Information Store Viewer, for example, to determine why a message can be saved but not sent. This tool has limited use for most people, and is most useful when you are trying to track down and troubleshoot problems with the Microsoft Product Support Services group. Before attempting to use this tool, you should be fairly familiar with the Messaging Application Program Interface (MAPI). Should you need a refresher on MAPI, see the MAPI Programmer’s Reference.
The Information Store Viewer can be run directly from the Exchange 2000 Server CD-ROM; it is located in the \Support\utils\I386 directory. If you decide to move the tool to a local hard-drive, it requires the following support files:
- Propvu32.dll
- Statvu32.dll
- Tblvu32.dll
- Xvport.dll
Before you can use the Information Store Viewer on a database, you must dismount it first (see Figure 19 below). Additionally, the Information Store Viewer needs a temporary database for its use. If you run the tool against a storage group with six databases, you will need to dismount a second database as well so that the tool will be able to create its temporary database. Typically you don’t ever create more than five databases in one storage group.
The following procedure can be used to run the Information Store Viewer:
- Open Windows Explorer and navigate to the Support\Utils\I386 directory on the Microsoft Exchange Server CD-ROM as shown in Figure 10.
Figure 10 – Locating the Information Store Viewer tool.
- Double-click the Mbdvu32.exe file.
- In the MAPILogonEx(MAPI_LOGON_UI) dialog box, select Mapi_New_Session, and then choose OK, as shown in Figure 11.
Figure 11 – Starting the Information Store Viewer.
- Select the user profile for the information stores you want to view and click OK.
- From the MDB menu, choose OpenMessageStore, as shown in Figure 12.
Figure 12 – Opening a message store.
- In the Select Message Store dialog box, select the information store you want to view, and then choose Open. The profile can contain a public information store, a private information store, and personal folders.
- From the MDB menu, choose Open Root Folder or Open IPM Subtree, as shown in Figure 13. (The Open IPM Subtree is not available for gateways.)
Figure 13 – Opening the folder.
- You can then work your way through the selected folder.
- Figure 14 shows the window after selecting Open IPM Subtree. Figure 15 shows the Sent Items folder after it has been opened.
Figure 14 – The IPM Subtree view.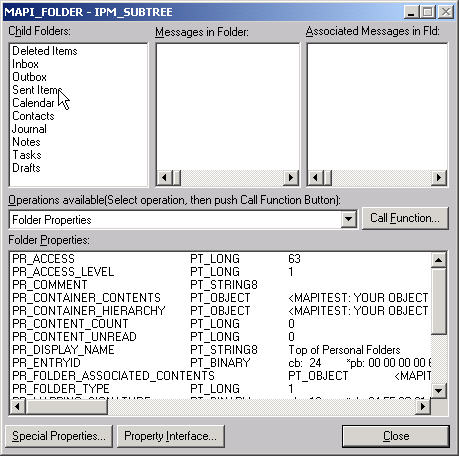
Figure 15 – The Sent Items folder.
- When you are ready to quit using the Information Store Viewer, close out all open windows and then select Store Logoff from the MDB menu, as shown in Figure 16.
Figure 16 – The Sent Items folder.
- Select the flags you want from the lpMDB->StoreLoggoff() window and click OK.
- Click OK to close out the dialog box confirming the store has been closed.
- Click Session from the menu bar and then select Exit to close out the Information Store Viewer, as shown in Figure 17.
Figure 17 – Closing the Information Store Viewer.
Information Store Integrity Checker
The Information Store Integrity Checker is a used to get that mile-high view of your Exchange databases. It can be used to view database statistics (the default) or correct errors found. The bad thing about the Information Store Integrity Checker is the lack of solid documentation. Searching through Google is probably going to be your best bet, as well as looking at the Exchange 2000 Server Resource Kit.
The Information Store Integrity Checker tool must be run from the command line and is found at \Program Files\Exchsrvr\bin. Figure 18 shows the syntax for the isinteg.exe utility.
Figure 18 – The Information Store Integrity Checker (isinteg.exe) syntax.
Before using the Information Store Integrity Checker, you must dismount the database from the Exchange System Manager, as shown in Figure 19.
Figure 19 – Dismounting a database.
You can see in Figure 20 a use of the Information Store Integrity Checker and in Figure 21 the output text file.
Figure 20 – The isinteg.exe tool in action.
Figure 21 – Log file results.
Wrap-up
In this article we have discussed four useful tools that you can use to keep your user’s information and Exchange Server databases healthy. These tools are all included with the products, either Outlook or Exchange Server. There are several dozen other very useful tools contained in the Exchange 2000 Server Resource Kit that you may also find useful.


