If you would like to read the next part in this article series please go to Using Forefront Script Kit with Forefront Protection for Exchange Server (Part 2).
Introduction
Microsoft introduced Forefront for Exchange Server 2010 in November 2009 and the product brought a lot of new features and capabilities to protect either Exchange Server 2010 or Exchange Server 2007. Here are some of the new features:
- Improved antispam protection. Product team says it has 99% detection rate
- Backscatter feature which in summary tags all messages sent out from your organization and doing that we can prevent DSN and bounced messages that were not originated from your organization.
- A better interface than previous versions of the product, now it’s easy to find stuff around and manage the product. The interface has statistics and health status built-in.
- It is possible to integrate FPE (Forefront Protection for Exchange on-premise) and FOPE (Forefront Online Protection for Exchange)
- It has PowerShell support
- Microsoft provides Antimalware Engine for antispyware scanning protection
FPE is easy to deploy and manage when you have a single server, however if you are using High Availability or you have a large environment with several MX records among your different locations the day to day management may not be so easy.
A good way to keep consistency of configuration among several servers was using the built-in Import and Export procedures using Forefront PowerShell session however the process does not allow reporting, the standard was just export the settings and overwrite settings on the target servers.
When Forefront Script Kit was released it became much easier to manage Forefront. The Forefront Script Kit supports Exchange and Sharepoint protection. Basically, with Forefront Script Kit we have the following features:
- Discover server in the domain
- Export and Import settings based on the discovered information
- Use a computer as a baseline and propagate the settings to all other servers
- Generate reports
- Compare Forefront configurations
If you are coming from Forefront Security for Exchange field, you recall that on the previous version we were able to use FSSMC (Forefront Server Security Management Console) to deploy Forefront and manage from a central location. I wrote about this tool on MSExchange.org, you can check the first article of the series here.
At this point (I’m writing this article in November of 2010) the best method that we have to control several servers is using the Forefront Script Kit however Forefront team announced that they will be releasing a management console for Forefront and it will be called Forefront Protection Server Management Console 2010 and it is expected by the end of this year (2010).
For this article we are using a couple of Windows Server 2008 R2 with Exchange Server 2010 deployed and we are managing all settings from one of the servers.
Importing and Exporting Forefront settings
The export process is a simple task using the Export-FSESettings cmdlet. The only required parameter is the location (-Path switch) to define where all current settings will be exported in a XML file. The following syntax can be used to export all settings from a FPE:
Export-FSESettings -Path <Location-with-file-name>
example: Export-FSESettings –Path C:\FPEScript\FPE-Settings.xml
In some cases the administrator doesn’t want to export all settings and for those cases we can use the switch –Element with Export-FSESettings cmdlet to pick which component will be exported, these are the components that can be defined, as follows:
|
– ExchangeAntiSpamPS – FPSEHSPolicy – AdvancedOptions – EngineManagement – FPENotification – GatewayManagement – IncidentOptions – LoggingOptions – OnDemandFilter – OnDemandScan – TransportScan – FilterList |
– QuarantineOptions – RealtimeFilter – RealtimeScan – ScheduledFilter – ScheduledScan – SignatureUpdate – SignatureUpdateOptions – SpamConnectionFilter – SpamContentFilter – SpamFiltering – TransportFilter – TracingOptions |
In order to use –Element, a string array is necessary, so let’s first create the array and then use the array during the Export-FSESettings cmdlet, as shown in Figure 01.

Figure 01
Now, that we have completed the export process it is time to start using the import process. Bear in mind that the import process will overwrite all settings on the target server and by default is going to require confirmation during the cmdlet process. Both procedures combined can provide you with documentation and even a backup of your Forefront information in case you need it.
Before importing the settings we must make sure that the server is ready to receive the configuration, in order to do that, we have to run the Get-FseExchangeManagementStatus and the result must be True (Figure 02) otherwise you need to wait for the replication process. All Forefront servers will be added to Hygiene Management group and if you have a large environment the replication may take a while.

Figure 02
Installing Forefront Script Kit and its prerequisites
The script deployment is a straight forward process. We can download it here and after that we can extract the contents to a folder. In this tutorial we are going to use FPEScript folder on the C: drive to keep all Forefront Script Kit information. After downloading and extracting the content to the folder as shown in Figure 03.

Figure 03
As we mentioned earlier, the Forefront Script Kit can be used to manage either Exchange or SharePoint Forefront products. The scripts can be used in the majority of the Operating System (Windows Vista SP3, Vista SP1, Windows 7, 2003 SP2, 2008, 2008 R2) and it requires PowerShell v2.0 (it requires .Net Framework 2.0 SP1) and WinRM.
One more requirement is to make sure that Windows PowerShell remoting management is enable on all computers that will be used. In order to do that the Enable-PSRemoting cmdlet must be run, as shown in Figure 04. Also, the execution policy of the machines involved in this process must be configured to AllSigned, as shown in Figure 05.

Figure 04

Figure 05
Using Forefront Script Kit
We are good to go! Let’s say that we have several servers and we are going to use the script to help us to maintain a baseline of the configuration from now on.
The Forefront Script Kit is a main script with different scripts that are called during the execution, for us we just need to worry about the main script (FPSSK.ps1).
For this tutorial I created a folder called C:\FPEScrit and all script files will be on that location, in addition all outputs from the following sections will be redirected to the same location.
Forefront Script Kit – Discovering Servers…
The first thing to do with the Script Kit is to identify how many FPE servers you have running in your Active Directory. The script will use Active Directory information to retrieve the list of the servers
The first thing that we can use the script is to identify all servers running FPE in your Active Directory domain. The script uses Active Directory information to retrieve a list of all servers which means that the script is not going to each server to ask if they have Forefront installed.
In order to run the script the following syntax can be used:
.\FPSSK.ps1 -Discover -Domain <your-FQDN-Domain-Name> –ExportCsv C:\FPEScript\
Note #1:
If you don’t know your FQDN domain name, no worries, just run net config rdr and the domain name will be displayed on the Workstation Domain DNS Name.
Note #2:
You can always use “.” If you want to specify the current folder, this way you don’t have to specify a full path.
Here we go the output will be .csv file containing all servers with FPE installed. The cmdlet and the output file are shown in Figure 06. Pretty easy, isn’t it?
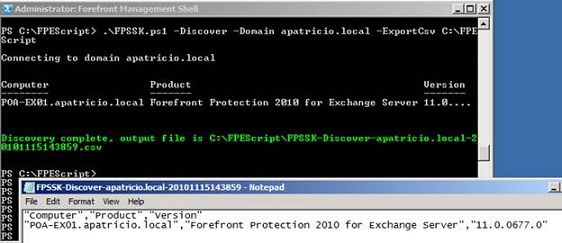
Figure 06
Conclusion
In this first article we went through the process of importing and exporting Forefront configuration using built-in cmdlets and we started our journey using Forefront Script Kit to help the overall administration of the product.
If you would like to read the next part in this article series please go to Using Forefront Script Kit with Forefront Protection for Exchange Server (Part 2).


