If you would like to read the other parts in this article series please go to:
Introduction
In the first two parts of this series, we looked at the kind of planning required before creating a Hybrid Exchange organization, and what’s going to go on under the hood of the wizard while it runs.
In part three of this article we’re going to run through the wizard itself explaining what actions you need to take as the Wizard is in progress and what effect settings you choose have on the final configuration of your Exchange and Office 365 environment.
Using the Hybrid Configuration Wizard
Now that we understand what’s going to happen under the hood when the Hybrid Configuration Wizard runs it’s time to walk through the wizard itself, and look at what kind of information you’ll need to have to hand when you run it yourself. Using the wizard involves the following steps:
- Creating the Hybrid Configuration Object
- Providing Credentials
- Choosing Accepted Domains
- Confirming Accepted Domain Ownership
- Choosing On-Premise Servers
- Defining Mail Flow Settings
- Selecting Mail Flow Certificates
- Monitoring progress and completing the wizard
Creating the Hybrid Configuration Object
The first step is to create the underlying Active Directory object that represents the Hybrid Configuration and it’s desired configuration. We’ll do this by opening the Exchange Management Console, navigating to the root Organization Configuration node, then on the Hybrid Configuration tab, choose New Hybrid Configuration:

Figure 1: Creating a new Hybrid Configuration
You’ll then see a quick two-step Wizard that creates the Hybrid Configuration Object with default settings. Next, select the new Hybrid Configuration object from the list, then choose Manage Hybrid Configuration to begin entering configuration information:

Figure 2: Starting the Hybrid Configuration Wizard
Providing Credentials
You first need to enter credentials for your on-premises Exchange organization and Office 365 tenant – both of these credentials should be administrative credentials, for example:
- An on premise user account with Organization Management rights
- An Office 365 Global Administrator or user with Exchange Online Organization management rights.
Bear in mind at this stage, if you’ve already got a remote PowerShell session open to Exchange Online, or expanded and been looking around your Office 365/Exchange Online tenant via the Exchange Management Console with the same credentials, you might hit the session limit of 3 consecutive sessions.
If this is the case, cleanly close other sessions using the same ID – if you’ve been using the Exchange Management Console you can simply close and re-open it, but don’t expand your Office 365 tenant after re-opening.
Choosing Accepted Domains
Next, we’ll select our accepted domains that we want to use in the Hybrid configuration, which should already be registered within Office 365 and of course accepted domains within our Exchange on-premises organization:

Figure 3: Selecting accepted domains
It’s not essential, but it makes sense to register the accepted domains you use on-premise in Office 365, and choose them here when selecting the domains to use within the Hybrid configuration:
Confirming Accepted Domain Ownership
After choosing the domains we’re going to pair up with Office 365, we’ll need to re-affirm that we’re the owner of the domain. Although we’ve proved to Office 365 that we own the domain as part of the tenant setup process, we’ll also need to prove domain ownership to the Microsoft Federation Gateway. For each domain you choose, you’ll see the Provisioning Status, Domain Name and the Record Value status:

Figure 4: Domain Proof of Ownership
The Provisioning Status is a quick check to see whether the domain ownership has already been confirmed, if it has it will show as Active, otherwise it will show as Pending.
The Record Value is the field we’ll need to set up as a DNS Text (TXT) record within each domain listed as Pending. As this value is longer than you can easily see above, copy and paste the values out into your text editor of choice, then with your external DNS provider for each specific domain configure the DNS TXT record.
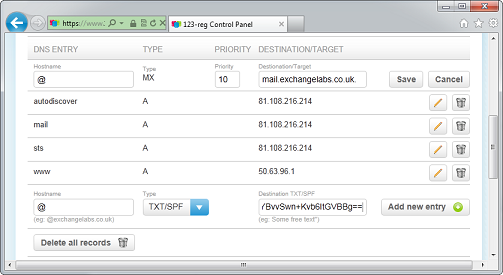
Figure 5: Configuring the TXT record using my domain provider’s control panel
You will most likely have performed this procedure when registering the domain for Office 365, so if you’ve already got a TXT record in place for the Office 365 validation, assuming you’ve validated your domain already, you can just replace it with the new validation record.
With most DNS providers there’s likely to be a short wait until this record is propagated through their infrastructure and resolvable to the rest of the world. Give it some time then using a server that will resolve external DNS entries for your domain, use nslookup to check the record exists:
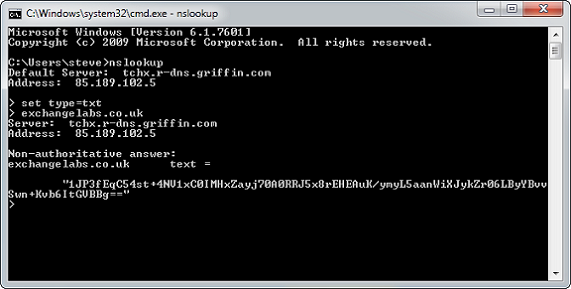
Figure 6: Checking the TXT record using nslookup
In the example above, we’ve entered the following command after launching nslookup:
set type=txt
By setting this option before querying the domain name, we’ve asked nslookup to only return TXT records. We’ll see in the response that our TXT record now shows up fine and in the Hybrid Configuration Wizard, we can select the checkbox Check to confirm that the TXT records have been created in public DNS for the domains above and continue.
Choosing On-Premise Servers
When choosing the on-premise servers we’ll be using for our Hybrid environment, the up-front planning in part one of this series really is important. Here we’ll select the Client Access Servers that provide our internet-facing (or perhaps just office 365 facing) names for services including Exchange Web Services, and also select the Hub Transport servers that will be used to relay messages to and from the Office 365:

Figure 7: Selected Server for Hybrid Configuration
Defining Mail Flow Settings and Certificates
The final two steps of the Hybrid Configuration Wizard relate to mail flow and the settings that will be configured both in our new on-premise receive connectors and Forefront Online Protection for Exchange (FOPE).
First, we’ll need to provide the external IP addresses that relate to the Transport Servers participating in the Hybrid Relationship, and we’ll need to enter the Fully Qualified Domain Name (FQDN) used for the on-premises Exchange servers. This is less about the DNS entry itself but more about the certificate that will be used, and the FQDN that the Send Connector presents to FOPE when asked:
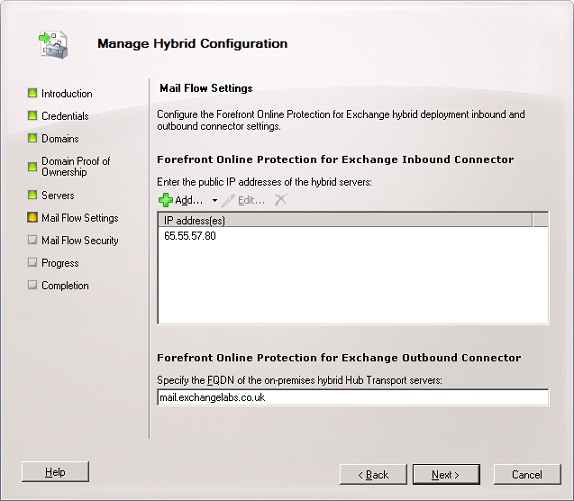
Figure 8: Configuring FOPE IP and DNS names
On the final configuration page of the Hybrid Configuration Wizard, we’ll need to set to final options; the certificate used by all Hub Transport servers that participate in the Hybrid configuration, and the mail flow for outbound mail from Office 365.
The certificate used must be present on each server, otherwise it won’t be available from the drop down list – and you’ll need connectivity from the machine you’re running the Hybrid Configuration Wizard on to each Hub Transport Server to retrieve the list of certificates.
The mail flow options are fairly straightforward but have implications for both your infrastructure and organization’s policies.
Deliver Internet-bound messages directly using the external recipient’s DNS settings allows Office 365 to route mail itself, alleviating you infrastructure of the load of processing all outbound mail for those recipients.
Route all Internet-bound messages through your on-premises Exchange servers means all messages sent to recipients outside of your Office 365 tenant will use your existing infrastructure. This is an important consideration as the network traffic for each internet-bound message from Office 365’s Exchange Online is doubled as it must come back into your organization before being routed to the internet:

Figure 9: Selecting Certificates and outbound mail flow
Completing the Wizard
After double checking the settings you’re going to use when applying the Hybrid Configuration, we’re ready to go.
Be prepared however to wait quite some time whilst the wizard completes the configuration as some of the behind the scene steps can take a long time to complete. For a small Exchange organization around 10 minutes would be reasonable; but if you’ve got a user population in the tens of thousands, just applying the Email Address Policy could take an hour, and you’ll see no little visual feedback apart from the progress bar.
Getting More Feedback
If you want to see more progress, you’ve got a couple of options. Firstly, you can navigate to the Logs folder for the Hybrid Configuration Wizard, and take a look at the latest log file – typically located in the following location:
C:\Program Files\Microsoft\Exchange Server\V14\Logging\Update-HybridConfiguration
You’ll see within the log file the list of checks, test and cmdlets that have so far been executed along with timestamps:
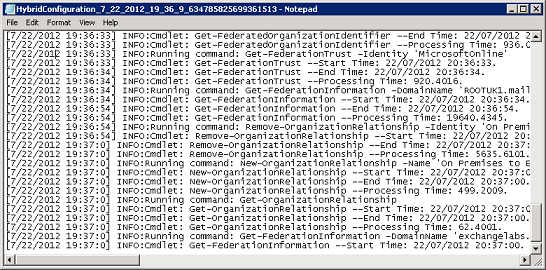
Figure 10: Update-HybridConfiguration Log File
Alternatively, copy the information from the Configuration Summary page just before pressing Manage:

Figure 11: Configuration Summary
After copying the information, press Cancel instead of Manage, and open an Exchange Management Shell session where you’ll execute the Set-HybridConfiguration and Update-HybridConfiguration cmdlets manually. In our example above, we’ll use:
Set-HybridConfiguration -Features:’MoveMailbox’,’OnlineArchive’,’FreeBusy’,’MailTips’,’MessageTracking’,’OwaRedirection’,’SecureMail’,’CentralizedTransport’ -Domains:’exchangelabs.co.uk’ -ClientAccessServers:’EX01′ -TransportServers:’EX01′ -ExternalIPAddresses:’64.4.11.20′ -OnPremisesSmartHost:’mail.exchangelabs.co.uk’ -SecureMailCertificateThumbprint:’1FFFE8399C71F694AD25F4E28ED303C4790DED8E’
And finally, with we’ll grab some credentials, and execute the Update-HybridConfiguration cmdlet with the -Verbose parameter to give us some juicy feedback as the task progresses.
$TenantCredentials = Get-Credential
$OnPremisesCredentials = Get-Credential
Update-HybridConfiguration -OnPremisesCredentials:$ OnPremisesCredentials -TenantCredentials:$TenantCredentials -Verbose
You’ll see the kind of feedback you can expect below – as you can see it’s very detailed:

Figure 12: Update-HybridConfiguration performed using the Exchange Management Shell
However for most purposes, I’d recommend using the Exchange Management Console’s GUI wizard and waiting for it to complete, as there’s not much you can do while it’s running to change it’s course of action.
Summary
We’ve had a look at how to use the Hybrid Configuration Wizard in part three of this article, both in the GUI form via the Exchange Management Console and by using the Exchange Management Shell.
In the final part in this series we’ll be looking at some of the tests that are worth running post configuration to verify functionality, and also have a look at some of the troubleshooting steps you may have to perform.
If you would like to read the other parts in this article series please go to:


