If you would like to read the other parts in this article series please go to:
- Using Hyper-V to Build a Private Cloud (Part 1)
- Using Hyper-V to Build a Private Cloud (Part 2)
- Using Hyper-V to Build a Private Cloud (Part 3)
- Using Hyper-V to Build a Private Cloud (Part 5)
- Using Hyper-V to Build a Private Cloud (Part 6)
- Using Hyper-V to Build a Private Cloud (Part 7)
- Using Hyper-V to Build a Private Cloud (Part 8)
- Using Hyper-V to Build a Private Cloud (Part 9)
- Using Hyper-V to Build a Private Cloud (Part 10)
Introduction
In the previous article in this series, I showed you how to create a deployment image and add it to the Windows Deployment Service. Although the image that we created is bootable at this point, it isn’t really ready to use. Because we are creating a private cloud the eventual goal is to be able to generate virtual machines on the fly through a self-service console. Before we can achieve such a goal the deployment image needs to be normalized.
As you probably know, every Windows installation contains information such as the computer name and a SID that uniquely identifies the computer on the network. As such, virtual machines running Windows cannot be cloned if they are running a normal Windows installation because the cloning process would lead to duplicate machines on the network. That being the case, we need to normalize the deployment image that we have created. Normalizing the image strips any uniquely identifying information so that the virtual machine can be cloned as many times as is necessary.
With that said, let’s go ahead and create and then normalize a virtual machine based on the deployment image that was previously created. Begin the process by using a server that’s running Hyper-V to create a new virtual machine. To do so, open the Hyper-V Manager and choose the New | Virtual Machine commands from the Actions pane. When the New Virtual Machine Wizard starts, click Next to bypass the Welcome screen.
In the previous articles we created deployment images for Windows 7 and for Windows Server 2008 R2. For the sake of demonstration I will be using the Windows 7 deployment image. Therefore, specify Windows 7 Image as the virtual machine name. This screen also gives you the option to store the virtual machine in a different location. If you have a volume set up for virtual machine storage then I highly recommend using it.
Click Next and the wizard will ask you how much memory you want to allocate to the virtual machine. I recommend allocating at least 1024 MB.
The following screen asks you which network adapter the virtual machine should use. By default virtual machines are configured not to connect to the network. Make sure you choose a network adapter before clicking Next.
You will now be prompted to specify the size of the virtual hard disk that you want to use. I recommend that you use a minimum of 50 GB. Remember that Hyper-V uses thin provisioning by default, so even if you specify the maximum size of 2040 GB the actual virtual hard disk file will only be as large as the amount of data that is stored within it.
The next screen asks you if you want to install an operating system. Be sure to choose the option to install an operating system from a network based installation server, as shown in Figure A. Click Finish to create the virtual machine.
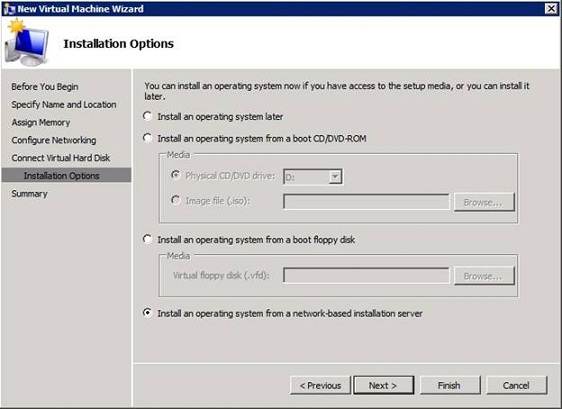
Figure A: You must configure the virtual machine to use a network based installation.
Installing Windows
When you are returned to the main Hyper-V Manager screen double click on the newly created virtual machine to view it. The virtual machine is initially powered off, so choose the Start command from the Action menu to power it on. After a minute or two the virtual machine will acquire an IP address from your DHCP server. When this happens you must quickly press the F12 key to initiate a network boot. At that point, the virtual machine will load a Windows pre-boot environment, as shown in Figure B.
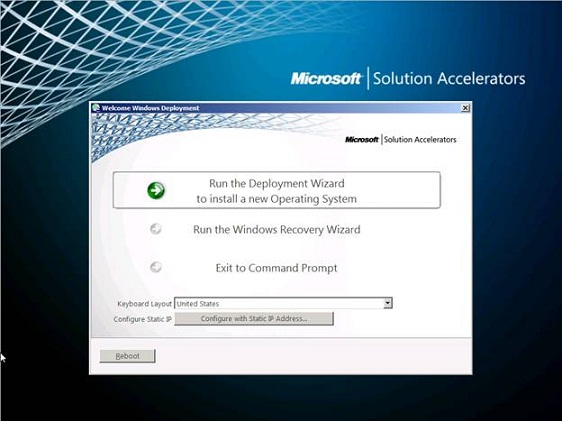
Figure B: The virtual machine loads a pre-boot environment.
On the screen shown in the figure above, make sure that the proper keyboard layout is selected and then click the Run the Deployment Wizard to Install a New Operating System option. You will now be prompted to provide a username, domain name, and password that can be used to connect to your deployment share.
Upon entering your credentials, click OK. You will now be prompted for the operating system that you want to install, as shown in Figure C. The choices that are displayed mimic the deployment images that you previously defined.

Figure C: Choose the operating system that you want to install.
Click Next and you will be prompted to enter a computer name. The computer name that you choose is irrelevant since we will be normalizing the image, so just click Next to accept the default name.
The following screen asks you if you want to join a domain. You should not join a domain at this point. Instead select the Join a Workgroup option and click Next.
The next screen asks you if you want to restore user data. Choose the Do Not Restore User Data and Settings option and click Next.
At this point verify that the appropriate language, time and currency format, and keyboard layout are selected and click Next. Now, choose your time zone and click Next.
The next screen that you will see is very important. You must select the Capture an Image of this Reference Computer option, as shown in Figure D. The Location field must point back to your deployment share and you must specify a unique name for the image that you are creating.
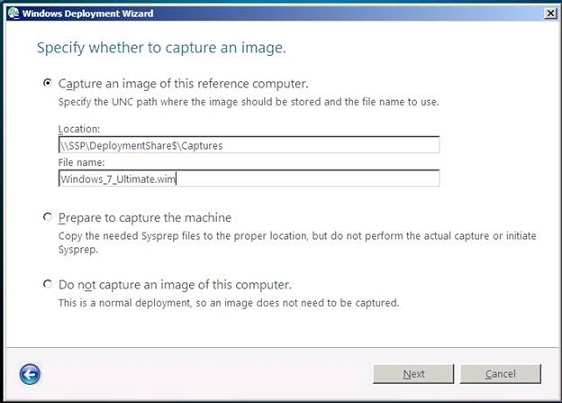
Figure D: You must capture a reference image of the virtual machine.
Now, click Next followed by Begin. The pre-installation environment will begin installing Windows 7 as shown in Figure E.
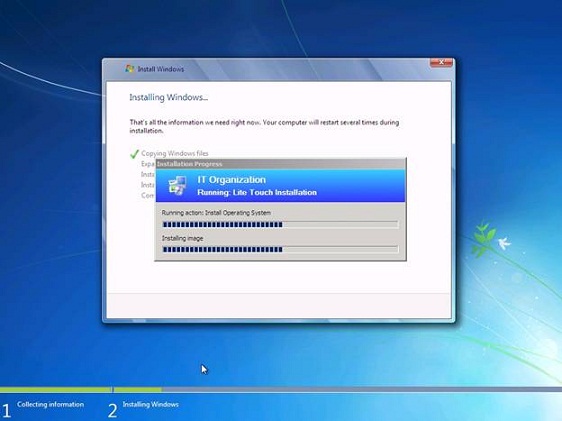
Figure E: Windows 7 is installed from a network share.
Once the basic Windows installation process completes, the virtual machine drops back to the pre-installation environment and generates an image file (a .WIM) file, as shown in Figure F.

Figure F: The virtual machine builds a .WIM file based on the installation that was just performed.
As you will recall, the pre-installation environment required you to provide a set of credentials that could be used to interact with the deployment share. The reason why you had to provide those credentials was because the .WIM file that is created at the end of the Windows installation is written to the deployment share using the path that you provided.
Conclusion
Now that we have an image that can be used to deploy other virtual machines we are well on our way toward creating a private cloud. The virtual machines themselves will reside on top of Hyper-V. As you will recall, earlier in the series we created a Hyper-V deployment image and that image can be combined with the technique that I just showed you to create a series of Hyper-V servers.
Of course Hyper-V is just a virtual machine hosting platform. The actual private cloud infrastructure is going to be based on System Center Virtual Machine Manager and on version 2.0 of the Self Service Portal. In the next article in the series, I will begin showing you how to build the private cloud infrastructure. Later, I will show you how to use the image that you just created to dynamically generate virtual machines within the private cloud.
If you would like to read the other parts in this article series please go to:
- Using Hyper-V to Build a Private Cloud (Part 1)
- Using Hyper-V to Build a Private Cloud (Part 2)
- Using Hyper-V to Build a Private Cloud (Part 3)
- Using Hyper-V to Build a Private Cloud (Part 5)
- Using Hyper-V to Build a Private Cloud (Part 6)
- Using Hyper-V to Build a Private Cloud (Part 7)
- Using Hyper-V to Build a Private Cloud (Part 8)
- Using Hyper-V to Build a Private Cloud (Part 9)
- Using Hyper-V to Build a Private Cloud (Part 10)


