If you would like to read the other parts in this article series please go to:
- Using Hyper-V to Build a Private Cloud (Part 1)
- Using Hyper-V to Build a Private Cloud (Part 2)
- Using Hyper-V to Build a Private Cloud (Part 3)
- Using Hyper-V to Build a Private Cloud (Part 4)
- Using Hyper-V to Build a Private Cloud (Part 5)
- Using Hyper-V to Build a Private Cloud (Part 6)
- Using Hyper-V to Build a Private Cloud (Part 8)
- Using Hyper-V to Build a Private Cloud (Part 9)
- Using Hyper-V to Build a Private Cloud (Part 10)
Introduction
In Part 6 of this series, I showed you how to install the Self Service Portal, which will be used by the end users to dynamically create virtual machines on the fly. Now that the Self Service Portal has been installed, I want to turn my attention to the configuration process.
Accessing the Self Service Portal
Assuming that you installed the Self Service Portal according to the directions that I outlined in the previous article, the URL for the self-service portal will be HTTP://<your server’s fully qualified domain name or IP address>:<port number>. As you might recall we had to assign a unique port number to the self-service portal Web site because the Default Web Site was already using Port 80. In my case, I assigned port 79. My server’s fully qualified domain name is ssp.lab.com and its IP address is 147.100.100.27. Therefore, the Self Service Portal is accessible at either of the following addresses:
http://ssp.lab.com:79
http://147.100.100.27:79
Of course you will have to change the fully qualified domain name, IP address, and port number to match your own settings.
The Initial Configuration
When you navigate to the site’s URL, you should be prompted to enter a set of credentials. Since we still have some set up work to do, go ahead and log in as a domain administrator. When you do, you will see the screen displayed in Figure A.

Figure A: This is the initial Self Service Portal configuration screen.
Once you have accessed the screen shown in the figure above, the first thing that you have to do is to enter the fully qualified domain name of your System Center virtual machine manager server.
Next, drop down to the Active Directory area and enter the names of the domains that you are using. If you want to specify multiple domain names then each name should be separated by a comma.
Now, scroll to the bottom of the page and locate the Environment section. The Self Service Portal makes you add an environment before you can continue on. For all practical purposes, an environment is just a name that represents a collection of configuration settings. Therefore, click the Add an Environment link and then specify a name that you would like to use for your environment. Click Submit to complete the process.
Once you have specified these three configuration settings, click the Save and Close link. You will now be taken to the Settings page shown in Figure B.
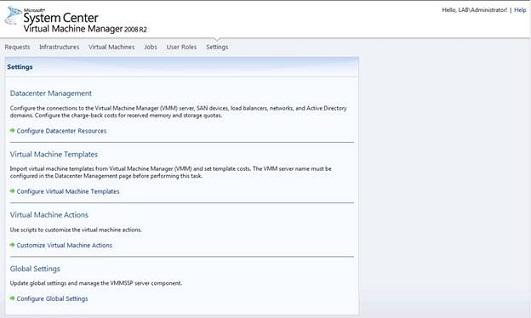
Figure B: There are more configuration settings to configure.
The Console Structure
Before we configure anything else, I want to point something out in the figure above. If you look at the menu at the top of the screen capture, you will notice that Settings is currently selected. This is appropriate because the Settings area is where we perform the basic private cloud setup. However, there are five other tabs that you also need to be familiar with. I will be talking about most or all of these tabs later in the series, but for right now I wanted to at least familiarize you with the tabs as a way of helping you to gain a better understanding of how everything will eventually work.
Requests – The Requests tab has two purposes. First, this is the tab where users submit infrastructure requests. In other words, if a user needs to reserve infrastructure such as memory or storage space then this is where they go to do it. This is also the screen that you as an administrator will use to approve pending infrastructure requests.
Infrastructures – The Infrastructures screen is where users go to make use of the infrastructure that they have been provided with. Here users can create virtual machines, import machines, or create change requests.
Virtual Machines – The Virtual Machines screen is kind of like a miniature version of the Hyper-V Manager. Users can use this screen to start and stop their virtual machines.
Jobs – The Jobs screen shows you the status of the most recently performed tasks. For example, if you deleted a virtual machine then you might go to the Jobs tab to view the status of the operation.
User Roles – Obviously you wouldn’t want just any user to be able to freely create virtual machines on a whim. The User Roles screen defines a series of user roles, each with a different set of rights. You can also use this screen to view or edit the users within each role.
Building a Template
I spent quite a bit of time at the beginning of this article series showing you how to build various types of deployment images. However, before we can move forward, we have to turn our reference images into virtual machine templates.
So far we have installed System Center Virtual Machine Manager, but we really haven’t done much to it. Therefore, there are a few configuration tasks that we need to perform.
The first thing that we need to do is to make System Center Virtual Machine Manager aware of our Hyper-V hosts. To do so, open the Virtual Machine Manager console and select the Hosts container. Next, click on the Add Host link and follow the prompts to add all of your Hyper-V hosts. The process is really simple and I still have a lot of material to cover, so I am not going to cover this task in a step by step manner.
After you add your Hyper-V server to the Virtual Machine Manager console, select the console’s Library tab and then navigate through the console tree to Library Servers | <your server> | <your deployment share> | VMs and Templates, as shown in Figure C. Now, click on the New Template link found in the Library Actions pane.
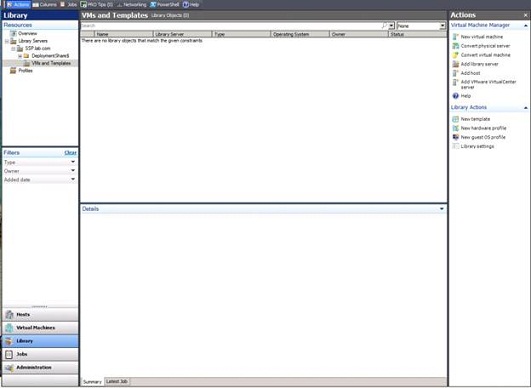
Figure C: Navigate to the VMs and Templates folder.
When the New Template wizard starts, you will see a prompt asking you if you want to base the template on something in the library or from a virtual machine that is deployed on the host. Choose the option to create the template from an existing virtual machine that is deployed on the host, and then click the Browse button.
Earlier in this article series, I showed you how to deploy a virtual machine and then capture a reference image of that machine. When you worked through this process, you should have been left with a generalized virtual machine on your host server. It is this virtual machine that we will use as a template. Select the virtual machine and then click OK, followed by Next.
You will now see a warning like the one shown in Figure D, telling you that creating a template from a virtual machine will destroy the virtual machine. Click Yes to confirm that you do want to convert the virtual machine into a template.

Figure D: Converting a virtual machine into a template will destroy the virtual machine.
At this point, you will be prompted to assign a name to the template that you are creating. Be sure to pick something descriptive, although you also have the option to enter a description. When you are done, click Next.
The following screen will prompt you to create a hardware profile to go along with the template. If we already had hardware profiles in place we could use those, but for the time being we will have to create a new one. To do so, just specify the hardware that you want to allocate to the virtual machine template and then click Next.
The following screen lets you supply various parameters that will be used when the template machine is installed. For instance you can specify a product key, time zone, domain, etc. When you are done, click Next.
You will now be prompted to select your library server. Make your selection and click Next. Finally, choose the path within your deployment share where you would like to store the template and then click Next, followed by Create. The template will now be created as shown in Figure E

Figure E: The template is created.
Importing Virtual Machine Templates
Now that we have created a template, we can import it into the Self Service Portal. To do so, open the Self Service Portal, go to the Settings tab and then click on the Configure Virtual Machine Templates link. Incidentally, if you receive any error messages from this point forward then you should open the Service Control Manager and make sure that all of the services that are configured with an automatic startup type are actually running. On my lab server there were a couple of services that failed to start automatically (although I was able to manually start them) and that led to several errors.
With that said, click the Import Template link. You should now be taken to a screen that asks you to select a library server and a library share. Now, simply select your library server, your library share, enter an asterisks (*) in the Search for Templates dialog box, and click the Search icon. You should see your template displayed as shown in Figure F.

Figure F: The Self Service Portal should find your template.
Select the check box next to your template and then click on Add Selected. You will be taken to a screen that allows you to specify a cost for the template. The cost is used in determining chargebacks. If you don’t know about chargebacks then just enter a cost of 0.00 for now and I will talk about chargebacks later in the series. Click Save and Close to complete the process.
Conclusion
Now that we have provided the Self Service Portal with a virtual machine template, we can move forward with the rest of the configuration process. In Part 8 I will talk about user roles.
If you would like to read the other parts in this article series please go to:
- Using Hyper-V to Build a Private Cloud (Part 1)
- Using Hyper-V to Build a Private Cloud (Part 2)
- Using Hyper-V to Build a Private Cloud (Part 3)
- Using Hyper-V to Build a Private Cloud (Part 4)
- Using Hyper-V to Build a Private Cloud (Part 5)
- Using Hyper-V to Build a Private Cloud (Part 6)
- Using Hyper-V to Build a Private Cloud (Part 8)
- Using Hyper-V to Build a Private Cloud (Part 9)
- Using Hyper-V to Build a Private Cloud (Part 10)


